@madpilot makes

Twilio + AWS Lamba + Rev = Easy call recording!

I have been doing a bunch of user interviews at work. It’s been difficult to get our users in front of a computer, or to get them to install video conferencing software, so I’ve been calling them on the telephone. I find that taking notes while I interview people kills my flow, and I’m really not very good at it, so I needed a way to easily record these phone calls, and then get them transcribed.

There are a bunch of solutions out there, but they all seem to rely on a third party app that make a VoIP call. This presented me with three problems:

  1. Our spotty office wifi caused drop outs – and when it did work, the quality was terrible (thanks Australia!);
  2. The incoming number was a either blocked or some weird overseas number, which users promptly ignored
  3. Automatic transcription of phone calls is woeful – because of the low bandwidth, the audio signal isn’t great, and computers do a really bad job at translating it to text.

When I was last at JSConf, I got chatting to Phil Nash who is a developer evangelist at Twilio. I asked him whether I could setup a number that I could call, have me enter a number, dial that number and record the call. He said it should be easy.

Challenge accepted.

Spoiler alert: It is.

Note: This code and deployment process isn’t actually the one I used at work. We use Golang, which is way more lines of code, and has way more boiler plate – and I needed to write an abstraction around TwiML – so I chose to rewrite it in Python here for simplicity’s sake. We also use CloudFormation to create Lambdas and API gateways, and have a CI build pipeline to deploy them, which isn’t conducive to a pithy blog post. Does this process work? Yes. Would you use it in real world in a production environment? Up to you. 🤷‍♀️

An overview

At a high level, this is what happens when you dial the number and request an outgoing call:

  1. Twilio answers your call
  2. Twilio makes a request to an Amazon Lambda via an API Gateway, which returns some TwiML instructing Twilio’s voice engine to ask you to enter a phone number.
  3. It waits for you to enter the phone number followed by the hash key
  4. When it detected the hash key, it makes another request to the lambda, this time with the number you entered. The lambda returns an instruction to dial the number (after some normalisation – more on this later), join the calls, and to record both sides of the conversation.

After this happens, you can log in to the Twilio console, download the MP3, and upload that to Rev.com where real-life humans transcribe the conversation.

The code

from twilio.twiml.voice_response import VoiceResponse, Say, Gather, Dial
from urllib.parse import parse_qs

LANGUAGE="en-AU"
AUTHORISED_NUMBERS = ['ADD YOUR PHONE NUMBER HERE IN INTERNATIONAL FORMAT ie +61400000000']

def authorized_number(number):
    return number in AUTHORISED_NUMBERS

def say(words):
    return Say(words, voice="alice", language=LANGUAGE)

def get_outgoing_number(request):
    response = VoiceResponse()

    action = "/" + request['requestContext']['stage'] + "/ivr"
    words = say("Please dial the number you would like to call, followed by the hash key.")

    gather = Gather(action=action)
    gather.append(words)
    response.append(gather)

    return response

def add_country_code(number):
    if number[0] == "+":
        return number
    elif number[0] == "0":
        return "+61" + number[1:]
    elif number[0:2] == "13":
        return "+61" + number
    elif number[0:2] == "1800":
        return "+61" + number

def hangup():
    response = VoiceResponse()
    response.hangup()
    return response

def handle_ivr_input(params):
    to = params['Digits'][0]
    dial = Dial(add_country_code(to), record="record-from-answer-dual", caller_id=params['Caller'])

    response = VoiceResponse()
    response.append(say("Calling."))
    response.append(dial)
    return response

def handler(request, context):
    path = request['path']
    params = parse_qs(request['body'])

    response = ""
    if path == "/incoming":
        if authorized_number(params["Caller"][0]):
            response = get_outgoing_number(request)
        else:
            response = hangup()
    elif path == "/ivr":
        response = handle_ivr_input(params)
    else:
        return {
            'body': "Action not defined",
            'statusCode': 404,
            'isBase64Encoded': False,
            'headers': { 'context_type': 'text/plain' }
        }

    return {
        'body': str(response),
        'statusCode': 200,
        'isBase64Encoded': False,
        'headers': { 'content_type': 'text/xml' }
    }

Code is also on GitHub.

I’m in Australia, so there is a little bit of localization happing here: I set the voice of Alice (the most human sounding robot that Twilio has) to Australian, and I insert the Australian country code if it is not already set. Twilio doesn’t do this automatically, and it’s a pain to replace the first 0 with a +61 for every call.

When the call is made, the caller ID is set to the number you called from, so the call looks like it came from you. You need to authorise Twilio to do that.

I’ve included a hard-coded allow-list (AUTHORISED_NUMBERS) of phone numbers who can make outgoing phone calls. If a number that is not on the list tries to call the number, they just get hung up on. You wouldn’t want someone accidentally stumbling across the number and racking up phone bills. I guess at least you would have recordings as evidence…

Note: the code doesn’t know about area codes, so if you are calling land lines (Wikipedia entry if you are under 30 and don’t know what they are) you will always need to include your area code.

Cool. So what do you do with this code? It needs packaging and uploading to Amazon.

Packaging the script

(Want to skip this bit? Here is the ZIP – you can edit it in the Lambda console once you upload)

You will need Python 3.6 for this. Instructions for OSX, Linux and Windows. Good Luck.

git clone git https://github.com/madpilot/twilio-call-recorder
cd twilio-call-recorder
pip install twilio -t ./
find . | grep -E "(__pycache__|\.pyc|\.pyo$)" | xargs rm -rf
zip -r lambda.zip *

Creating the Lambda

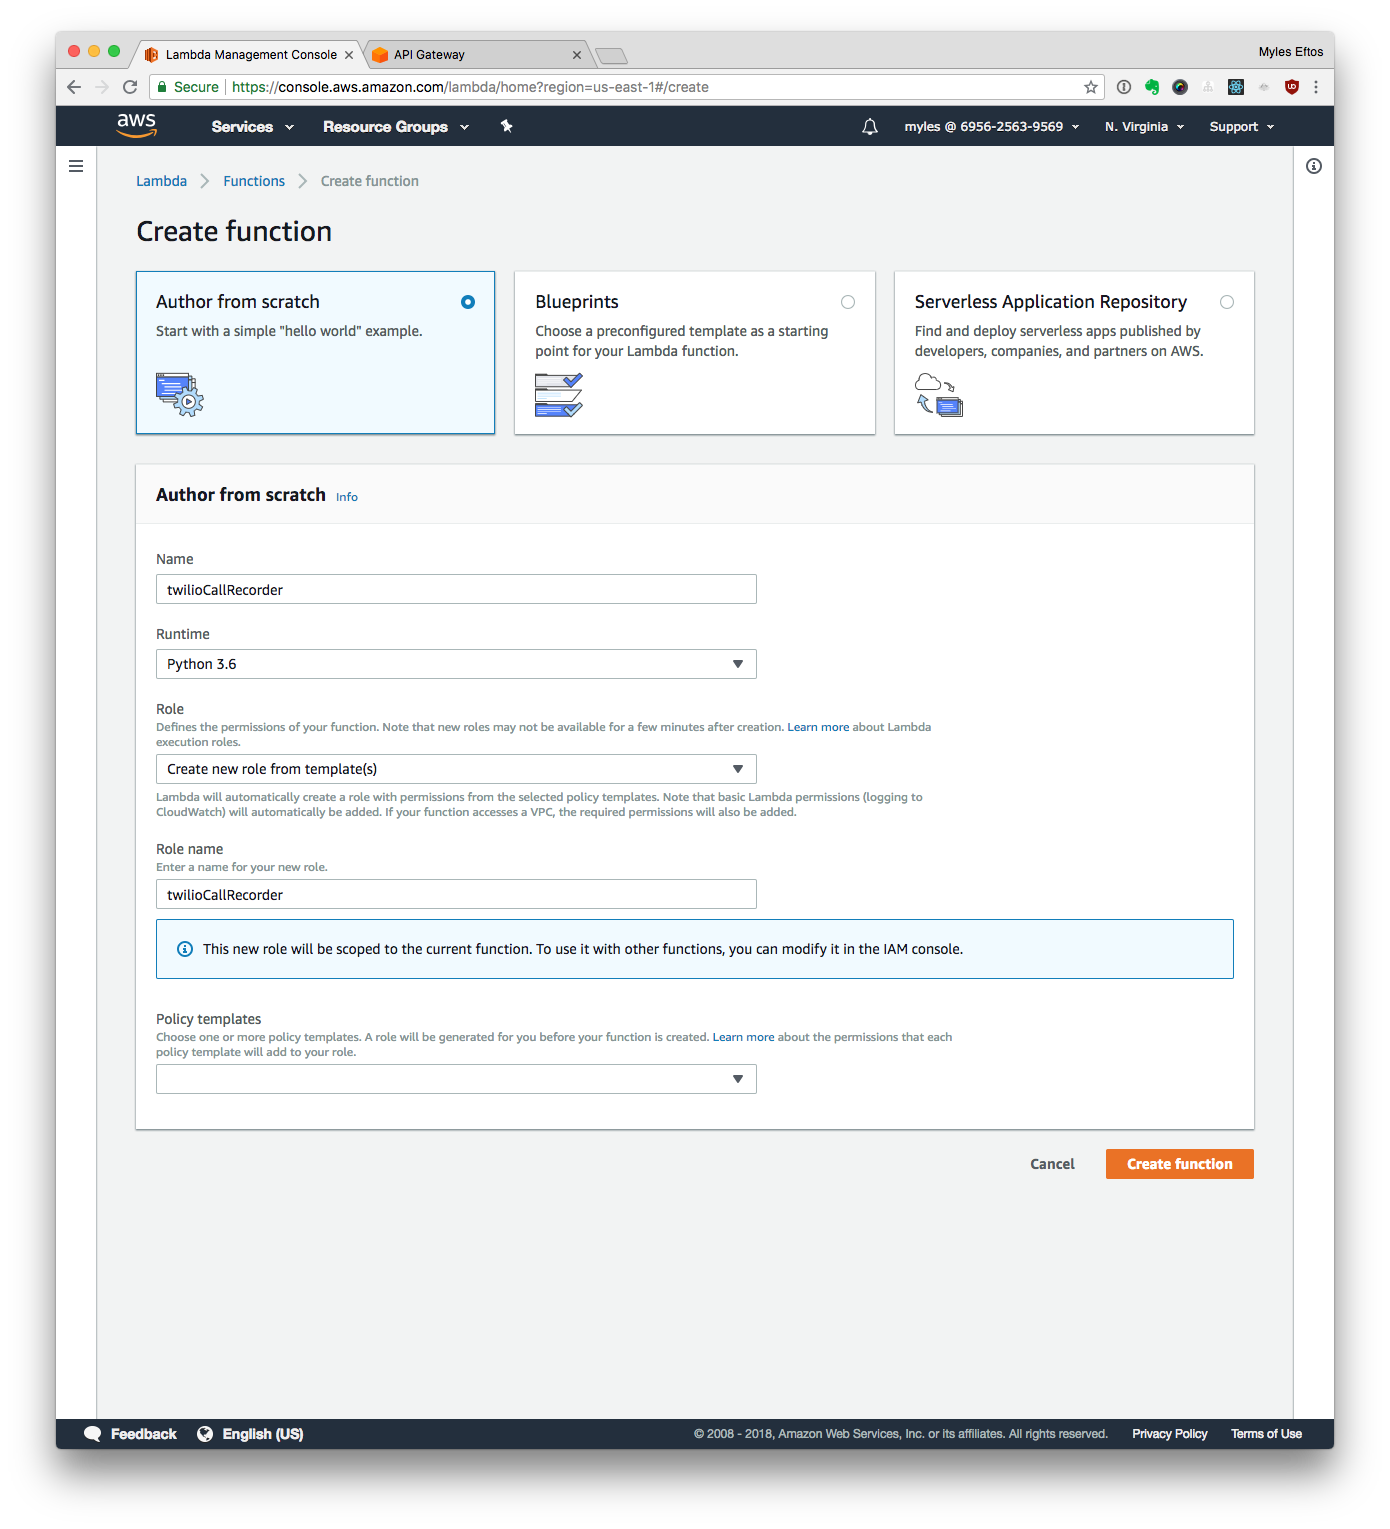
  1. Log in to your AWS account, and go to https://console.aws.amazon.com/lambda/home
  2. Click Create function
  3. Then Author from scratch
  4. Name your lambda: twilioCallRecorder
  5. Select Python 3.6 as the runtime
  6. Select the Create new role from template(s) option
  7. Name the role: twilioCallRecorderRole
  8. Click Create Function

Your screen should look similar to this:

Screen Capture of the AWS Lambda Setup.

Important! Don’t Add a trigger from this screen! We need to set the API gateway in a non-standard way, and it just means you’ll have to delete the one this page sets up.

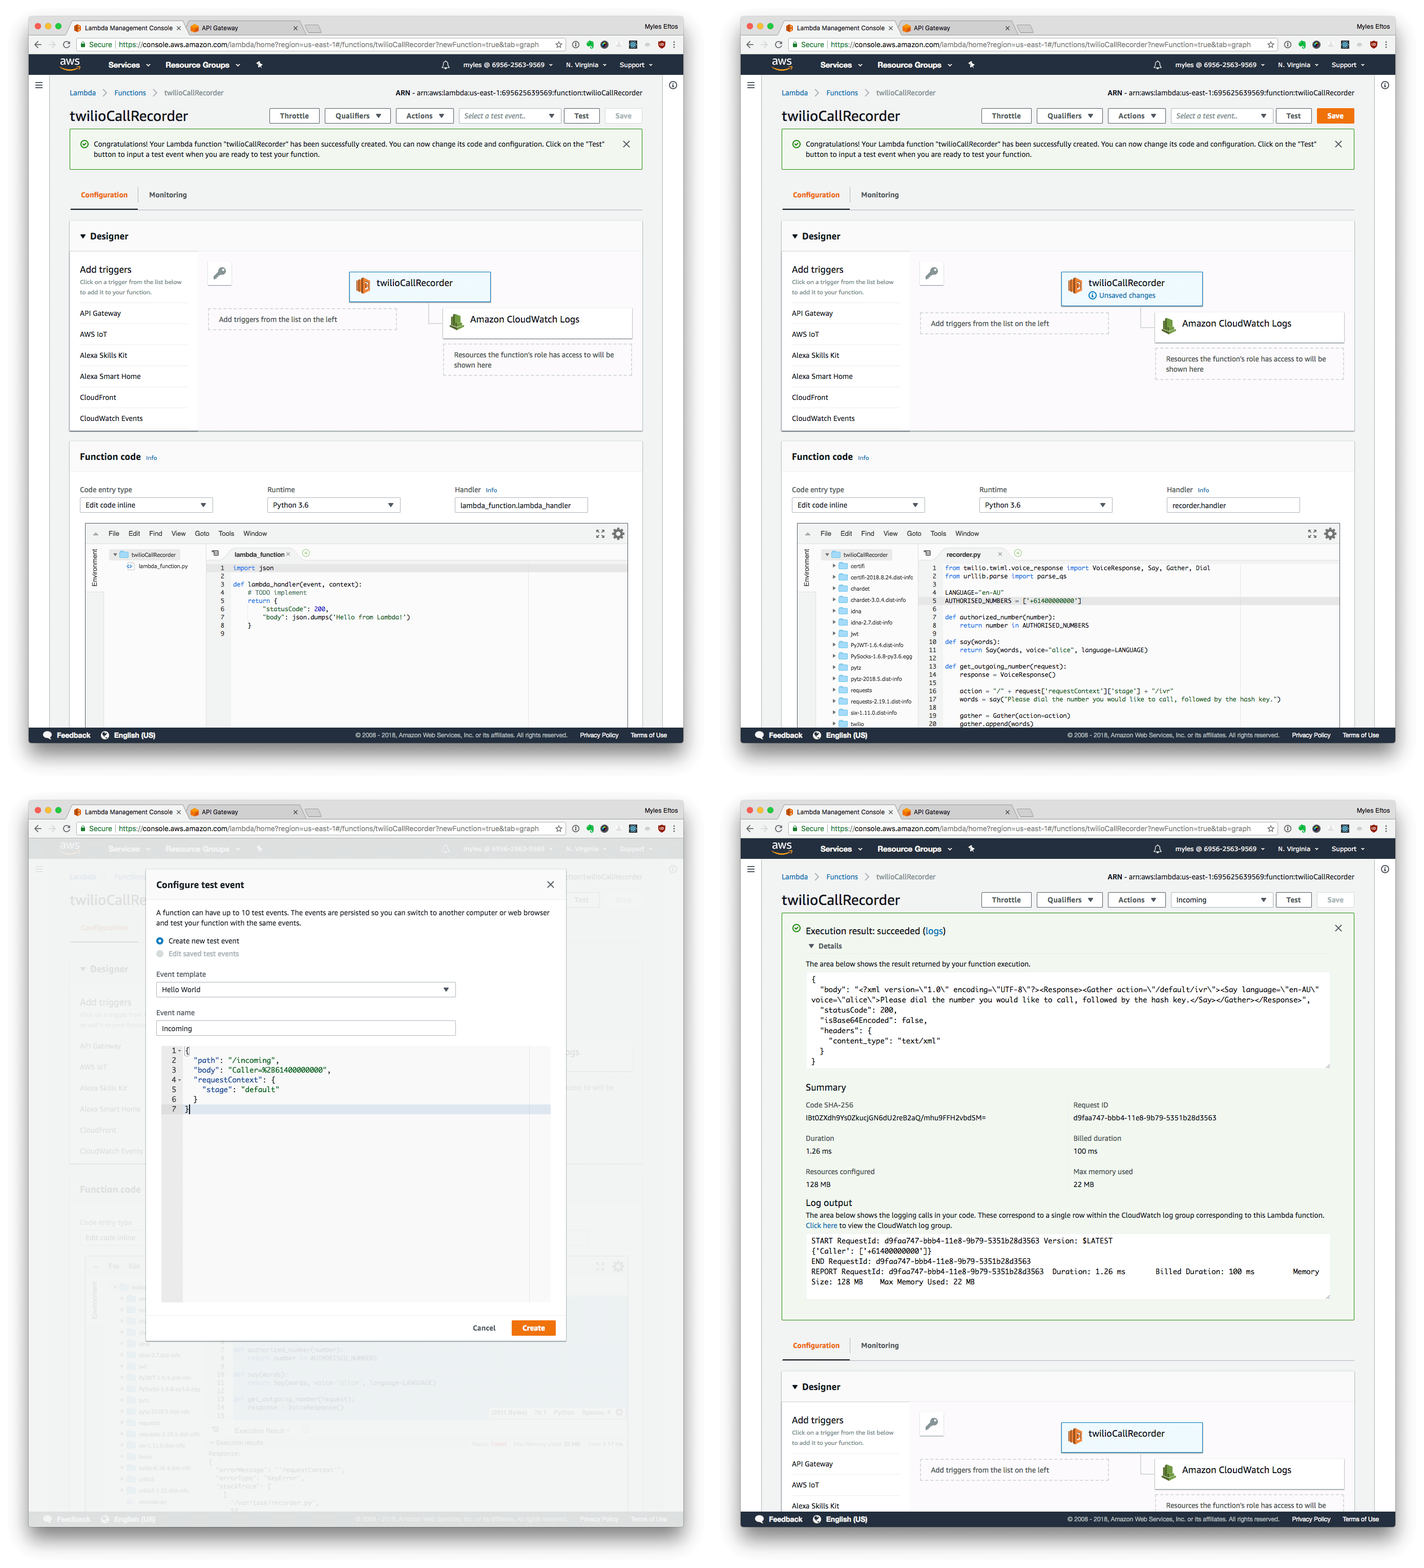
Uploading the Code

  1. Upload ZIP File
  2. Set the handler to recorder.handler
  3. Click Save
  4. In the code editor, Add all the phone numbers who can make outgoing calls to the AUTHORISED_NUMBERS list (include +61 at the beginning)
  5. Click Test
  6. Set the event name to Incoming”

Set the payload to

{
  "path": "/incoming",
  "body": "Caller=%2B61400000000",
  "requestContext": {
    "stage": "default"
  }
}
  • Click Create
  • Click Test GIF of the Code uploading Process

Setting up the Web API Gateway

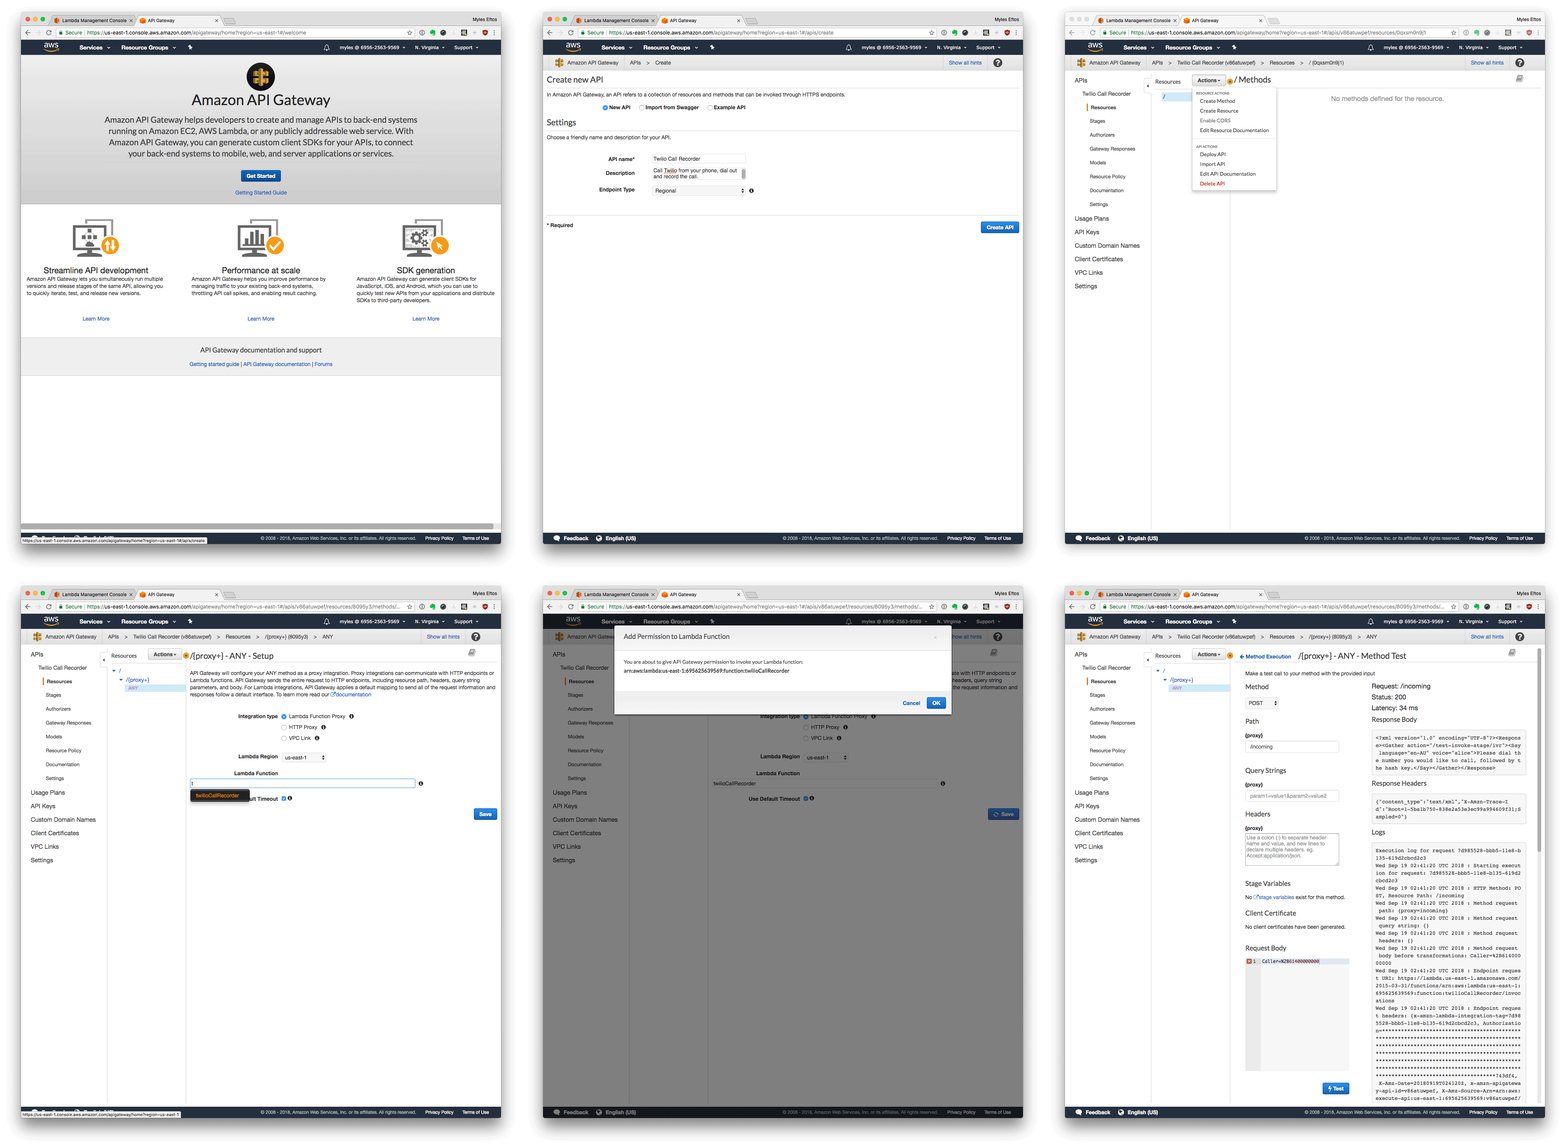
  1. Click Get Started
  2. Click New API
  3. Name the API Twilio Call Recorder
  4. Click Create API
  5. From the Actions menu, select Create Resource
  6. Check the Configure as Proxy Resource option
  7. Click Create Resource
  8. Start typing the name you gave the Lambda (twilioCallRecorder) – it should suggest the full name
  9. Click Save
  10. Click Ok
  11. Click Test
  12. Select Post in the Method drop down
  13. Select /incoming as path
  14. Set RequestBody to
Caller=%2B61400000000

replacing 61400000000 with one of the numbers in your allow list

  1. Click Test

If that all worked, you should see a success message.

Screen Captures of setting up the API gateway

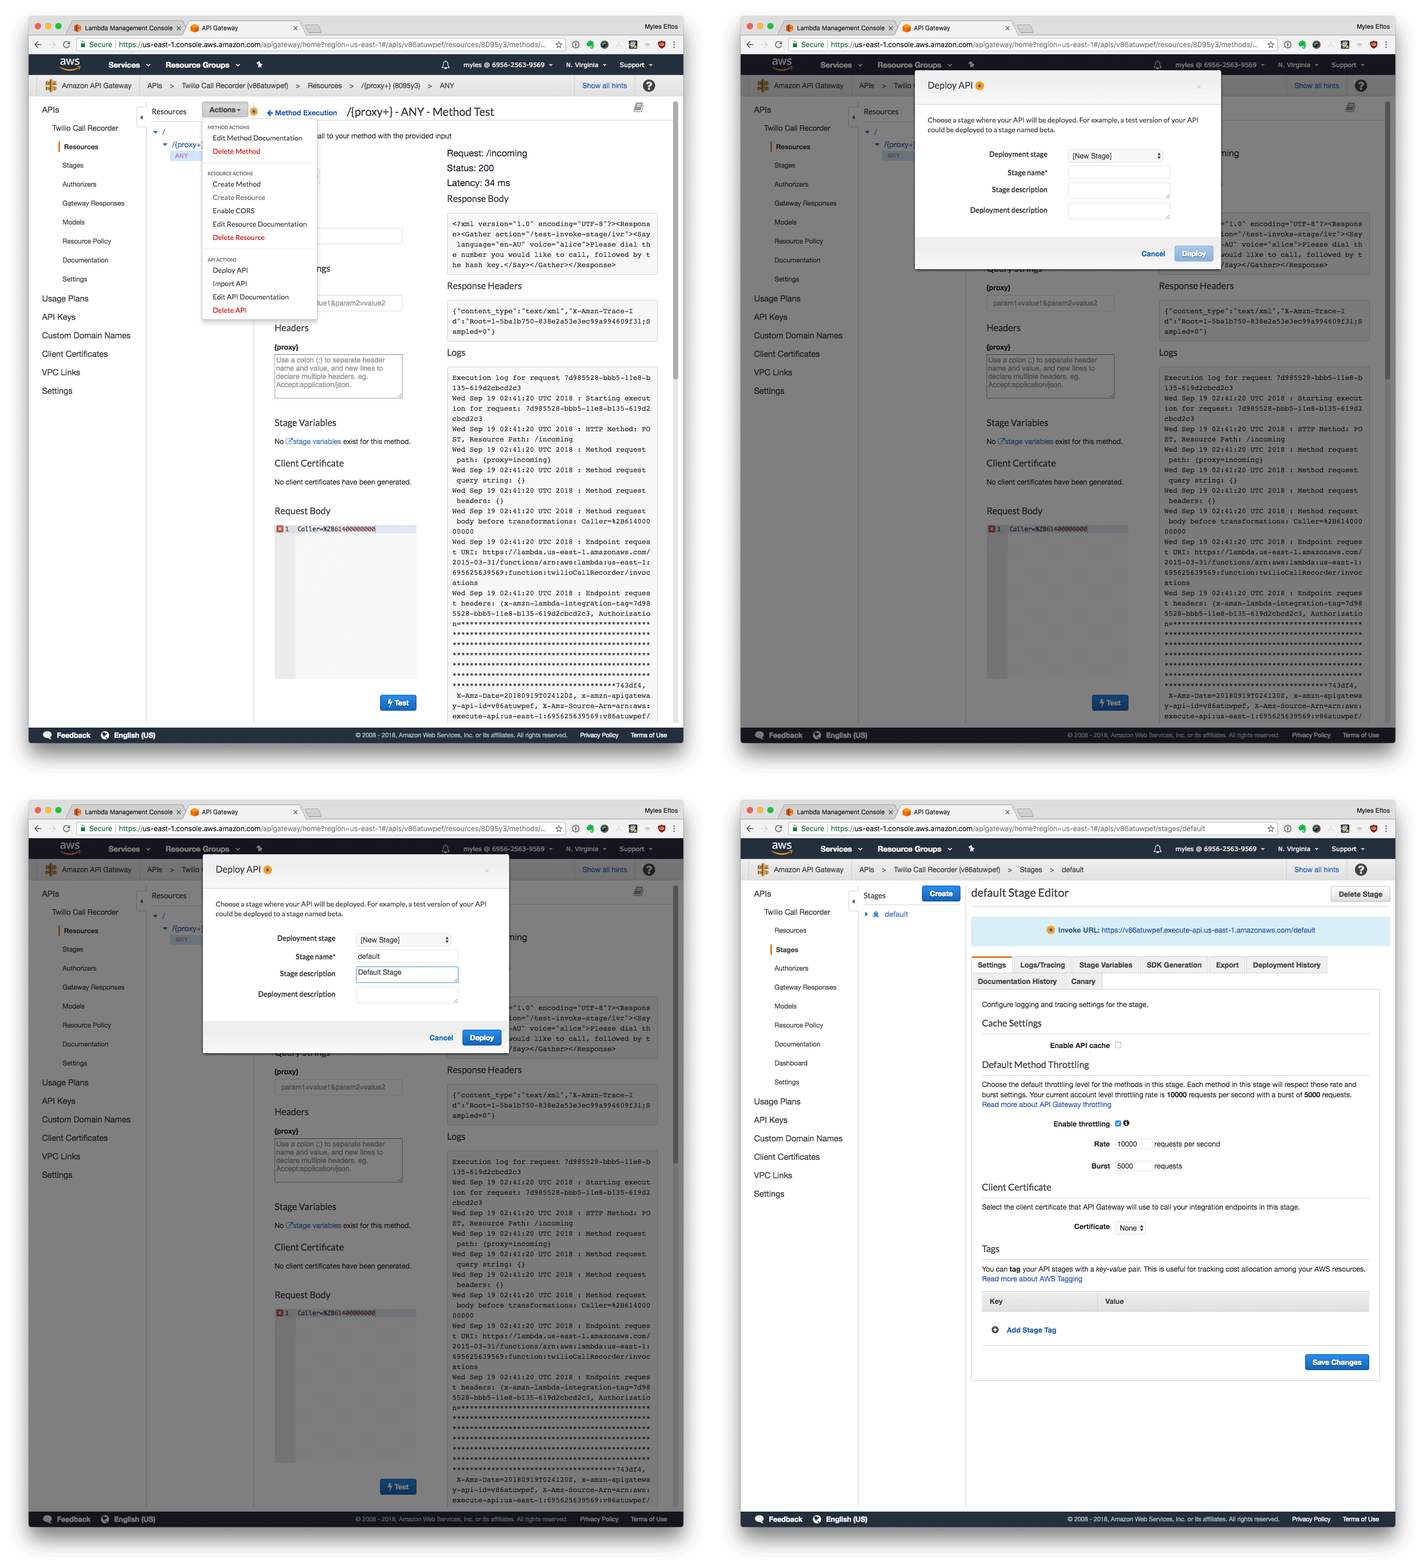
Deploy the API Gateway

  1. From the Actions menu, select Deploy API
  2. Enter Default as the name
  3. Click Deploy Screen Captures of the Deployment

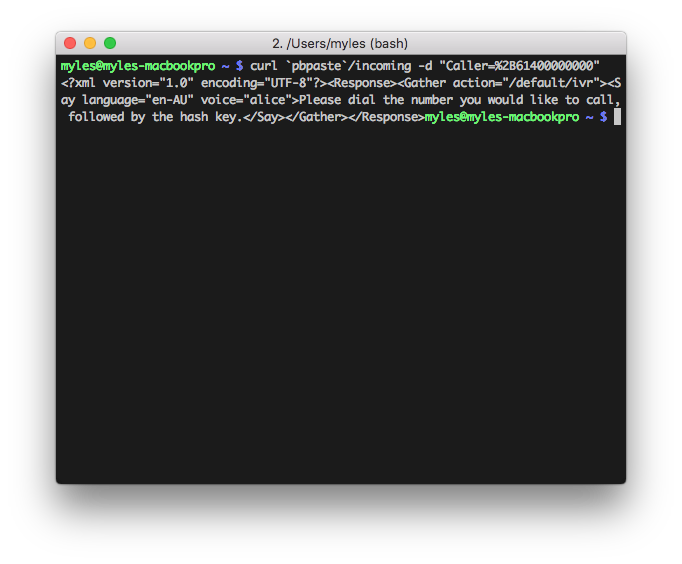
Copy the invoke URL. In a terminal (if you are on a Mac):

curl `pbpaste`/incoming -d "Caller=%2B61400000000"

Testing the endpoint in the command line

Congratulations! You have setup the API Gateway and Lambda correctly!

Setup Twilio

See the documentation around webhooks on the Twilio website – paste in the URL from the API gateway, and you are good to go.

Making a call

The part you have been waiting for! Pick up your phone, and dial the incoming number you setup at Twilio. If all is well, you should hear a lovely woman’s voice asking you the number you wish to dial. Enter the number, and hit the hash key. After a moment, the call will be connected!

Once you hang up, you can log in to the Twilio console, browse to the Programmable Voice section and click the Call log. You should see the call you made. Click on it and you will be able to download a WAV or MP3 version of the recording.

Now, you just need to download it (I chose the MP3, because it will be faster), and upload it to Rev.com. After a couple of hours, you will have a high quality transcription of your conversation. It’s really very easy!
I, for one, welcome our new screencasting overloads

Or, how I used robots to make my screencasts.

I don’t like screencasts. I don’t like watching them, and I hate making them.

However, I know a lot of people do like watching them, especially people that are trying evaluate software. It had been pointed out to me that there was no way to see the internals of 88 Miles without signing up (Personally, I would suggest signing up, but whatever). So I thought I’d investigate a way to make a screencast without wanting to stab myself in the face.

So why do I hate making them?

  1. If you change any part of the UI, you have to go through and re-record the whole thing. This becomes tedious. That said, having an out of date screencast is probably worse than having no screencast.
  2. Making typos during the recording looks unprofessional, so either you need to be perfect (not going to happen) or you need to spend ages editing out the typos (I’ve got better things to do).
  3. Not only do you have to write content, you have to record voice over audio and video. They are a lot of work.

I’ve spent a lot of time on the look and feel of 88 Miles, and I wasn’t going to produce a crappy screencast – it had to look professional. So I needed a way to automate as much of this as I could, so that I replicate the video easily.

After putting out a call to twitter, Max pointed me at a ruby gem called Castanaut that basically wraps AppleScript allowing the automation of both the screencasting software (in my case: iShowU) and Safari. Success! Sort of. There was a little bit of work to get it all working.

The first thing to do is install the gem:

gem install castanaut

I started out using the screenplay from Castanaut site, but had to make some changes to get it working. First of all, I don’t have Mousepos installed, so I removed that plugin.

Next, Castanaut seemed to miss clicks randomly, which was a pain. After a bit of digging it looks like it was the way that it was calling AppleScript. Rather than debugging that, I just installed cliclick which is a commandline app that control the mouse without AppleScript. I had to write a small plugin to override the move and click functions. (Save this to plugin/cliclick.rb)

module Castanaut
  module Plugin
    module Cliclick
      def click(btn = "left")
        `cliclick c:+0,+0`
      end

      def doubleclick(btn = "left")
        `cliclick dc:+0,+0`
      end

      def cursor(*options)
        options = combine_options(*options)
        apply_offset(options)
        @cursor_loc ||= {}
        @cursor_loc[:x] = options[:to][:left]
        @cursor_loc[:y] = options[:to][:top]

        `cliclick m:#{@cursor_loc[:x]},#{@cursor_loc[:y]}`
      end
    end
  end
end

Castanaut will use say (the built in speech synthesis software on a Mac) for timing voiceovers. You really don’t want to be using that in your final screencast, unless you are actually Stephen Hawking. To solve this problem, I wrote another plugin that automatically generates a subtitle file that, when run under VLC will display the text, allowing me to read along with the video

module Castanaut
  module Plugin
    module Subtitle
      def start_subtitles(filename)
        @filename = filename
        @start = Time.now
        @sequence = 1
        @srt = ''
        @webvtt = "WEBVTT\n\n"
      end

      def stop_subtitles
        @start = nil
        @sequence = 0
        File.write "#{@filename}.srt", @srt
        File.write "#{@filename}.vtt", @webvtt
        @srt = ''
        @webvtt = ''
      end

      def subtitle(narrative, &blk)
        start = Time.now - @start
        yield
        stop = Time.now - @start

        @srt += "#{@sequence}\n"
        @srt += "#{time_diff(start)} --> #{time_diff(stop)}\n"
        @srt += "#{narrative.scan(/\S.{0,40}\S(?=\s|$)|\S+/).join("\n")}\n"
        @srt += "\n"

        @webvtt += "#{time_diff(start).gsub(',', '.')} --> #{time_diff(stop).gsub(',', '.')}\n"
        @webvtt += "#{narrative.scan(/\S.{0,40}\S(?=\s|$)|\S+/).join("\n")}\n"
        @webvtt += "\n"

        @sequence += 1
      end

      def say_with_subtitles(narrative)
        subtitle narrative do
          say(narrative)
        end
      end

      def while_saying_with_subtitles(narrative, &blk)
        subtitle narrative do
          while_saying narrative, &blk
        end
      end

      protected
      def time_diff(time)
        micro = ((time.to_f - time.to_i) * 1000).floor
        seconds = (time.abs % 60).floor
        minute = (time.abs / 60 % 60).floor
        hour = (time.abs / 3600).floor
        (time != 0 && (time / time.abs) == -1 ? "-" : "") + hour.to_s.rjust(2, '0') + ":" + minute.to_s.rjust(2, '0') + ":" + seconds.to_s.rjust(2, '0') + ',' + micro.to_s
      end
    end
  end
end

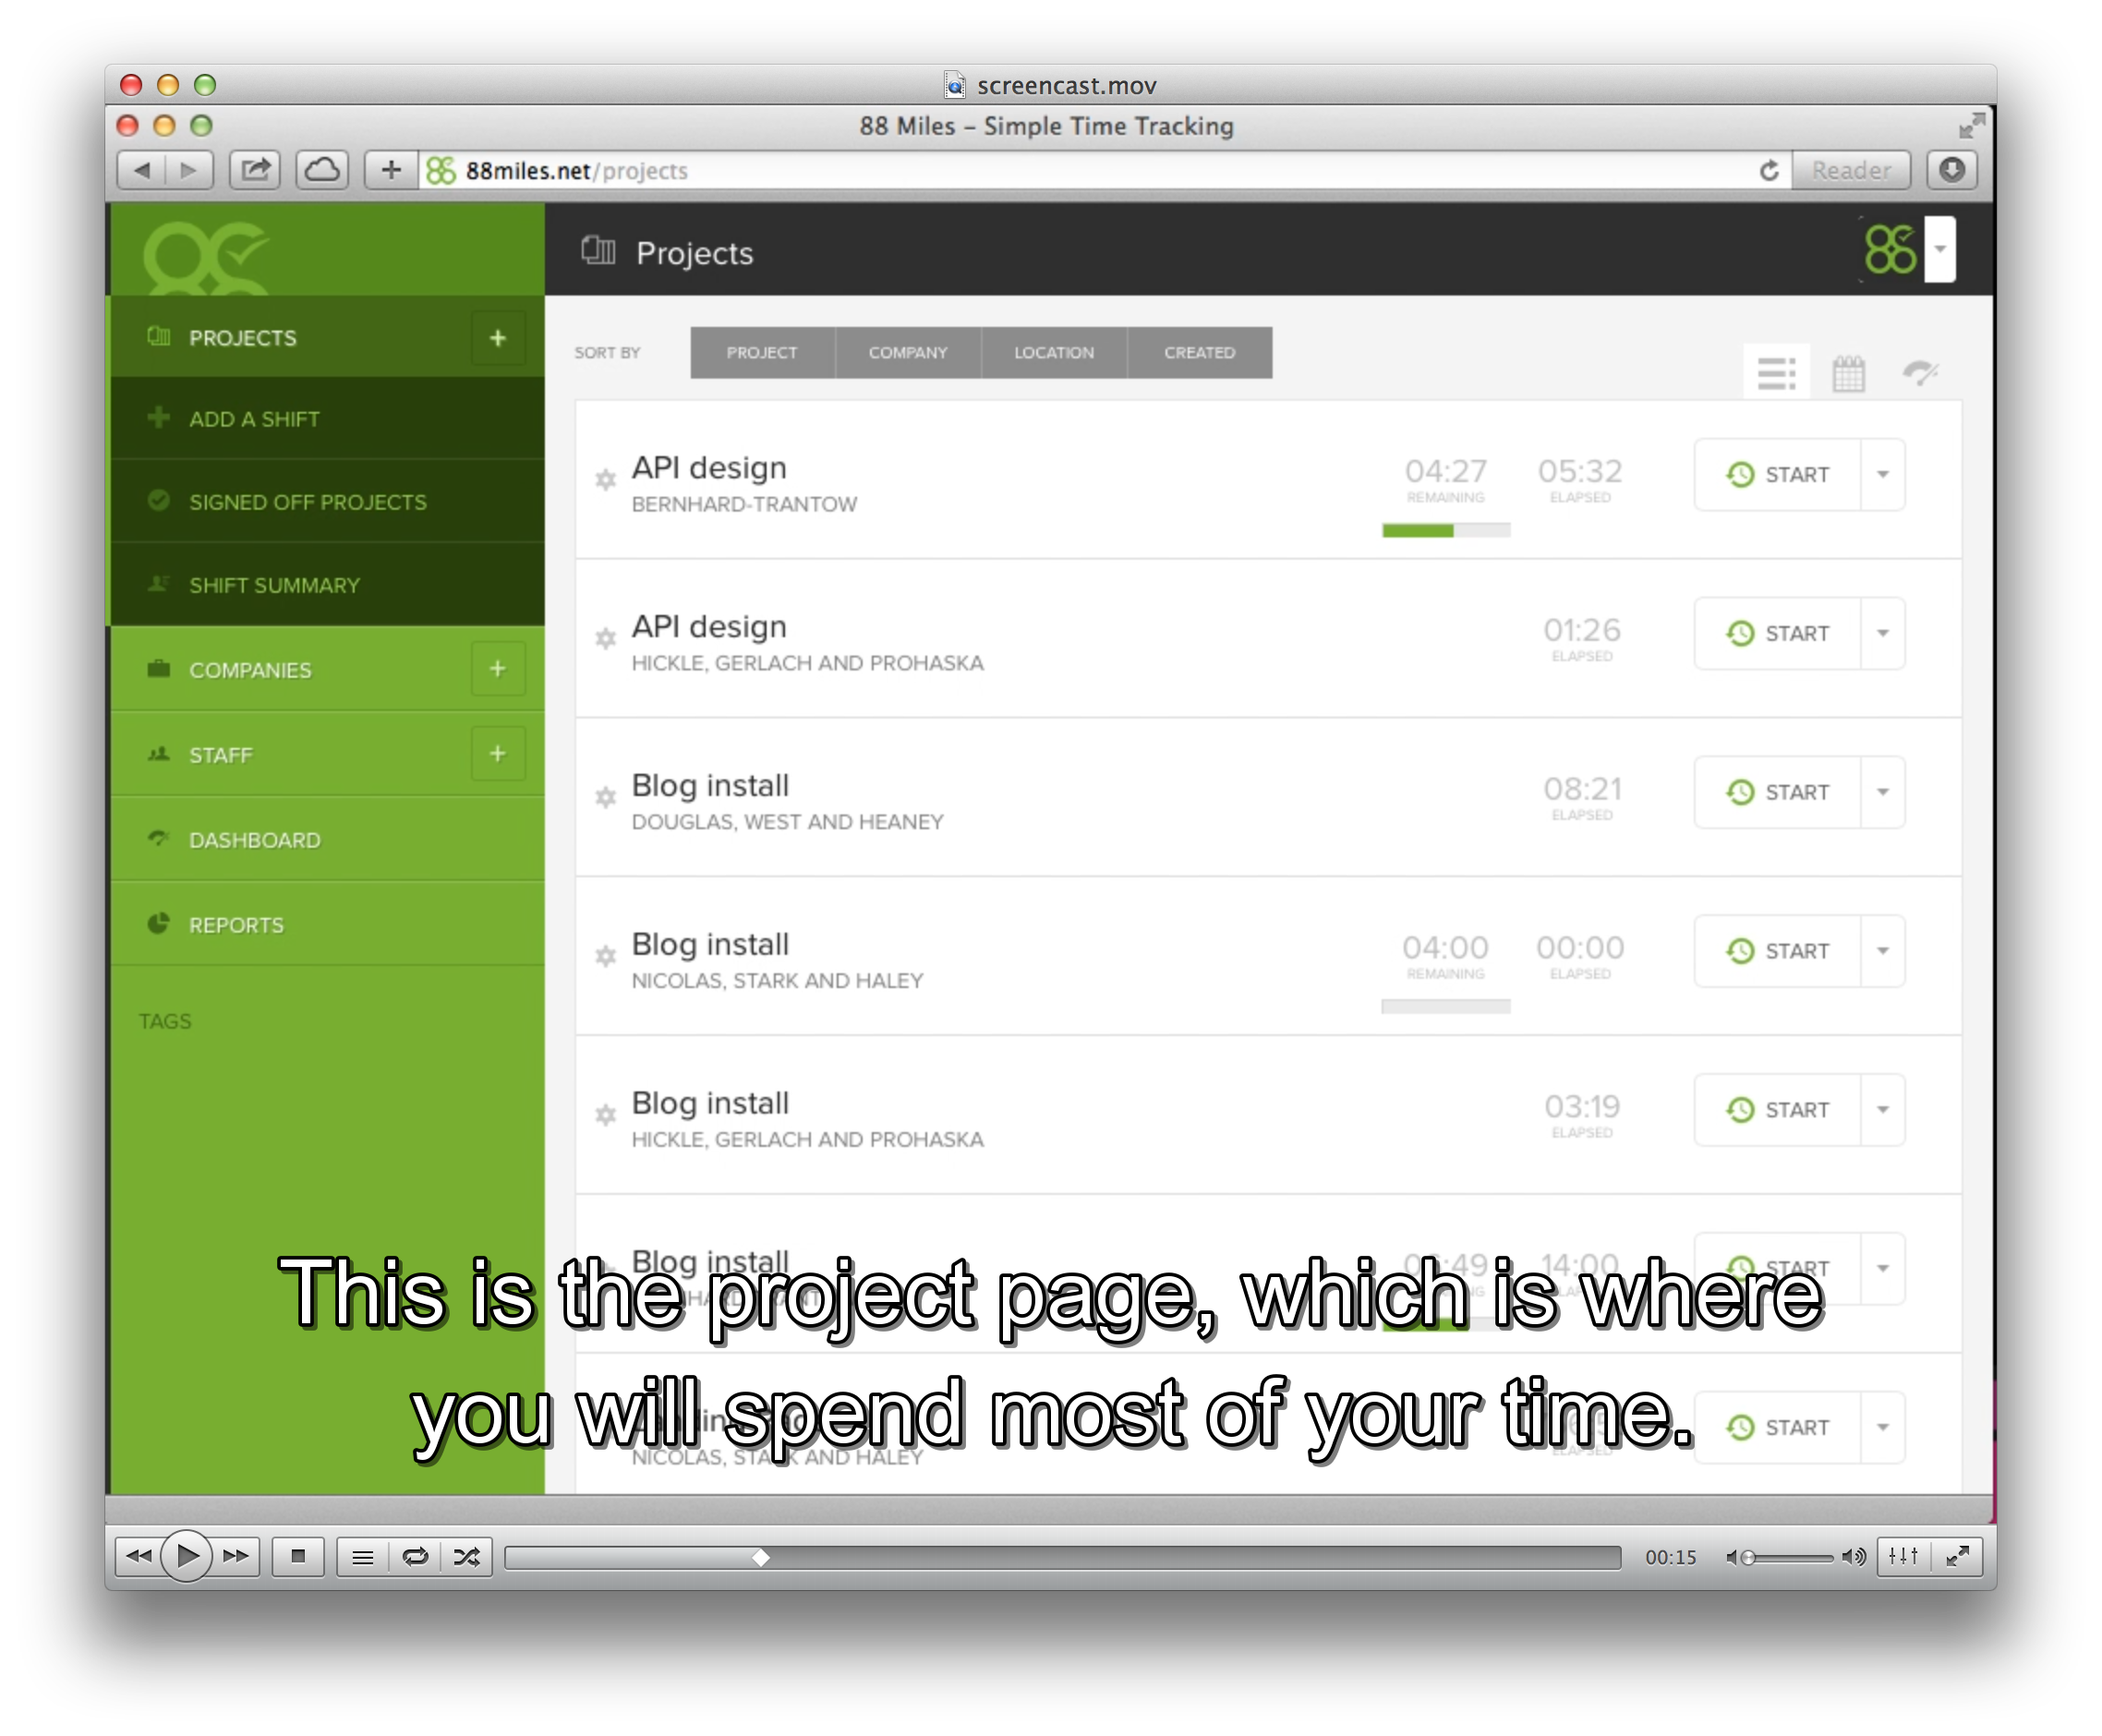
This will create both a SRT and VTT (Web subtitle) file. Here is a screen shot of the subtitle overlayed on to the video:

Showing the subtitles overlayed in VLC

Here is an excerpt from my screenplay file:

#!/usr/bin/env castanaut
plugin "safari"
plugin "keystack"
plugin "cliclick"
plugin "subtitle"
plugin "ishowu"
plugin "sayfast"

launch "Safari", at(120, 120, 1024, 768)
url "http://88miles.net/projects"
pause 5

ishowu_start_recording
start_subtitles "/Users/myles/Movies/iShowU/tour"
pause 1
say_with_subtitles "Hi, my name is Myles Eftos, and I'm the creator of Eighty Eight Miles"
say_with_subtitles "a time tracking application for designers, developers and copywriters."
say_with_subtitles "This short video will show you how Eighty Eight Miles tracks your time"

Oh, one last thing – I found the synthesised voice was too slow, so I made another plugin that speeds up the voice (saved in plugins/sayfast.rb):

module Castanaut
  module Plugin
    module Sayfast
      def say(narrative)
        run(%Q`say -r 240 "#{escape_dq(narrative)}"`)  unless ENV['SHHH']
      end
    end
  end
end

I recorded the voice over using Audacity. I wasn’t too fussed about an exact sync, so I just hit record on Audacity, and play in VLC. If you are worried about sync, just make a noise into the microphone when hit click (tapping the mic will do it), and you can use that as a sync mark.

Protip: Don’t use the built in microphone on your laptop, unless you are going for the “I’m recording this in a toilet” aesthetic. Ideally, you’d have a decent studio mic with a pop filter (I have a Samson C01U), but you know what? A gaming headset mic will still be orders of magnitude better than your laptop microphone.

Now, you should have a MP4 and WAV file (one for video, one for audio) than need to get mashed together. I use Adobe Premier Pro for this, but iMovie works great too. You will need to remove the existing audio track from the video file as it will have the robot voice on it, replacing it with your voice over track.

Finally, I topped-and-tailed the video with some titles for that last bit of fancy.

After exporting the final render, I used FFMPEG to encode the file into a final MP4 and WEBM file so I could drop them into a video tag. To install ffmpeg:

brew install ffmpeg --with-libvpx --with-libvorbis --with-fdk-aacc

Then run the following commands

ffmpeg -i [input file] -crf 10 -b:v 1M -c:a libfaac screencast.mp4
ffmpeg -i [input file] -c:v libvpx -crf 10 -b:v 1M -c:a libvorbis screencast.webm

You can upload those files somewhere, then reference them in like so:

<video autoplay class="tour" controls height="768" preload="auto" width="1024">
  <source src="/videos/screencast.mp4" type="video/mp4"></source>
  <source src="/videos/screencast.webm" type="video/webm"></source>
  <track default kind="captions" label="English" src="/videos/screencast.vtt" srclang="en"></track>
</video>

Want to see the output? Here is the final render embedded on the internets.

What if we treated marketing like we did code?

As someone that started writing code at a young age I, like many others, have learnt my trade via books and google searches and long hours in front of a keyboard. As the Internet engulfed our lives, solutions to problems and access to really smart people has become just one stack overflow or Github repo away. The software world really is one of knowledge sharing. It’s pretty ace.

I’ve been doing a lot of research in to marketing and sales lately for my startup, and I’ve found that the same really can’t be said for the marketing world. While there seems to be a lot of information out there, when you dig a little deeper it seems to be a rehash of a couple of ideas, a lot of link-bait lists and offers to increase my conversions by up to 250%! If I sign up to a newsletter and pay $35 a month and follow 12-simple steps that point me at a $3000 seminar.

It’s got me wondering though – would it be possible to treat marketing the same way that we treat code?

If you think about it, there are a lot of similarities between writing code, and running a marketing campaign:

  1. It’s a creative exercise. As I keep telling non-programmers, it’s not paint-by-numbers. Sure, libraries can help solve problems, but more often than not you have to engineer your own solution, or modify something else to get it working right. From what I’ve seen, marketing is the same. There is some starting points, but you need to work out what will work in a certain situation and adapt.
  2. Regardless of how well you plan, you’ll get thrown a curve-ball that means you’ll have to re-think your strategy
  3. It’s testable. Not in a unit test sense, but in a benchmark sort of way. You can do something measure it and wok out what works best in a given situation. Big-O notation for marketing, anyone? Bueller?
  4. There is a lot of self-proclaimed experts – the difference here is the output of coders can be read and assessed by anyone. Marketeers just say they are experts.

Of course, they aren’t exactly the same either:

  1. Lot’s of people make software for fun. Just look at the number of open source repos on Github. I don’t know of people that do marketing just for fun – they might find it fun, but at the end of the day, they are doing it to make money.
  2. There isn’t much actual sharing. People don’t like giving away real numbers, because they are doing this to make money and that’s a trade secret or something. It’s the equivalent of closed source software, I guess – not that there is anything wrong with it, but if it’s all closed up, it makes getting to the knowledge harder.

The question that I’ve been asking myself, is could be open source some of this stuff? Can we write up some marketing experiments and techniques, with actual results and share them for others to take inspiration off?

What is we wrote that our marketing experiments up and posted it to Github, so others could fork, implement, and improve? A library of marketing libraries for want of a better term?

Is it possible to modularise and share marketing ideas while cutting through the usual online-marketing expert bullshit? Can marketing be something that we play with for no better reason than to learn something or does it have to always just be about making a buck? What, in my n00bness have I missed, that makes this ultimately a stupid idea? Or is this actually something that could happen?

Lots of questions, not too many answers. Leave a comment, or let’s discuss it on twitter.

Track email opens using a pixel tracker from Rails

If you are sending out emails to you customers from your web app, it pretty handy to know if they are opening them. If you have ever sent out an email newsletter from a service like Campaign Monitor, you would have seen email open graphs. Of course, tracking this stuff is super important for a newsletter campaign, but it would also be interesting to see if users are opening, for example, welcome emails or onboarding emails.

The simplest way to do this is via a tracking pixel – a small, invisible image that is loaded off your server every time the email is opened (See caveat below). This is fairly simple to achieve using Rails by building a simple Rack application.

Caveat

This only works for HTML emails (unless you can work out how to embed an image in a plain text email), and relies on the user having “Load images” turned on. Clearly, this isn’t super accurate, but it should give you a decent estimate.

The Setup

We’ll add two models: One to tracking sending email, and one to track opening of email:

rails generate model sent_email
rails generate model sent_email_open

The schema for these are fairly simple: Save a name to identify the email, the email address it was sent to, an ip address and when the email was sent and opened.

class CreateSentEmails < ActiveRecord::Migration
  def change
    create_table :sent_emails do |t|
      t.string :name
      t.string :email
      t.datetime :sent
      t.timestamps
    end
  end
end
class CreateSentEmailOpens < ActiveRecord::Migration
  def change
    create_table :sent_email_opens do |t|
      t.string :name
      t.string :email
      t.string :ip_address
      t.string :opened
      t.timestamps
    end
  end
end
class SentEmail < ActiveRecord::Base
  attr_accessible :name, :email, :sent
end
class SentEmailOpen < ActiveRecord::Base
  attr_accessible :name, :email, :ip_address, :opened
end

With the models setup, let’s add a mail helper that will generate the image pixel – create this is /app/helpers/mailer_helper.rb

module MailerHelper
  def track(name, email)
    SentEmail.create!(:name =d> name, :email =d> email, :sent =d> DateTime.now)
    url = "#{root_path(:only_path =d> false)}email/track/#{Base64.encode64("name=#{name}&email=#{email}")}.png"
    raw("<img src=\"#{url}\" alt="" width=\"1\" height=\"1\"d>")
  end
end

What this does is give our mailers a method called track that takes a name for the email and the email address of the person we are sending it to. To enable it, call the helper method in the mailers you want to track:

class UserMailer < ActionMailer::Base
  helper :mailer
end

Now we can add the tracker to our html emails. Say we have a registration email that goes out, and there is a user variable, with an email attribute:

<!-- Snip --d>
<%= track('register', @user.email) %d>
<!-- Snip --d>

Right, now the magic bit:

Create a directory called /lib/email_tracker and create a new file called rack.rb

module EmailTracker
  class Rack
    def initialize(app)
      @app = app
    end

    def call(env)
      req = ::Rack::Request.new(env)

      if req.path_info =~ /^\/email\/track\/(.+).png/
        details = Base64.decode64(Regexp.last_match[1])
        name = nil
        email = nil

        details.split('&').each do |kv|
          (key, value) = kv.split('=')
          case(key)
          when('name')
            name = value
          when('email')
            email = value
          end
        end

        if name && email
          SentEmailOpen.create!({
            :name =d> name,
            :email =d> email,
            :ip_address =d> req.ip,
            :opened =d> DateTime.now
          })
        end

        [ 200, { 'Content-Type' =d> 'image/png' }, [ File.read(File.join(File.dirname(__FILE__), 'track.png')) ] ]
      else
        @app.call(env)
      end
    end
  end
end

Create a 1×1 pixel transparent PNG and save it as track.png and place it in the same directory. Next, include it in your config/application.rb

module App
    class Application < Rails::Application
        require Rails.root.join('lib', 'email_tracker', 'rack')
        # Some other stuff
        config.middleware.use EmailTracker::Rack
    end
end

And that’s it! Now, every time the email gets sent out, it will create a record in the send_emails table, and if it is opened (and images are turned on) it will create a record in send_email_opens. Doing up a status board is left up as an exercise to the user, but you can check you percentage open rate by doing something like:

(SentEmailOpen.where(:name =d> 'register').count.to_f / SentEmail.where(:name =d> 'register').to_f) * 100

How it works

It’s super simple. The track method generates a Base64 encoded string that stores the name of the email and the email address it is being sent to. It them returns an image URL that can be embedded in the email. The Rack app looks for a URL that looks like /track/email/[encodedstring].png and if it matches records the hit. It then returns a transparent PNG to keep the email client happy.

I might get around to turning this into a gem if there is enough interest.