@madpilot makes

Twilio + AWS Lamba + Rev = Easy call recording!

I have been doing a bunch of user interviews at work. It’s been difficult to get our users in front of a computer, or to get them to install video conferencing software, so I’ve been calling them on the telephone. I find that taking notes while I interview people kills my flow, and I’m really not very good at it, so I needed a way to easily record these phone calls, and then get them transcribed.

There are a bunch of solutions out there, but they all seem to rely on a third party app that make a VoIP call. This presented me with three problems:

  1. Our spotty office wifi caused drop outs – and when it did work, the quality was terrible (thanks Australia!);
  2. The incoming number was a either blocked or some weird overseas number, which users promptly ignored
  3. Automatic transcription of phone calls is woeful – because of the low bandwidth, the audio signal isn’t great, and computers do a really bad job at translating it to text.

When I was last at JSConf, I got chatting to Phil Nash who is a developer evangelist at Twilio. I asked him whether I could setup a number that I could call, have me enter a number, dial that number and record the call. He said it should be easy.

Challenge accepted.

Spoiler alert: It is.

Note: This code and deployment process isn’t actually the one I used at work. We use Golang, which is way more lines of code, and has way more boiler plate – and I needed to write an abstraction around TwiML – so I chose to rewrite it in Python here for simplicity’s sake. We also use CloudFormation to create Lambdas and API gateways, and have a CI build pipeline to deploy them, which isn’t conducive to a pithy blog post. Does this process work? Yes. Would you use it in real world in a production environment? Up to you. 🤷‍♀️

An overview

At a high level, this is what happens when you dial the number and request an outgoing call:

  1. Twilio answers your call
  2. Twilio makes a request to an Amazon Lambda via an API Gateway, which returns some TwiML instructing Twilio’s voice engine to ask you to enter a phone number.
  3. It waits for you to enter the phone number followed by the hash key
  4. When it detected the hash key, it makes another request to the lambda, this time with the number you entered. The lambda returns an instruction to dial the number (after some normalisation – more on this later), join the calls, and to record both sides of the conversation.

After this happens, you can log in to the Twilio console, download the MP3, and upload that to Rev.com where real-life humans transcribe the conversation.

The code

from twilio.twiml.voice_response import VoiceResponse, Say, Gather, Dial
from urllib.parse import parse_qs

LANGUAGE="en-AU"
AUTHORISED_NUMBERS = ['ADD YOUR PHONE NUMBER HERE IN INTERNATIONAL FORMAT ie +61400000000']

def authorized_number(number):
    return number in AUTHORISED_NUMBERS

def say(words):
    return Say(words, voice="alice", language=LANGUAGE)

def get_outgoing_number(request):
    response = VoiceResponse()

    action = "/" + request['requestContext']['stage'] + "/ivr"
    words = say("Please dial the number you would like to call, followed by the hash key.")

    gather = Gather(action=action)
    gather.append(words)
    response.append(gather)

    return response

def add_country_code(number):
    if number[0] == "+":
        return number
    elif number[0] == "0":
        return "+61" + number[1:]
    elif number[0:2] == "13":
        return "+61" + number
    elif number[0:2] == "1800":
        return "+61" + number

def hangup():
    response = VoiceResponse()
    response.hangup()
    return response

def handle_ivr_input(params):
    to = params['Digits'][0]
    dial = Dial(add_country_code(to), record="record-from-answer-dual", caller_id=params['Caller'])

    response = VoiceResponse()
    response.append(say("Calling."))
    response.append(dial)
    return response

def handler(request, context):
    path = request['path']
    params = parse_qs(request['body'])

    response = ""
    if path == "/incoming":
        if authorized_number(params["Caller"][0]):
            response = get_outgoing_number(request)
        else:
            response = hangup()
    elif path == "/ivr":
        response = handle_ivr_input(params)
    else:
        return {
            'body': "Action not defined",
            'statusCode': 404,
            'isBase64Encoded': False,
            'headers': { 'context_type': 'text/plain' }
        }

    return {
        'body': str(response),
        'statusCode': 200,
        'isBase64Encoded': False,
        'headers': { 'content_type': 'text/xml' }
    }

Code is also on GitHub.

I’m in Australia, so there is a little bit of localization happing here: I set the voice of Alice (the most human sounding robot that Twilio has) to Australian, and I insert the Australian country code if it is not already set. Twilio doesn’t do this automatically, and it’s a pain to replace the first 0 with a +61 for every call.

When the call is made, the caller ID is set to the number you called from, so the call looks like it came from you. You need to authorise Twilio to do that.

I’ve included a hard-coded allow-list (AUTHORISED_NUMBERS) of phone numbers who can make outgoing phone calls. If a number that is not on the list tries to call the number, they just get hung up on. You wouldn’t want someone accidentally stumbling across the number and racking up phone bills. I guess at least you would have recordings as evidence…

Note: the code doesn’t know about area codes, so if you are calling land lines (Wikipedia entry if you are under 30 and don’t know what they are) you will always need to include your area code.

Cool. So what do you do with this code? It needs packaging and uploading to Amazon.

Packaging the script

(Want to skip this bit? Here is the ZIP – you can edit it in the Lambda console once you upload)

You will need Python 3.6 for this. Instructions for OSX, Linux and Windows. Good Luck.

git clone git https://github.com/madpilot/twilio-call-recorder
cd twilio-call-recorder
pip install twilio -t ./
find . | grep -E "(__pycache__|\.pyc|\.pyo$)" | xargs rm -rf
zip -r lambda.zip *

Creating the Lambda

  1. Log in to your AWS account, and go to https://console.aws.amazon.com/lambda/home
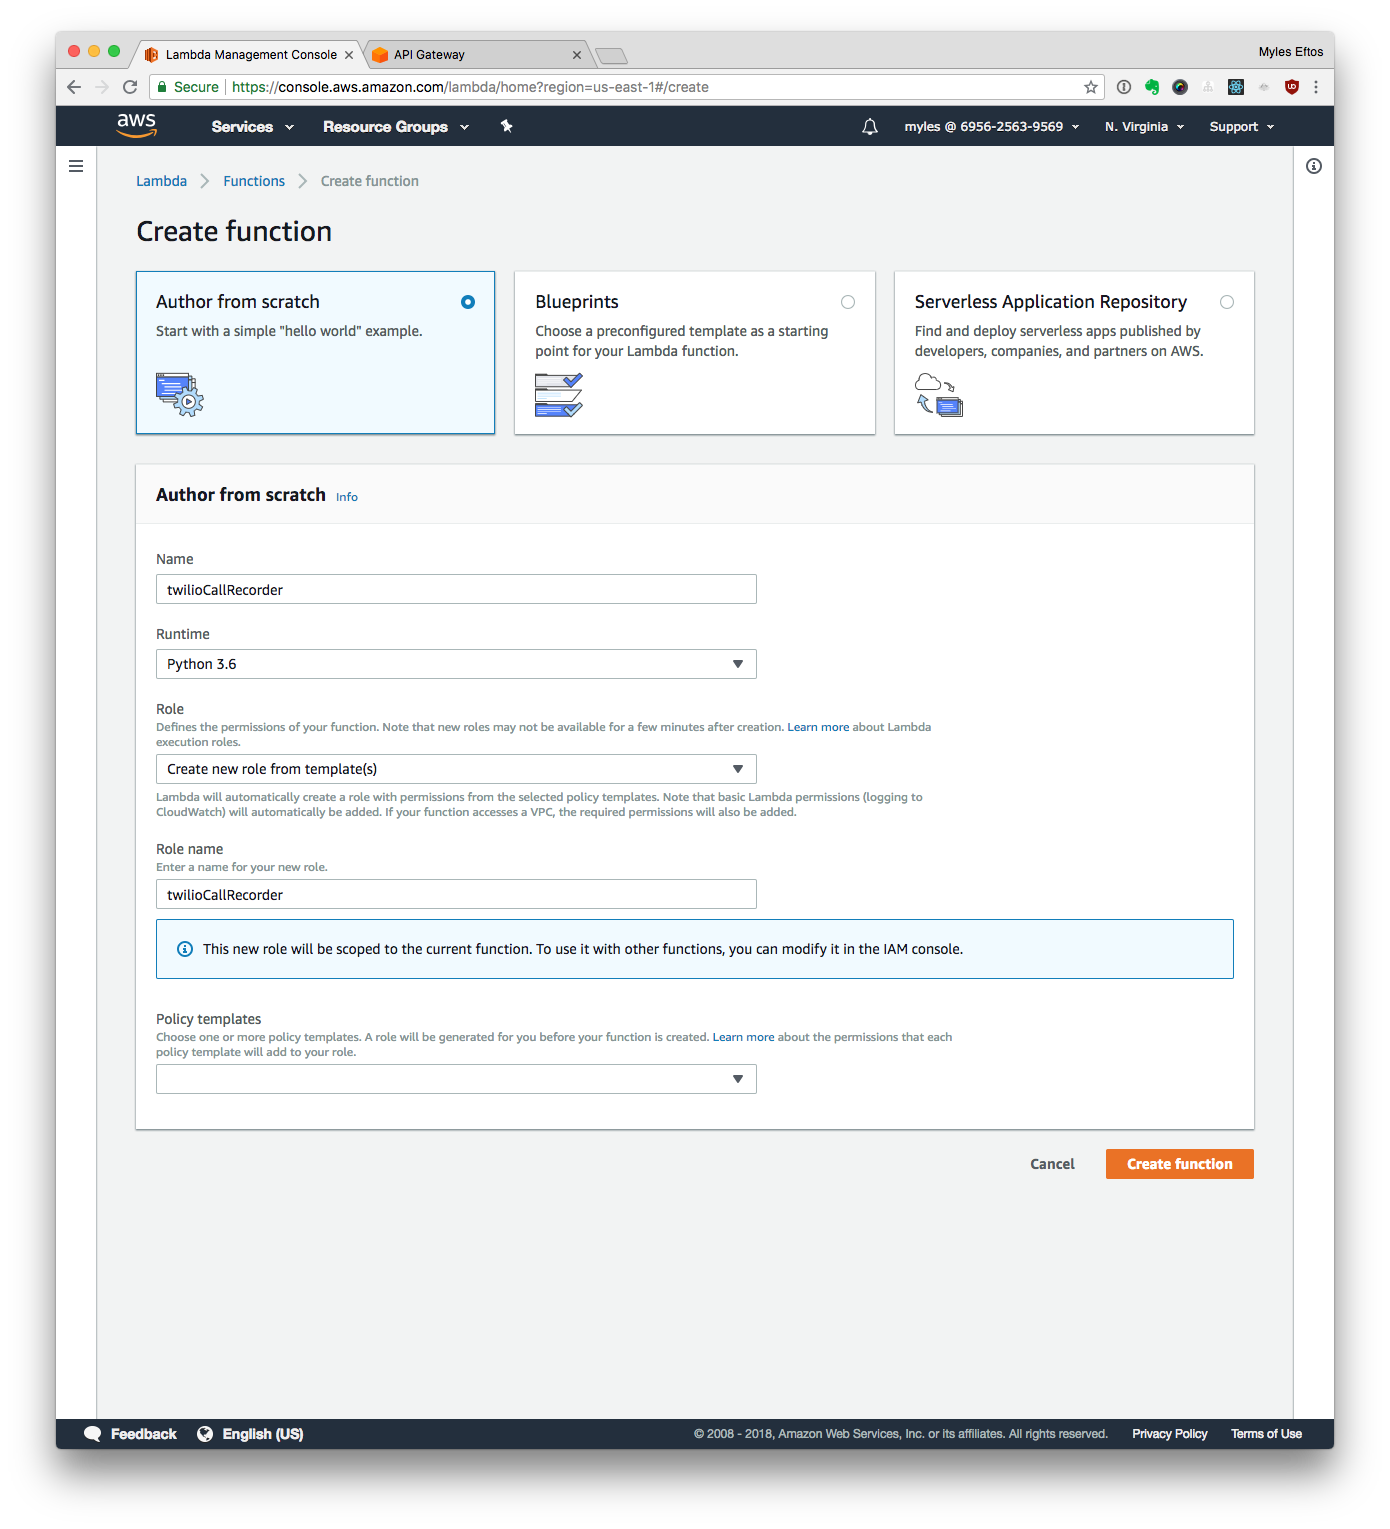
  2. Click Create function
  3. Then Author from scratch
  4. Name your lambda: twilioCallRecorder
  5. Select Python 3.6 as the runtime
  6. Select the Create new role from template(s) option
  7. Name the role: twilioCallRecorderRole
  8. Click Create Function

Your screen should look similar to this:

Screen Capture of the AWS Lambda Setup.

Important! Don’t Add a trigger from this screen! We need to set the API gateway in a non-standard way, and it just means you’ll have to delete the one this page sets up.

Uploading the Code

  1. Upload ZIP File
  2. Set the handler to recorder.handler
  3. Click Save
  4. In the code editor, Add all the phone numbers who can make outgoing calls to the AUTHORISED_NUMBERS list (include +61 at the beginning)
  5. Click Test
  6. Set the event name to Incoming”

Set the payload to

{
  "path": "/incoming",
  "body": "Caller=%2B61400000000",
  "requestContext": {
    "stage": "default"
  }
}
  • Click Create
  • Click Test GIF of the Code uploading Process

Setting up the Web API Gateway

  1. Click Get Started
  2. Click New API
  3. Name the API Twilio Call Recorder
  4. Click Create API
  5. From the Actions menu, select Create Resource
  6. Check the Configure as Proxy Resource option
  7. Click Create Resource
  8. Start typing the name you gave the Lambda (twilioCallRecorder) – it should suggest the full name
  9. Click Save
  10. Click Ok
  11. Click Test
  12. Select Post in the Method drop down
  13. Select /incoming as path
  14. Set RequestBody to
Caller=%2B61400000000

replacing 61400000000 with one of the numbers in your allow list

  1. Click Test

If that all worked, you should see a success message.

Screen Captures of setting up the API gateway

Deploy the API Gateway

  1. From the Actions menu, select Deploy API
  2. Enter Default as the name
  3. Click Deploy Screen Captures of the Deployment

Copy the invoke URL. In a terminal (if you are on a Mac):

curl `pbpaste`/incoming -d "Caller=%2B61400000000"

Testing the endpoint in the command line

Congratulations! You have setup the API Gateway and Lambda correctly!

Setup Twilio

See the documentation around webhooks on the Twilio website – paste in the URL from the API gateway, and you are good to go.

Making a call

The part you have been waiting for! Pick up your phone, and dial the incoming number you setup at Twilio. If all is well, you should hear a lovely woman’s voice asking you the number you wish to dial. Enter the number, and hit the hash key. After a moment, the call will be connected!

Once you hang up, you can log in to the Twilio console, browse to the Programmable Voice section and click the Call log. You should see the call you made. Click on it and you will be able to download a WAV or MP3 version of the recording.

Now, you just need to download it (I chose the MP3, because it will be faster), and upload it to Rev.com. After a couple of hours, you will have a high quality transcription of your conversation. It’s really very easy!

Using openssl to encrypt development scripts that have secrets

I like having scripts that can pull production data down to development – the best kind of fake data is real data. Usually that involves taking a database dump and downloading any uploaded files. Unfortunately, that also means remembering long command line arguments, and dealing with credentials for both the database and the file server.

Up until now, I’ve kept a secure notepad of command line arguments with secrets in my password manager, but that doesn’t really scale if you want to be able to supply different arguments in different contexts (The number of times I’ve forgotten to change an argument…) – what I really wanted was a script that I could call that abstracted the nasty command line call with long arguments to a slightly less nasty command line call with shorter arguments. Ideally it could also be stored in source control so other could use it.

The app I’m currently working on has a little helper bash script that does common tasks, like bringing up docker, running bundler – things that cost me valuable keypresses – and I really wanted to add a sync from production script. And this is how I did it.

The bash script (let’s call it /bin/lazy.sh) is just a stupid set of functions and case statements:

command = $1

function run {
  local command = $1
  shift

  case $command in
    backend)
      docker-compose run backend $@
    ;;
    frontend)
      docker-compose run frontend $@
    ;;
}

case $command in
  run)
    run $@
  ;;
esac

This allows me to build up a nice little DSL of helper commands, meaning I don’t have to type so much.

$ lazy.sh run backend

Now, the fancy bit. Create another script, called lazy.secret (not stored in source control)

command = $1

function sync {
  local command = $1
  shift

  case $command in
    database)
      PGPASSWORD=supersecretpassword pgdump -h -h database-server.aaaaaa.ap-southeast-2.rds.amazonaws.com -d database_name -U username
    ;;
    uploads)
      AWS_ACCESS_KEY_ID=amazonaccesskey AWS_SECRET_ACCESS_KEY=longstringofrandomcharacters s3_get bucket
    ;;
}

case $command in
  sync)
    sync $@
  ;;
esac

And then encrypt it:

openssl enc -aes-256-cbc -salt -in lazy.secret -out /bin/lazy.encrypted

When this happens, openssl will ask you to provide a passcode to decrypt the file. The encrypted file that has the secrets can by stored in source control (it’s not readable without the passkey), and the passcode can be stored in your password manager.

If you want to be slightly more paranoid, delete lazy.secret – you can decrypt the file if you need to modify it.

openssl enc -aes-256-cbc -d -in $dir/lazy.encrypted -out lazy.secret

Of course, remembering the command line argument to decrypt the file is way too hard, so let’s get the original /bin/lazy.sh script do that for us (it will ask you for the passkey first):

command = $1

function sync {
  # This tells bash to look for the file in the same directory as the source script, not the current working dir
  dir="$( cd "$( dirname "${BASH_SOURCE[0]}" )" && pwd )"
  # Decrypt the file, and pipe it into bash. We need to supply /dev/stdin so the command line arguments passthrough.
  openssl enc -aes-256-cbc -d -in $dir/lazy.encrypted | /bin/bash /dev/stdin $@
}

function run {
  local command = $1
  shift

  case $command in
    backend)
      docker-compose run backend $@
    ;;
    frontend)
      docker-compose run frontend $@
    ;;
}

case $command in
  run)
    run $@
  ;;
  sync)
    sync $@
  ;;
esac

Kablamo!

$ /bin/lazy.sh sync database
enter aes-256-cbc decryption password:

Limitations

It’s not perfect, but it’s a nice simple way to share complicated scripts that require credentials with your team. Things to consider:

  1. Running ps while the script is running will expose all the secrets. But this also a problem when running the scripts by hand
  2. Everyone needs to know the passkey – Perhaps openssl has a way of having different keys unlock the same script? Let me know in comments
  3. If the key becomes exposed, your source control has a history that allows an attacker to decrypt and get the secrets at that point in time – in this case, just rotate all the credentials in the script, change the passkey and push. You should be doing this each time a team member arrives or leaves anyway.

Setting up Buildbox when you run your own Git server

I’ve been trying to get a CI server for 88 Miles sorted out for ages. I tried to cobble something together before, but lost interest trying to keep track of previous builds and Ruby environments and other stuff. Me being me, I run my own Git server, so many of the existing CI servers out there won’t work for me (They assume GitHub), and I don’t really feel comfortable sending out source on a private project to a third party server. I also have a VM in my office that runs various dev machines, so I have the hardware to do it. Well, it turns out that a buddy of mine has been building a CI server that is a perfect fit for my purposes! It’s called Buildbox, and it comprises of an agent that you run on your hardware that manages builds for you. This is roughly what I did to get it running.

The Build Server

I setup a VM running Gentoo, with 1Gb of RAM and two virtual CPUs. It is as close to my prod environment as I can get it, running RVM – this is important, as there is a bit of a trick to this. I also set up a specific user (called build), that will do the work. I initiate the Buildbox daemon using monit, so if it ever dies, it should get restarted automatically.

Note: I’ve omitted the Buildbox setup instructions – The website does a better job than I could.

The wrapper script

Because I’m running RVM, and because monit is fairly dumb in setting up bash environments, I wrote a small wrapper script that will start and stop the Buildbox executable:

#!/bin/bash
case $1 in
        start)
                if [[ -s "$HOME/.rvm/scripts/rvm" ]]; then
                        source "$HOME/.rvm/scripts/rvm"
                elif [[ -s "/usr/local/rvm/scripts/rvm" ]]; then
                        source "/usr/local/rvm/scripts/rvm"
                else
                        printf "ERROR: An RVM installation was not found.\n"
                        exit -1
                fi

                rvm use ruby-2.0.0-p247
                buildbox agent:start &
                echo $! > /var/run/buildbox/buildbox.pid
                ;;
        stop)
                kill `cat /var/run/buildbox/buildbox.pid`
                rm /var/run/buildbox/buildbox.pid
                ;;
        *)
                echo "Usage: buildbox-wrapper {start|stop}";;
esac
exit 0

If you call buildbox-wrapper start it sets up a RVM environment, then runs the buildbox agent and then saves the PID to /var/run/buildbox/buildbox.pid (Make sure the /var/run/buildbox directory is writable by the build user). Calling buildbox-wrapper stop reads the pid file and kills the agent.

The monit config

Add the following to your monitrc:

check process buildbox with pidfile /var/run/buildbox/buildbox.pid
        start program = "/bin/su - build /bin/bash --login -c '/home/build/scripts/buildbox-wrapper start'"
        stop program = "/bin/su - build /bin/bash --login -c '/home/build/scripts/buildbox-wrapper stop'"

This will change to the build user, then run the wrapper script.

My build script

You enter this into the code section of the web UI (I was a little confused by this – I didn’t realise it was editable!)

#!/bin/bash
set -e
set -x

if [ ! -d ".git" ]; then
  git clone "$BUILDBOX_REPO" . -q
fi

git clean -fd
git fetch -q
git checkout -qf "$BUILDBOX_COMMIT"

bundle install
bundle exec rake db:schema:load
bundle exec rake minitest:all

This is pretty much a cut and paste from the Buildbox website, except I run Minitest. I also tmp/screenshots/*/* and coverage/*/* to the artifacts section. Artifacts are get uploaded after a build is complete. I use them to upload my screenshots from all of my integration tests, as well as my coverage reports.

Git post-receive

This script belongs on your Git server in the hooks directory. Name is post-receive

#!/bin/bash

while read oldrev newrev ref
do
  branch=`echo $ref | cut -d/ -f3`
  author=`git log -1 HEAD --format="format:%an"`
  email=`git log -1 HEAD --format="format:%ae"`
  message=`git log -1 HEAD --format="format:%B"`

  echo "Pushing to Buildbox..."

  curl "https://api.buildbox.io/v1/projects/[username]/[projectname]/builds?api_key=[apikey]" \
          -s \
          -X POST \
          -F "commit=${newrev}" \
          -F "branch=${branch}" \
          -F "author[name]=${author}" \
          -F "author[email]=${email}" \
          -F "message=${message}"
  echo ""
done

Replace username, projectname and apikey with your own details. Make the file executable, and then push a change, and a build should start!

A quick and dirty way to ensure your cron tasks only run on one AWS server

88 Miles has a cron job that runs every hour that does a number of things, one of which is billing. I currently run two servers (Yay failover!), which makes ensuring the cron job only runs once problematic. The obvious solution is to only run cron on one server, but this is also problematic, as there is no guarantee that the server running cron hasn’t died and another spun up in it’s place. The proper sysops solution is to run heartbeat or some other high-availability software to monitor cron – if the currently running server dies, the secondary will take over.

While that is the correct solution that I may implement later, it’s also a pain to setup, and I needed something quick that I could implement now. So came up with a this lo-fi solution.

Each AWS instance has a instance_id with is unique (it’s a string that looks something like this: i-235d734c). By fetching all of the instance_ids of all the productions servers in my cluster, and then sorting them alphabetically, I’ll pick the first one, and run the cron job on that. This setup uses the AWS ruby library, and assumes that your cron job fires off a rake task, which is where this code lives.

So step one is go get the ip address of instance that the job is running on.

uri = URI.parse('http://169.254.169.254/latest/meta-data/local-ipv4')
ip_address = Net::HTTP.get_response(uri).body

That URL is some magic URL that when called from any AWS instance will return metadata about the server – in this case the local ip address (also unique).

Next, pull out all of the servers in the cluster.

servers = []
ec2 = AWS::EC2.new :access_key_id => '[YOUR ACCESS KEY]', :secret_access_key => '[YOUR SECRET KEY]'
ec2.instances.each do |instance|
    servers << instance if instance.tags['environment'] == 'production'
end
servers.compact!

I tag my servers by environment, so I want to filter them based on that tag. You might decided to tag them differently, or just assume all of your server can run cron jobs – that bit is left as an exercise for the reader. Replace [YOUR ACCESS KEY] and [YOUR SECRET KEY] with your access key and your secret key.

Now, sort the servers by instance id

servers.sort{ |x, y| x.instance_id <=> y.instance_id }

Finally, check to see if the first server’s local ip address matches the ip address of the server we are currently running on

if servers.first.private_ip_address == ip_address
    # Success! We are the first server - run that billing code!
end

See? Quick and dirty. There are a few things to keep in mind…

  • If a server with a lower instance_id gets booted just as the cron jobs are due to run, you might get a race condition. You would have to be pretty unlucky, but it’s a possibility.
  • There is no testing to see if the nominated server can actually perform the job – not a big deal for me, as the user will just get billed the next day. But you can probably work around this via business logic if it is critical for your system – crons fail, so you need a way to recover anyway…

As I said – quick and dirty, but effective!

Delivering fonts from Cloudfront to Firefox

I use both non-standard and custom icon fonts on 88 Miles, which need to be delivered to the browser in some way. Since all of the other assets are delivered via Amazon’s Content Delivery Network (CDN) Cloudfront, it would make sense to do the same for the fonts.

Except that didn’t work for Firefox and some version of Internet Explorer. Turns out they both consider fonts as an attack vector, and will refuse to consume them if they are being delivered via another domain (commonly know as a cross domain policy). On a regular server, this is quite easy to fix: You just set the:

Access-Control-Allow-Origin: *

HTTP header. The problem is, S3 doesn’t seem to support it (It supposedly supports CORS, but I couldn’t get it working properly). It turns out though, that you can selectively point Cloudfront at any server, so the simplest solution is to tell it to pull the fonts from a server I control that can supply the Access-Control-Allow-Origin header.

First, set up your server to supply the correct header. On Apache, it might look something like this (My fonts are in the /assets folder):

<Location /assets>
  Header set Access-Control-Allow-Origin "*"
</Location>

If you don’t use Apache, google it. Restart your server.

Next, log in to the AWS console and click on Cloudfront, and then click on the i icon next to the distribution that is serving up your assets.

Amazon Cloudfront settings

Next, click on Origins, and then Create Origin button.

In the Origin Domain Name field enter the base URL of your server. In the Origin ID field, enter a name that you’ll be able to recognise – you’ll need that for the next step.

Hit Create, and you should see the new origin.

New origin added

Now, click on the Behaviours tab, and click Create Behavior. (You’ll need to do this once for each font type that you have)

Enter the path to you fonts in Path pattern. You can use wildcards for the filename. So for woff files it might look something like:

Setting up the cache

Select the origin from the origin drop down. Hit Create and you are done!

To test it out, use curl:

> curl -I http://yourcloudfrontid.cloudfront.new/assets/fonts.woff

HTTP/1.1 200 OK
Content-Type: application/vnd.ms-fontobject
Content-Length: 10228
Connection: keep-alive
Accept-Ranges: bytes
Access-Control-Allow-Origin: *
Date: Mon, 16 Sep 2013 06:05:35 GMT
ETag: "30fb1-27f4-4e66f39d4165f"
Last-Modified: Sun, 15 Sep 2013 17:14:52 GMT
Server: Apache
Vary: Accept-Encoding
Via: 1.0 ed617e3cc5a406d1ebbf983d8433c4f6.cloudfront.net (CloudFront)
X-Cache: Miss from cloudfront
X-Amz-Cf-Id: ZFTMU-m781XXQ2uOw_9ukQGbBXuGKbjlVsilwW44IS2MvHbeBsLnXw==

The header is there. Success! Now, pop open your site in Firefox, and you should see all of your fonts being served up correctly.