@madpilot makes

I, for one, welcome our new screencasting overloads

Or, how I used robots to make my screencasts.

I don’t like screencasts. I don’t like watching them, and I hate making them.

However, I know a lot of people do like watching them, especially people that are trying evaluate software. It had been pointed out to me that there was no way to see the internals of 88 Miles without signing up (Personally, I would suggest signing up, but whatever). So I thought I’d investigate a way to make a screencast without wanting to stab myself in the face.

So why do I hate making them?

  1. If you change any part of the UI, you have to go through and re-record the whole thing. This becomes tedious. That said, having an out of date screencast is probably worse than having no screencast.
  2. Making typos during the recording looks unprofessional, so either you need to be perfect (not going to happen) or you need to spend ages editing out the typos (I’ve got better things to do).
  3. Not only do you have to write content, you have to record voice over audio and video. They are a lot of work.

I’ve spent a lot of time on the look and feel of 88 Miles, and I wasn’t going to produce a crappy screencast – it had to look professional. So I needed a way to automate as much of this as I could, so that I replicate the video easily.

After putting out a call to twitter, Max pointed me at a ruby gem called Castanaut that basically wraps AppleScript allowing the automation of both the screencasting software (in my case: iShowU) and Safari. Success! Sort of. There was a little bit of work to get it all working.

The first thing to do is install the gem:

gem install castanaut

I started out using the screenplay from Castanaut site, but had to make some changes to get it working. First of all, I don’t have Mousepos installed, so I removed that plugin.

Next, Castanaut seemed to miss clicks randomly, which was a pain. After a bit of digging it looks like it was the way that it was calling AppleScript. Rather than debugging that, I just installed cliclick which is a commandline app that control the mouse without AppleScript. I had to write a small plugin to override the move and click functions. (Save this to plugin/cliclick.rb)

module Castanaut
  module Plugin
    module Cliclick
      def click(btn = "left")
        `cliclick c:+0,+0`
      end

      def doubleclick(btn = "left")
        `cliclick dc:+0,+0`
      end

      def cursor(*options)
        options = combine_options(*options)
        apply_offset(options)
        @cursor_loc ||= {}
        @cursor_loc[:x] = options[:to][:left]
        @cursor_loc[:y] = options[:to][:top]

        `cliclick m:#{@cursor_loc[:x]},#{@cursor_loc[:y]}`
      end
    end
  end
end

Castanaut will use say (the built in speech synthesis software on a Mac) for timing voiceovers. You really don’t want to be using that in your final screencast, unless you are actually Stephen Hawking. To solve this problem, I wrote another plugin that automatically generates a subtitle file that, when run under VLC will display the text, allowing me to read along with the video

module Castanaut
  module Plugin
    module Subtitle
      def start_subtitles(filename)
        @filename = filename
        @start = Time.now
        @sequence = 1
        @srt = ''
        @webvtt = "WEBVTT\n\n"
      end

      def stop_subtitles
        @start = nil
        @sequence = 0
        File.write "#{@filename}.srt", @srt
        File.write "#{@filename}.vtt", @webvtt
        @srt = ''
        @webvtt = ''
      end

      def subtitle(narrative, &blk)
        start = Time.now - @start
        yield
        stop = Time.now - @start

        @srt += "#{@sequence}\n"
        @srt += "#{time_diff(start)} --> #{time_diff(stop)}\n"
        @srt += "#{narrative.scan(/\S.{0,40}\S(?=\s|$)|\S+/).join("\n")}\n"
        @srt += "\n"

        @webvtt += "#{time_diff(start).gsub(',', '.')} --> #{time_diff(stop).gsub(',', '.')}\n"
        @webvtt += "#{narrative.scan(/\S.{0,40}\S(?=\s|$)|\S+/).join("\n")}\n"
        @webvtt += "\n"

        @sequence += 1
      end

      def say_with_subtitles(narrative)
        subtitle narrative do
          say(narrative)
        end
      end

      def while_saying_with_subtitles(narrative, &blk)
        subtitle narrative do
          while_saying narrative, &blk
        end
      end

      protected
      def time_diff(time)
        micro = ((time.to_f - time.to_i) * 1000).floor
        seconds = (time.abs % 60).floor
        minute = (time.abs / 60 % 60).floor
        hour = (time.abs / 3600).floor
        (time != 0 && (time / time.abs) == -1 ? "-" : "") + hour.to_s.rjust(2, '0') + ":" + minute.to_s.rjust(2, '0') + ":" + seconds.to_s.rjust(2, '0') + ',' + micro.to_s
      end
    end
  end
end

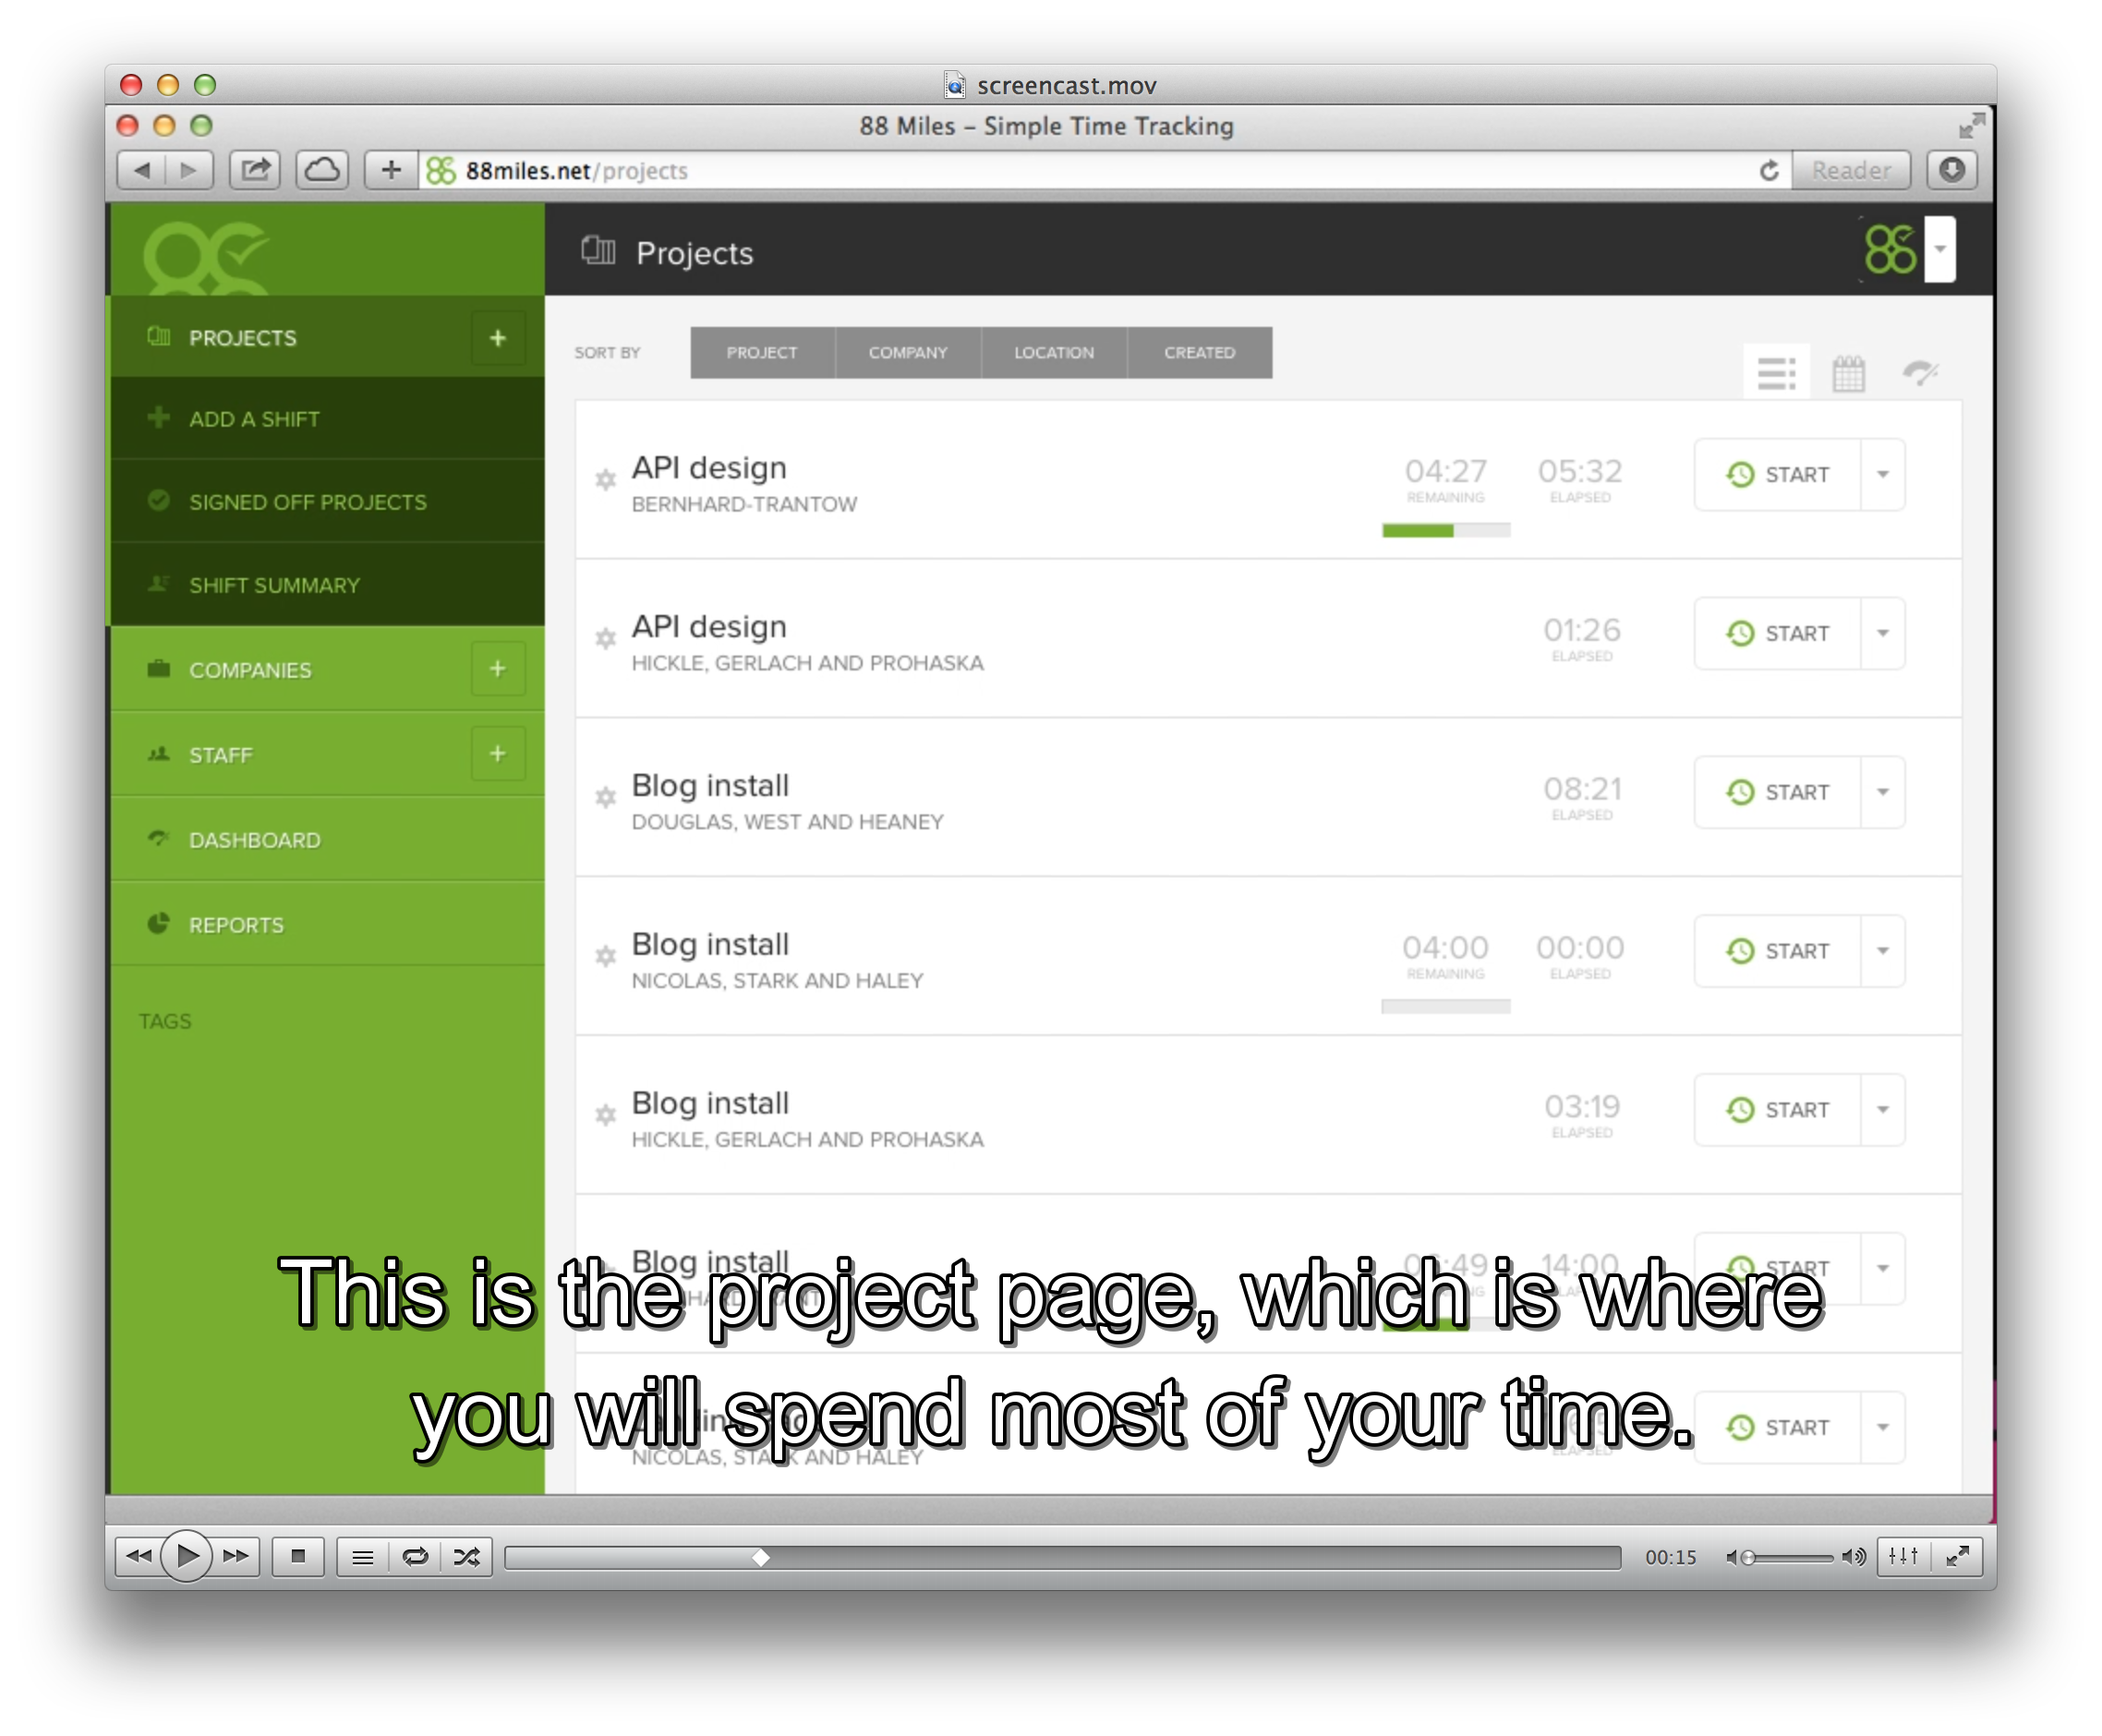
This will create both a SRT and VTT (Web subtitle) file. Here is a screen shot of the subtitle overlayed on to the video:

Showing the subtitles overlayed in VLC

Here is an excerpt from my screenplay file:

#!/usr/bin/env castanaut
plugin "safari"
plugin "keystack"
plugin "cliclick"
plugin "subtitle"
plugin "ishowu"
plugin "sayfast"

launch "Safari", at(120, 120, 1024, 768)
url "http://88miles.net/projects"
pause 5

ishowu_start_recording
start_subtitles "/Users/myles/Movies/iShowU/tour"
pause 1
say_with_subtitles "Hi, my name is Myles Eftos, and I'm the creator of Eighty Eight Miles"
say_with_subtitles "a time tracking application for designers, developers and copywriters."
say_with_subtitles "This short video will show you how Eighty Eight Miles tracks your time"

Oh, one last thing – I found the synthesised voice was too slow, so I made another plugin that speeds up the voice (saved in plugins/sayfast.rb):

module Castanaut
  module Plugin
    module Sayfast
      def say(narrative)
        run(%Q`say -r 240 "#{escape_dq(narrative)}"`)  unless ENV['SHHH']
      end
    end
  end
end

I recorded the voice over using Audacity. I wasn’t too fussed about an exact sync, so I just hit record on Audacity, and play in VLC. If you are worried about sync, just make a noise into the microphone when hit click (tapping the mic will do it), and you can use that as a sync mark.

Protip: Don’t use the built in microphone on your laptop, unless you are going for the “I’m recording this in a toilet” aesthetic. Ideally, you’d have a decent studio mic with a pop filter (I have a Samson C01U), but you know what? A gaming headset mic will still be orders of magnitude better than your laptop microphone.

Now, you should have a MP4 and WAV file (one for video, one for audio) than need to get mashed together. I use Adobe Premier Pro for this, but iMovie works great too. You will need to remove the existing audio track from the video file as it will have the robot voice on it, replacing it with your voice over track.

Finally, I topped-and-tailed the video with some titles for that last bit of fancy.

After exporting the final render, I used FFMPEG to encode the file into a final MP4 and WEBM file so I could drop them into a video tag. To install ffmpeg:

brew install ffmpeg --with-libvpx --with-libvorbis --with-fdk-aacc

Then run the following commands

ffmpeg -i [input file] -crf 10 -b:v 1M -c:a libfaac screencast.mp4
ffmpeg -i [input file] -c:v libvpx -crf 10 -b:v 1M -c:a libvorbis screencast.webm

You can upload those files somewhere, then reference them in like so:

<video autoplay class="tour" controls height="768" preload="auto" width="1024">
  <source src="/videos/screencast.mp4" type="video/mp4"></source>
  <source src="/videos/screencast.webm" type="video/webm"></source>
  <track default kind="captions" label="English" src="/videos/screencast.vtt" srclang="en"></track>
</video>

Want to see the output? Here is the final render embedded on the internets.

Delivering fonts from Cloudfront to Firefox

I use both non-standard and custom icon fonts on 88 Miles, which need to be delivered to the browser in some way. Since all of the other assets are delivered via Amazon’s Content Delivery Network (CDN) Cloudfront, it would make sense to do the same for the fonts.

Except that didn’t work for Firefox and some version of Internet Explorer. Turns out they both consider fonts as an attack vector, and will refuse to consume them if they are being delivered via another domain (commonly know as a cross domain policy). On a regular server, this is quite easy to fix: You just set the:

Access-Control-Allow-Origin: *

HTTP header. The problem is, S3 doesn’t seem to support it (It supposedly supports CORS, but I couldn’t get it working properly). It turns out though, that you can selectively point Cloudfront at any server, so the simplest solution is to tell it to pull the fonts from a server I control that can supply the Access-Control-Allow-Origin header.

First, set up your server to supply the correct header. On Apache, it might look something like this (My fonts are in the /assets folder):

<Location /assets>
  Header set Access-Control-Allow-Origin "*"
</Location>

If you don’t use Apache, google it. Restart your server.

Next, log in to the AWS console and click on Cloudfront, and then click on the i icon next to the distribution that is serving up your assets.

Amazon Cloudfront settings

Next, click on Origins, and then Create Origin button.

In the Origin Domain Name field enter the base URL of your server. In the Origin ID field, enter a name that you’ll be able to recognise – you’ll need that for the next step.

Hit Create, and you should see the new origin.

New origin added

Now, click on the Behaviours tab, and click Create Behavior. (You’ll need to do this once for each font type that you have)

Enter the path to you fonts in Path pattern. You can use wildcards for the filename. So for woff files it might look something like:

Setting up the cache

Select the origin from the origin drop down. Hit Create and you are done!

To test it out, use curl:

> curl -I http://yourcloudfrontid.cloudfront.new/assets/fonts.woff

HTTP/1.1 200 OK
Content-Type: application/vnd.ms-fontobject
Content-Length: 10228
Connection: keep-alive
Accept-Ranges: bytes
Access-Control-Allow-Origin: *
Date: Mon, 16 Sep 2013 06:05:35 GMT
ETag: "30fb1-27f4-4e66f39d4165f"
Last-Modified: Sun, 15 Sep 2013 17:14:52 GMT
Server: Apache
Vary: Accept-Encoding
Via: 1.0 ed617e3cc5a406d1ebbf983d8433c4f6.cloudfront.net (CloudFront)
X-Cache: Miss from cloudfront
X-Amz-Cf-Id: ZFTMU-m781XXQ2uOw_9ukQGbBXuGKbjlVsilwW44IS2MvHbeBsLnXw==

The header is there. Success! Now, pop open your site in Firefox, and you should see all of your fonts being served up correctly.

Using Selenium to generate screenshots for support documents

I’ve just been working on some support documentation for 88 Miles, and I wanted to include some screenshots. Since I’m lazy, and hate having to repeat tasks, I decided to use Selenium and Capybara to generate all the screenshots for me. Using robots means I can re-generate all my screenshots quickly, so I’m more likely to do it if I change the UI. I covered using PhantomJS for generating screenshots before, but I’m using Selenium for this to make sure a real browser is used, just in case there are any rendering differences (which there usually is).

Again, this guide is for OSX. I’m also using Chrome, rather than the default Firefox as the webdriver.

First, install the selenium server

brew install selenium-server-standalone

and start the server up

java -jar /usr/local/opt/selenium-server-standalone/selenium-server-standalone-2.35.0.jar -p 4444

Next, download the chrome webdriver from google code, unzip it and copy the chromedriver executable to /usr/local/bin

Add the selenium-webdriver gem to your Gemfile in the test section

group :test do
    gem "selenium-webdriver"
end

Edit your test/test_helper.rb and create a new driver for chrome (put this after you require capybara)

require 'capybara/rails'

Capybara.register_driver :chrome do |app|
  Capybara::Selenium::Driver.new(app, :browser =&gt; :chrome)
end

Finally, create a new test that will generate the screenshots. I created a directory for the tests, and a directory for the screen shots to be saved to

mkdir test/support
mkdir app/assets/images/support

Now you can create a integration test file, and watch as a browser opens an starts replaying all the actions!

require File.expand_path(File.join(File.dirname(__FILE__), '..', 'test_helper'))

module Support
  class ReportsControllertest &lt; ActionDispatch::IntegrationTest
    self.use_transactional_fixtures = false

    setup do
      Capybara.default_driver = :chrome
      Capybara.javascript_driver = :chrome
    end

    teardown do
      Capybara.use_default_driver
    end

    test 'generate screenshots' do
      visit '/login'
      save_screenshot(Rails.root.join('app', 'assets', 'images', 'support', 'login.png'))
    end
  end
end

To run just this test (it’s slow, so you probably don’t want to automatically run it using guard):

bundle exec ruby -I"lib:test" test/support/reports_controller_test.rb

You can see (a beta) example on the 88 Miles beta website.

Track email opens using a pixel tracker from Rails

If you are sending out emails to you customers from your web app, it pretty handy to know if they are opening them. If you have ever sent out an email newsletter from a service like Campaign Monitor, you would have seen email open graphs. Of course, tracking this stuff is super important for a newsletter campaign, but it would also be interesting to see if users are opening, for example, welcome emails or onboarding emails.

The simplest way to do this is via a tracking pixel – a small, invisible image that is loaded off your server every time the email is opened (See caveat below). This is fairly simple to achieve using Rails by building a simple Rack application.

Caveat

This only works for HTML emails (unless you can work out how to embed an image in a plain text email), and relies on the user having “Load images” turned on. Clearly, this isn’t super accurate, but it should give you a decent estimate.

The Setup

We’ll add two models: One to tracking sending email, and one to track opening of email:

rails generate model sent_email
rails generate model sent_email_open

The schema for these are fairly simple: Save a name to identify the email, the email address it was sent to, an ip address and when the email was sent and opened.

class CreateSentEmails < ActiveRecord::Migration
  def change
    create_table :sent_emails do |t|
      t.string :name
      t.string :email
      t.datetime :sent
      t.timestamps
    end
  end
end
class CreateSentEmailOpens < ActiveRecord::Migration
  def change
    create_table :sent_email_opens do |t|
      t.string :name
      t.string :email
      t.string :ip_address
      t.string :opened
      t.timestamps
    end
  end
end
class SentEmail < ActiveRecord::Base
  attr_accessible :name, :email, :sent
end
class SentEmailOpen < ActiveRecord::Base
  attr_accessible :name, :email, :ip_address, :opened
end

With the models setup, let’s add a mail helper that will generate the image pixel – create this is /app/helpers/mailer_helper.rb

module MailerHelper
  def track(name, email)
    SentEmail.create!(:name =d> name, :email =d> email, :sent =d> DateTime.now)
    url = "#{root_path(:only_path =d> false)}email/track/#{Base64.encode64("name=#{name}&email=#{email}")}.png"
    raw("<img src=\"#{url}\" alt="" width=\"1\" height=\"1\"d>")
  end
end

What this does is give our mailers a method called track that takes a name for the email and the email address of the person we are sending it to. To enable it, call the helper method in the mailers you want to track:

class UserMailer < ActionMailer::Base
  helper :mailer
end

Now we can add the tracker to our html emails. Say we have a registration email that goes out, and there is a user variable, with an email attribute:

<!-- Snip --d>
<%= track('register', @user.email) %d>
<!-- Snip --d>

Right, now the magic bit:

Create a directory called /lib/email_tracker and create a new file called rack.rb

module EmailTracker
  class Rack
    def initialize(app)
      @app = app
    end

    def call(env)
      req = ::Rack::Request.new(env)

      if req.path_info =~ /^\/email\/track\/(.+).png/
        details = Base64.decode64(Regexp.last_match[1])
        name = nil
        email = nil

        details.split('&').each do |kv|
          (key, value) = kv.split('=')
          case(key)
          when('name')
            name = value
          when('email')
            email = value
          end
        end

        if name && email
          SentEmailOpen.create!({
            :name =d> name,
            :email =d> email,
            :ip_address =d> req.ip,
            :opened =d> DateTime.now
          })
        end

        [ 200, { 'Content-Type' =d> 'image/png' }, [ File.read(File.join(File.dirname(__FILE__), 'track.png')) ] ]
      else
        @app.call(env)
      end
    end
  end
end

Create a 1×1 pixel transparent PNG and save it as track.png and place it in the same directory. Next, include it in your config/application.rb

module App
    class Application < Rails::Application
        require Rails.root.join('lib', 'email_tracker', 'rack')
        # Some other stuff
        config.middleware.use EmailTracker::Rack
    end
end

And that’s it! Now, every time the email gets sent out, it will create a record in the send_emails table, and if it is opened (and images are turned on) it will create a record in send_email_opens. Doing up a status board is left up as an exercise to the user, but you can check you percentage open rate by doing something like:

(SentEmailOpen.where(:name =d> 'register').count.to_f / SentEmail.where(:name =d> 'register').to_f) * 100

How it works

It’s super simple. The track method generates a Base64 encoded string that stores the name of the email and the email address it is being sent to. It them returns an image URL that can be embedded in the email. The Rack app looks for a URL that looks like /track/email/[encodedstring].png and if it matches records the hit. It then returns a transparent PNG to keep the email client happy.

I might get around to turning this into a gem if there is enough interest.

Testing UI with Integration tests in Rails with phantomjs

Computers aren’t very good at testing visual changes on websites. Sure you can test the differences between two images, but image changes are really brittle. However, humans are pretty good at it. As a result, the common way to test visuals it to actually click through stuff on a browser. This doesn’t scale. For one, if your UI changes based on different initial states, it can take ages to set this stuff up.

Thankfully there is a fairly simple solution.

Rails integration tests can control with a number of browsers using Capybara and a automation system like Selenium or PhantomJS. If you haven’t heard of these, Selenium automates real browsers, and PhantomJS is a headless webkit browser. Both support modern CSS and JavaScript, so it’s like having a 1000 monkeys on a 1000 UNIX terminals. It just so happens that both also support taking screenshots, which we can use as a poor-man’s Mechanical Turk.

Aside: There is another solution: Using something like BrowserStack, although because it works remotely, it might make setting up the testing environment between tests difficult. I’ll look at this later in another blog post once I get a chance to play with it.

There are pros and cons to both systems:

Selenium

Pro: Can control basically any browser that it has a driver for – including Android and iPhones.
Con: It requires Java and a computer with all of those browsers and emulators installed. It’s also the slower of the two.

PhantomJS

Pro: Is headless, so doesn’t require X windows, or any other window manager.
Con: It’s WebKit only.

I’ll go through setting up PhantomJS on OSX, because that’s what I’ve set up so far; I’ll leave setting up Selenium as an exercise for the reader – the theory should be the same.

First, you need to install PhantomJS. On OSX, it’s just a matter of using homebrew

brew install phantomjs

Next, add the poltergeist gem (which is an interface to PhantomJS. It will also install Capybara)

group :test do
    gem "poltergeist", "~&gt; 1.3.0"
end

Add the following to your test/test_helper.js

require 'capybara/rails'
require 'capybara/poltergeist'

Capybara.default_driver = :poltergeist
Capybara.javascript_driver = :poltergeist

class ActionDispatch::IntegrationTest
  include Capybara::DSL

  setup do
    Capybara.reset!
  end

  teardown do
    Capybara.reset!
  end
end

Finally, generate a integration test

rails generate integration_test name_of_the_test

Open up the Integration test and create a test

require 'test_helper'

class NameOfTheTestIntegrationTest &lt; ActionDispatch::IntegrationTest
    # Don't forget this line - Database transactions don't work well with Capybara
    self.use_transactional_fixtures = false

    test 'some test name' do
      visit '/'
      # This is the important line. This is what saves the screenshot
      save_screenshot(Rails.root.join('tmp', 'screenshots', 'name_of_the_integration', 'some-test-name.png'))
    end
end

Run the integration test, and you will find a nice 1024×768 PNG screen shot in the tmp/screenshots/name_of_the_integration/some-test-name.png directory.

So, after your tests run, you can scan through the screen shots and see if anything looks weird. Win!

For a more in-depth instructions for running tests in Capybara, checkout their GitHub page.

Time to learn Ruby on Rails!

I like Rails. A lot. And you should too – it makes build web stuff fun, and faster. It’s poetry when compared to PHP. Not to mention there is some smart nerds doing work on it, and it has one of the most vibrant and passionate communities around. Unfortunately, the learning curve can be significant, especially if you are learning Ruby at the same time. Me to the rescue!

The guys behind Sitepoint have just launched a new site: Learnable, which is an online training centre, where people not only go to learn stuff, but they can teach stuff too! They ask me to create a Ruby on Rails 3 course for their launch, and it just went live today!

The course is 12 lessons, and covers enough stuff to build a real app – a code snippet library (A bit like pastie or github gists). I’ll be maning the course forums and answering any questions you have, and will appear online via video link up for some live Q&A sessions in the next couple of weeks.

If you are still using PHP, or have been meaning to learn Rails for a while, then go and sign up – it’s only $19.95 (Bargin!).

The only real pre-requisite is a basic grasp of programming – if you understand if statements, for loops and variables, you should be fine. Serious. Go now. It’s awesome. But don’t just believe me, listen to this talking headshot video of me:

https://learnable.com/courses/learning-rails-3-212

Rails Training is starting a week later

Due to a scheduling clash with us and the State government (There was a public holiday we forgot about), the start of Rails Training 1 has been pushed back a week. It now starts on Monday 8th and Thursday 11th respectively.

There are still spots left! Go and register. I’ll wait.

Learn Ruby on Rails

Alex Pooley (from Brown Beagle Software, and fellow 220er and Rails guy) are running some Ruby on Rails training sessions in March.

It will be an intensive primer designed to get web developers who work in PHP, or .Net up-to-speed in Rails in about four classes. We will cover Ruby, Rails and unit testing as well as deployment.

The classes cost $220, with one stream running on Monday 1st-22nd March 2010 and the other Thursday 4th-25th March 2010. So if you have been meaning to look at Rails, but haven’t had the time, then this could be perfect for you!

Head over to  http://railstraining.in and sign up!

Introducing meftos.com

I’ve been pretty busy lately, and haven’t had anytime for some good old fashioned hacking. I’ve also been copping some flack for letting my ruby-fu lapse (it seems a lot can happen in three months. Actually a lot happens in three minutes), so I decided to clear a couple of hours last weekend to have a play with GitHub, haml and sass, and just to generally get friendly with ruby again.

I recently read a couple of articles about the doom and gloom around URL shorteners and how if a couple of the big ones collapsed the entire intergoop would fall on it’s face. Whilst that is a little bit of an over exaggeration, there is some food for thought in that statement. I was also reading about the collapse of magnolia (I know – old news. Sue me). Many an innocent bystander lost many months or years of bookmarking just because one site went down. Whilst I’m a fan of the cloud, I’m also a bit of a control freak, so this was a little scary.

I’ve been using del.icio.us for a while, but only for the bookmarking facilities, not the social part. And even though Yahoo probably won’t go broke any time soon, I was wondering what would happen if they decided to close the big bookmarker in the sky down. So meftos.com was born.

meftos.com is a personal bookmarker and url shortener built in Rails. It only has one user (you), and you host it yourself. From a URL shortening point of view, there is no one point of failure – sure if a number of individuals remove their servers, you will have some broken links, but that if far less impact than one mega site bombing.

If you have a server that can run Rails, you too can install your own copy – feel free to skin it, and change it’s same. All of the source code is on GitHub, and I’m told you can nearly use it out of the box on Heroku. Play around, feel free to kick the tyres. There is still some stuff to do – namely search, better user management (There is no simple user management gems in Ruby any more – I’ll probably have to write my own) and some other bits and pieces, but it seems to work ok.

More importantly, I got a little glimpse again of why coding makes me happy. That should keep me warm on those cold, winter nights…

Eway Rebill and Managed Payments for ActiveMerchant

If you are an Australian Rails developer and have had to deal with online payments, chances are you’ve dealt with Eway. ActiveMerchant has supported Eway for single transactions for a while, but if you have had to deal with rebilling, you may have been at a loss.

I’ve just forked ActiveMerchant and added support for the new Eway Rebill and Managed Payments SOAP API (Obviously, you’ll need soap4r). It’s on github. Very sparse instructions are here. The Rebill API might still need some work, as I ended up concentrating on the Managed Payments API, as that is actually more flexible.

Some background: When using the Rebill API, you tell Eway who you are billing, and when to bill them, and it takes care of the rest. The Managed Payments API on the other hand has Eway storing the users credit card details, and when you need to charge the client, you send a request via the API.

The problem I see with the Rebill API is there is no easy way to check if a payment has failed, other than pulling out ALL the past transactions and checking, where as Managed Payments will give you an immediate response, at the expense of having to maintain your own scheduled task/cron job.

Let me know if it works for you!

Next