@madpilot makes

Introducing meftos.com

I’ve been pretty busy lately, and haven’t had anytime for some good old fashioned hacking. I’ve also been copping some flack for letting my ruby-fu lapse (it seems a lot can happen in three months. Actually a lot happens in three minutes), so I decided to clear a couple of hours last weekend to have a play with GitHub, haml and sass, and just to generally get friendly with ruby again.

I recently read a couple of articles about the doom and gloom around URL shorteners and how if a couple of the big ones collapsed the entire intergoop would fall on it’s face. Whilst that is a little bit of an over exaggeration, there is some food for thought in that statement. I was also reading about the collapse of magnolia (I know – old news. Sue me). Many an innocent bystander lost many months or years of bookmarking just because one site went down. Whilst I’m a fan of the cloud, I’m also a bit of a control freak, so this was a little scary.

I’ve been using del.icio.us for a while, but only for the bookmarking facilities, not the social part. And even though Yahoo probably won’t go broke any time soon, I was wondering what would happen if they decided to close the big bookmarker in the sky down. So meftos.com was born.

meftos.com is a personal bookmarker and url shortener built in Rails. It only has one user (you), and you host it yourself. From a URL shortening point of view, there is no one point of failure – sure if a number of individuals remove their servers, you will have some broken links, but that if far less impact than one mega site bombing.

If you have a server that can run Rails, you too can install your own copy – feel free to skin it, and change it’s same. All of the source code is on GitHub, and I’m told you can nearly use it out of the box on Heroku. Play around, feel free to kick the tyres. There is still some stuff to do – namely search, better user management (There is no simple user management gems in Ruby any more – I’ll probably have to write my own) and some other bits and pieces, but it seems to work ok.

More importantly, I got a little glimpse again of why coding makes me happy. That should keep me warm on those cold, winter nights…

A recipe for server migration

As any website grows, we often find ourselves having to move servers to deal with capacity, or better prices or whatever. This can be a right pain to do, but with a little planning and a few tricks, you can make the process somewhat smoother. In this quick howto, I’ll cover how to move a typical web setup: Web server, DNS, Mail and database. Of course there are more than one way to skin a cat, but this method works quite well if you have a couple of days up your sleeve and has the advantage of only costing you a few minutes in downtime. In this example, we will pretend to move http://www.mycoolwebapp.com from the IP address 192.168.0.1 to the new IP address of 10.0.0.1 (Fake web host, and fake, local IP addresses – substitute with real values).

Step 1. Move your DNS

DNS can be the most painful step, as it can take up to 72 hours to move from one primary DNS server to another. In a nutshell, DNS acts like a big phone book, which tells your browser that http://www.mycoolwebapp.com belongs to the IP address 192.168.0.1. When you enter http://www.mycoolwebapp.com in to your browser, it will ask the operating system for the IP address. If the Operating system has it cached, it will return it. If the cached value looks old (ie the TTL has expired), or it doesn’t know about it it will ask a parent DNS server (or root server) where it can find the updated records, and will then fetch the new records from the relevant DNS server. The TTL is usually set pretty high – in the range of days, as generally Name-to-IP address mappings don’t change much, but if you do change, there means there could be a couple of days before all the servers around the world are updated, meaning your site won’t be found during that time!

Most users don’t have control of the Time-to-live (TTL) value on the root servers, so you need to ensure that both your old primary DNS server, and your new primary DNS server mirror each other. This way, regardless of whether the user get old information or new information, they will still be directed to the same information.

Most users WILL have control of the TTL on their own servers, so we can set that to something small which will make switch over much easier. Make note of the TTL on your old DNS server – you will need to wait that long after changes things before you can switch over to your new server. Setup your new DNS server to point to the old server (192.168.0.1) – ensure that all of the values are exactly the same. Now, on both servers, set the TTL to something very small, say 10 minutes (which is 600 seconds).

As this can take a couple of days to for the root DNS changes to propagate, you may as well change the root DNS details now. This will usually done via the domain registrars control panel. Simply change the primary and secondary DNS server IPs from the old DNS servers to the new ones (192.168.0.1 to 10.0.0.1 in this example). Make sure you double check all the values, because if you make a mistake it can take days to rectify!

Step 2. Setup the new webserver

Now that the DNS is setup and in the process of re-delegating, you can setup website on the new server for final acceptance testing. This is usually the easiest part of the process. What I do here is deploy the current software to the new server, take a snapshot of the database (phpmyadmin helps here if you are on MySQL, but each database system has a mechanism for backing up the database) and copy over any uploaded files etc. Now, most shared hosts will use virtual hosts, which means it serves up different pages based on the domainname, not the IP address, and if your software relies on the domain name for functionality, it can be really hard to test all the functionality with out the having the name-to-IP address mapping in place (remember, at this point http://www.mycoolwebapp.com is still pointing to 192.168.0.1).

Hosts file to the rescue! You might not know this, but all the major operating systems have a “hosts” file, which is checked before a DNS check is made, so if the operating system finds the requested domain name in that file, it won’t even bother querying the DNS server. By associating the new server IP address with the domain name in this file, we can actually view what is going on on the new server (Just don’t forget to delete the entry when you are done!). Windows users can find the file in c:windowssystem32driversetchosts, and Linux (and I’m pretty sure OSX users) can find it in /etc/hosts. There is usually examples in the files, so it’s best to follow those, but I know these values work for Windows and linux:

10.0.0.1    www.mycoolwebapp.com

You may need to restart your browser for the change to take effect. Now if you go to http://www.mycoolwebapp.com you will be taken to the new server allowing you to set it up and check everything is working properly with out affecting the currently live version.

Step 3: Setup mail

Email can be pretty painful to setup, and is one of those things that will get you in a lot of trouble if you stuff it up. First off all you need to know all of the email addresses associated with the domain. If your hosting provider uses a web admin control panel like Plesk, this is usually pretty easy. Mirror all of the accounts on the new server, and make sure all of the quotas are either equal to or greater than the current values. If you need to setup new passwords for all of the accounts, note them down, as you will need to notify each user of their new password. Don’t forget to check for things like aliases and forwards.

Step 4: Check and double check

Make sure you note down any other bits and pieces that may have been setup, like cronjobs, other services and make sure that things like mail contact forms etc actually work. There is a trick here for young players with email forms – the resulting email may go to the new server, not the old one, so if you test a contact for and no email appears, check the new server.

Step 5: The big move

The way I usually play this is to replace the website on the old server with a “We are down for maintenance” page. This has the advantage of ensuring no one posts any new information whilst the the site is in flux and also gives you a visual confirmation that things worked. If your server can use .htaccess file, this is pretty easy using a rewrite directive. If the framework you use has friendly URLS, there will probably already be a .htaccess file that tells the server to rewrite the URLS to file – this is the simplest solution – just create a maintenance.html file and change the rewrite to look like this:

RewriteCond %{REQUEST_FILENAME} !-f
RewriteRule ^(.*)$ maintenance.html [QSA,L]

This allows you to still access CSS, images and JS files, so you can style the maintenance page, but any request to a file that doesn’t really exists will get piped through to the maintenance.html file.

If .htaccess isn’t an option or you have a lot of static file, you might have to do the old fashioned “move the current site root and replace with a new one” trick (There are rewrite rules you can do, but this just might be easier). Create a new directory that has the maintenance file (You would probably have to call it index.html in this instance) and put any associated images, CSS and JS files. Then move the current site root (for example public_html) to say, public_html.old and then move the new directory to replace the old one (ie public_html). When you view the site on the old server (you might need to remove the entry in the hosts file to see it) you should now see the maintenance message.

Next, re-sync the database and any new uploaded files and give the new server a final test (by putting the hosts file entry back in). Once you are happy everything is working, we can flick the DNS over.

Step 6. Flicking the DNS

On both the old and new server, change the IP addresses for all of the relevant entries from the old IP address to the new one. Within 10 minutes, everyone should be seeing the new server’s version of the site! This also means that all of the email will be heading to the new server to, so…

Step 7. Re-configure mail clients and syncing up folders

If you configured new passwords for all of the mail clients, they will need to enter the new password into their mail clients. I generally walk them through creating a NEW mail account on their clients – the reason for this will be revealed in a second.

If they have been using POP in the past, then they will probably already have local copies of their email, so your job here is done. However, if they are using IMAP (probably more likely now) you will need to sync up the two accounts. There are tools out there that can do it, but you will need to know the passwords on both servers, and they can be a bit hit and miss – thankfully you can use the users mail client to do the sync.

Simply create a new account on their mail client that points at the new server, and change the old account to point to the IP address of the old server. If done correctly, the user should now be able to access their old email and folders as well as any new email on the new server. Most mail clients will actually allow you to drag folders across servers – do that and your email will be synced up! (It might take a while, if they have a lot of archived mail). After that is done, you can delete the old account and set the new account to default.

Step 8. Shutdown the old server

The final task is to shutdown the old server. I usually leave it running for a week to be on the safe side, mainly to recover any email that the user forgot to move across (It ALWAYS happens).

Step 9. Do and get a drink

You deserve it – it’s probably been a big week!

I hope that this made sense, or at least acts as a resource when you try to explain to a client why it can take a week to move servers! Of course, these instructions are pretty general, so your mileage may vary. Golden rule is don’t rush and double check everything!
Hot or Not

Call it lazy blogging, but the beginning of a new year is a perfect opportunity to write a list post. I’m not going to call the list below predictions for 2008 as there is absolutely no scientific basis for any of this, so I’m calling it Hot or Not – stuff that I think/want to be hot in 2008 and stuff that I would love to see head to the big TCP/IP stack in the sky.

OAuth: Hot. Anything that brings some sort of order to the big bad world of web APIs is a good thing. If you haven’t seen it yet, it is a specification that describes a method for token-based access to third party applications. So now there is really no excuse for that confounding social network to ask for your usernames and passwords to all of your other confounding social networking sites, just so it can spam have access to all of your friends.

Confounding Social Network sites: Not. OK. That is enough. I am over been bamboozed at the sight of another social network that has no direction, meaning or business model. The concept behind a social network is cool – we used to call them forums, remember – but it is now officially out of control. To the “entrepreneurs” behind them – stop trying to kill Facebook, they have more money than you and careless less about their users than you ever could (Exception: Spock – You are still Satan’s spawn).

Software as a Service: Hot. It’s kinda like Web2.0 but this time with meaning. Bring back computing to what it was meant for – helping humans to do what they do. The web is the perfect delivery method for a lot of the desktop software we use everyday. Google has already shown us what can be done with apps like GMail and Google Docs and there is a myriad of web applications that have made the leap (If I can build one, anyone can). Pay for what you use, don’t worry about license fees any more, don’t worry about what happens when you hard drive crashes, or about deploying to all 500 machines in your organisation.

Advertising as a Business Mode: Not. The darling child of Web2.0/New Media/Social Networks. Unless your site is already doing the traffic of Google/YouTube/Facebook or your are a porn site, go and erase the “we will pay for our hosting via advertising” line from you business plan. Seconds thoughts, if you are Facebook, you should probably do the same (Nice work on beacon – at what point did that actually seem like a good idea?). Advertising only works if there is eyeballs a LOT of eyeballs on pages and if your target audience is the type that clicks on ads. And since every man and his dog has released a social network this week, you aren’t a unique snowflake. Get a real business plan first.

Mashups: Hot. Yeah, I know – these have been around since the first beta of Web 2.0 but it has never really extended much beyond adding a Google Map to your site. I think 2008 and will see some really cool productivity apps built leveraging the webservices of other web sites. I think that it may even spill over in to the corporate world – I’d love to see company intranets using webservices to customise workflows.

Getting VC funding then hoping to sell to : Not. Now, I have no problem with the concept of funding, or the hopes and dreams of having a large company with a bank balanace bigger than your phone number (including country and area code) throw you some bones, per se. Where I do draw the line, however is pitching with a business plan that can’t really pay back a return to the investor unless the business get bought out. Mind you, the investors really should know better – or maybe they are just much smarter than I am, who knows. Regardless, when this whole thing collapses in on it’s self, I’ll be dancing like it is on sale for $19.99…

Mobile: Hot. This is the next frontier for the web. Everyone has a mobile (some people two or three) and they are generally on their person at all times. Extend the SaaS idea to these small devices and you really will be able to get your stuff done when it suits. Again, this isn’t new, but there have been some advancements in technology and some new players who understand the web much better (that’s Google if you were wondering). I think 2008 is the year that see the mobile platform as a first-class netizen rather than something that the work experience kid gets to work on.

Using user data with out permission: Not: You would have by now seen my (MANY) rants about Spock and Facebook. Those playing in the dirty, back alleyways of social networking really need to take a long hard look at themselves. It’s my data, and I’d prefer it if you didn’t sell my browsing habits to the highest bigger. And don’t even think about scraping my data from other sites without my permission – they asked nicely, you didn’t.

Company-as-a-Service: Hot. Haven’t heard of this? That’s because I just made it up. We have seen Software-as-a-Service, Hardware-as-a-Service (eg Amazon EC2), so why not have have companies that can shrink, grow and churn as required? There are so many freelancers and consultants out there, as well as a huge number of micro businesses. If they all grouped together, they would be able to work on sites ranging from the very-very big to the very-very small. Many places kind of do this already (this is why contracting was invented) but I can see this working in a more peer-to-peer sort of way – you aren’t contracting for someone, you are contracting with someone (there is a remarkable difference).

New years lists: Not.

Leave a comment – Is this Hot or Not ;)

Freelancing 101 – Seven tips for managing your accounts

I’ve been freelancing under the moniker of MadPilot Productions on and off for nigh-on 7 years now and I’m the first to admit that making the books balance wasn’t always at the fore front of my mind. I’m a web developer – I need to develop! Unfortunately, running your own business means at some point you will have to deal with accounts and invoicing and the tax department. After all those years of battling my way through and making (expensive) mistakes, I have compiled a number of simple hints and tips that can help take the pain out of the financial side of things.

First my disclaimer: I’m not an accountant (ha!) and this might not be the most optimal way of doing things – but it does make it easier and is working for me. This is Australian specific, although I’m sure the general ideas will translate to other countries.

Register as a proper business

In Australia this is a really important step because you won’t be able to deal with Goods and Services Tax (GST) if your aren’t a registered business. You can register as a sole trader, which means you don’t need a company behind you. This is the easiest way, and usually isn’t going to cause to many headaches. I’m not going to cover the other types of business you can create (such as partnerships etc) as that can start getting complex, and you should really be taking advice from an accountant and/or a lawyer.

Once you have registered as a business you can apply for an Australian Business Number (ABN) and register for GST. Getting an ABN is optional, but I’d recommend doing it – it doesn’t cost you anything and if you don’t have one, other companies that you deal with are entitled to keep 46.5% of your invoices. So just get one.

Although you don’t need to register for GST if you are going to be making less than a threshold (it is currently $75,000) I would still do it. If you are small and you are good with you accounts it doesn’t take that much work, and it means you get to claim the GST back on any business related expenses!

All of this is explained in full at http://www.business.gov.au it also have links to the necessary forms to get you on your way.

Get a separate bank account

I personally find this the easiest way to manage expenses for your business. Having a separate statement at the end of the month is much easier than trying to sift through one HUGE single statement. It also means you can partition business money and personal money. If you ever get paid by cheque, you will need one as more often than not the cheque will be made out to you business name, not you personally – you can’t cash it if the names don’t match. Basic business accounts are usually pretty cheap and they are well worth it. Most banks will allow you to link your personal and business accounts via their online interface so transferring money between the two is easy.

When you are starting out, getting a business credit card can be nigh on impossible, but in this age of the web having one makes life MUCH easier. The solution is get a personal one (you are the only person using it if you a freelancer anyway) and pay any business expenses back from your business account. Many banks also have Visa or Mastercard debit accounts so if you don’t trust yourself with credit, this is another option. Unfortunately, these cards are generally only available to individuals not businesses, so you will still need another business account.

Get an accounting package

This is something that most new freelancers don’t think about, because they aren’t free and it seems like an expense that is hard to justify. Hopefully this will justify it: The accounting packages will help you see hidden expenses that you have forgotten about, such as TAX! When you work for someone else, they take care of the tax you need to pay. Unfortunately, since you are now your own employer, you are responsible for paying it. How much do you need to pay? No idea – that is what the accounting package is for.

There are many options – in Australia, MYOB and Quicken are the most popular choices, but have interfaces that suck. Thankfully there are some other options, such as the online system: NetAccounts which is what I use. These have a myriad of options so can take a little work to get used to but it is worth it, especially at Business Activity Statement (BAS) time – you click a button and it tells you how to fill it in – well worth the couple of hundred bucks you need to lay down to get it.

Get an accountant

You wouldn’t trust an accountant to do their own website, why should you do your own tax? They know the tax system better than you, so let them deal with it – if you follow my previous piece of advice and get an accounting package it should be a walk in the park for them. It’ll probably set you back a couple of hundred, but it could cost you a lot more if you did it wrong.

Get income insurance

If you get injured and can’t work, you are pretty well screwed. This is where income insurance can be really helpful. If you are in low-risk industry such as IT, it can be pretty cheap (mine is about $13 a week) and if you get injured they will pay out 75% of your income until you are fit enough to go back to work. Have a chat with an insurance broker – they can point you in the right direction.

Track your time

This is especially important if you change by the hour. It is all too easy to lose track of time and go over budget on a project. If you track your time well, you can warn a client if they are about to hit their budget limit BEFORE it happens and it also allows you to go back through your records when you are quoting in new jobs. If the job you did two months ago took 10 hours and is similar to the new job request you just got, you have a pretty accurate estimate.

Many people use spreadsheets for this, which I hated – so I wrote 88 Miles which is a simple time tracking system specifically for freelancers and small businesses. There I’ve plugged it!

Treat yourself as an employee

Ok, this sounds weird, but hear me out. A good general rule of thumb is that 2/3 of the money you bring in is going to go straight back out as expenses and tax (sucks huh?) so if you work that out as your wage you are less likely to find yourself short when all the bills come around. At the end of each week (or fortnight or month – what ever is easiest based on your cash flow), transfer 1/3 of what you brought in to your personal account. This is your money, and you can do with it what you like. Paying rent and buying food is always good and hopefully you have some left over to have a bit of fun.

DON’T TAKE ANY MORE OUT OF YOUR BUSINESS ACCOUNT! The business account if for the business – I can’t stress this enough.

If you have regular enough income, you can even setup the payroll facility of your accounting package to allocate you your pay each pay period. The benefit of this is it will take into account tax and superannuation. If this is the case, you can work on paying yourself 2/3 – the extra 1/3 will most probably end up going to the tax department, so you won’t see it anyway.

Example:

You are charging $50 an hour. Let’s say you can manage 5 hours of billable work a day and that you want to take holidays at some point (the standard is to treat one year as 260 days) you will be bringing in $65,000 a year. 1/3 of that is about $21,000 a year. The tax on $65,000 is roughly $15,000 so our estimate is close. So you will have $400 per week in your pocket for living and about $400 a week for running your business.

The great thing about this method is that you should have money left over, which means you should be able to go on a little spending spree at the end of the financial year, but more importantly if you get sick or want to take holidays, or god forbid the work dries up for a period, you still have some money in the bank to cover your expenses (for a while).

Hopefully this can help you freelancers out there run a successful business. The industry is pumping at the moment, so there isn’t a better time to go out on your own – just make sure you are smart about it.

One computers, one PocketPC and some funky software

I recently wrote about MaxiVista – some software which allows you to turn an old laptop into a  second monitor. I still use it at work everyday to get three screens of happiness. However , what to do at home? I’ve only got two screens  at home and frankly it makes me sad. As far as I’m concerned three monitors is the holy grail of productivity.

My old Compaq iPAQ was sitting next to my laptop looking at me all forlorn – I haven’t used it much lately, now my phone does everything it used to do, so it was just sitting there using electricity. I thought to my self

Yes, this is the sort of thing I think about. Since I only use the third monitor for Getting Things Done, such as my scheduling sheet and my time tracking, the smaller screen would actually do the job. Even Synergy would have done the job, as it would have allowed me to easily edit a Pocket Excel document, and 88 Miles works on PocketPC. Alas, Synergy for PocketPC doesn’t exist (no suprises there).

What does exist though, is SideWindow by Innobec. Seriously, they have created a piece of software that, just like MaxiVista allows you to extend your desktop to another computer – except this time the other computer is you PocketPC! Crazyness.

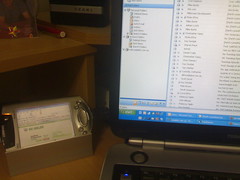
My PocketPC displaying 88 Miles via SideWindow

Now unfortunately my PocketPC doesn’t have WiFi, only Bluetooth so the connection is a little slow (and flaky), but it works! If does discconect for no reason occasionally, but I suspect this is more to do with my dodgy networking hack (I connect my iPAQ to my server via bluetooth and BlueZ, which in turn connects to my laptop via WiFi.).

SideWindow has a screen rotate feature built in, so you can run your new screen at a more natural landscape layout, rather than the less then useful portrait. Obviously 320×240 pixels isn’t really much real estate to gain, so the clever people at Innobec allow you to scale the window to fit more in (right up to 1024×768!) The more you scale the less readable things get – I’ve found 640×480 is a nice comprimise between readability and speed, however if you have a fast network connection you might get away with a higher resolutions.

It’s $15 to buy, and probably isn’t for everyone, but it’s still on of those “Cool” things to show off to your geek friends.

Getting Things Done tip #342: Scheduling with spreadsheets

Online GTD (Getting Things Done) services are so hot right now – Hey, I’ve released one.

But I would put money on the fact that most of them originated by the author abusing a spreadsheet at some point and for good reason. Creative use of a spreadsheet can allow you to experiment with different systems until you find one that fits.. Here is my tip for easy and effective job scheduling using nothing more than Excel or Google Spreadsheets (or what ever spreadsheet software you may choose).

The following goes shows you how to setup the system I use for planning my day using Excel:

  1. Create a new spreadsheet
  2. Click on the top-left hand corner, so that all cells highlight. Drag the right and bottom columns of the first cell to form a square. I like 150 px. All of the other cells in the spread sheet should follow.Step 1: Make all the cells largish squares
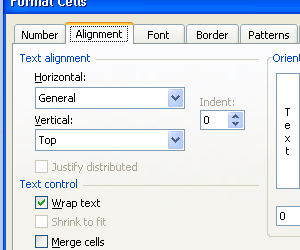
  3. Click the Format Menu and select Cells. Select the Alignment tab. Check the Word Wrap check box and change the vertical alignment to topStep 2: Format the cells
  4. Enter the days of the week down the left hand side
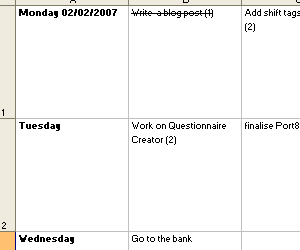
  5. Start entering your tasks for the week! I like to put the estimated or allocated hours in brackets and re-ordering the task so the most urgent ones are towards to left.Step 3: Add your tasks! Re-arrange by cutting and pasting.
  6. Once you completed the task, Click the cell that contains the task, Click the Format menu, and select Cells, then the font tab. Check the strikethrough checkbox.

If you need to shuffle things around, you can easily cut and paste cells. Need to add notes? Right click on the cell, and add some notes – A small red triangle will appear in the top right corner of the cell.

What is your favourite GTD scheduling tip?

Two computers, three monitors and some funky software

At Bam, I’ve had a second 19″ Dell LCD sitting idle on my desk for a while. Why has it been idle? Because the video card on my desktop doesn’t support multiple monitors. This was quite depressing as I love dual monitors, but I didn’t have time to find a card that would work for me (My box is half height, and only supports PCI express severely limiting my card choices).

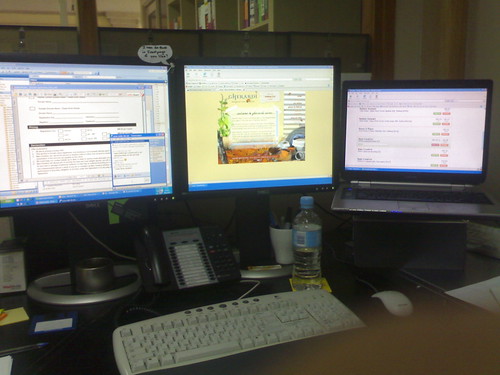
Then I discovered a little piece of software called Maxivista, which allows you to use a second computer as a virtual video card. It just so happens that my laptop supports an additional monitor as well as the built in laptop and since I take it to work most days it was a perfect candidate for the Maxivista treatment. By downloading the Pro version (about $50AU) I managed to set up THREE, count them THREE monitors! The image below shows my setup:

My three monitor setup!

The way it works is simple, yet ingenious – on the host (or server) you install the “virtual video cards”, which is just a software driver. The drivers appear to the host as a normal video card. You need to start a virtual card for each virtual monitor you want to support (I setup two). Then on the client/s you install a small app, which receives the video signal. I run two different instances of the software on my laptop, so I get two different monitors.

The lag is surprisingly low! For day-to-day development work, you don’t notice it at all. I was watching a YouTube video on the second monitor today and it was pretty smooth, although you wouldn’t be able to watch a DVD or play a game, but it is still pretty darn impressive!

I’d also recommend installing UltraMon – it allows you to add a discrete taskbar to each window, which makes organising you desktop even easier. I have my IDE in one window, a test browser in my second and my “Getting stuff done” stuff (time tracking, task lists etc) on my third. It is panoramic bliss! :)