@madpilot makes

Garage Door Opener – Let’s connect

So, now we have an MQTT server, lets see if we can get the ESP8266 to connect to it.

I’m going to use Nick O’Leary’s pubsubclient library. It’s pretty easy to install – find Manage Libraries in the Sketch Menu, search for pubsubclient and it should appear. Hit install.

After we physically connected to the WIFI (Which we’ll do via via hard coding the SSID and passkey for the moment – we’ll do that properly later), there are two things we need to do:

  1. Connect to the MQTT server – no security for the moment, we’ll work up to that
  2. Subscribe to a message. We provide the library with a callback function that gets called every time the server receives a message topic that we are subscribed to.

Here is the some proof of concept code that does all of that:


#include <ESP8266WiFi.h>
#include <ESP8266mDNS.h>
#include <PubSubClient.h>

#define SSID "your-wifi-ssid"
#define PASSKEY "your-wifi-password"
#define MQTT_IP "ip-address-of-the-mqtt-server"
#define MQTT_PORT 1883
#define MQTT_NAME "garage"

#define TOPIC "test"

#define QOS_LEVEL 0

// PubSub client
WiFiClient espClient;
PubSubClient pubSubClient(espClient);
void PubSubCallback(char* topic, byte* payload, unsigned int length);
long lastPubSubConnectionAttempt = 0;

void PubSubSetup() {
  pubSubClient.setServer(MQTT_IP, MQTT_PORT);
  pubSubClient.setCallback(PubSubCallback);
}

boolean PubSubConnect() {
  Serial.print("Connecting to MQTT server...");

  if(!pubSubClient.connect(MQTT_NAME)) {
    Serial.println("\nCouldn't connect to MQTT server. Will try again in 5 seconds.");
    return false;
  }

  if(!pubSubClient.subscribe(TOPIC, QOS_LEVEL)) {
    Serial.print("\nUnable to subscribe to ");
    Serial.println(TOPIC);
    pubSubClient.disconnect();
    return false;
  }

  Serial.println(" Connected.");
  return true;
}

void PubSubLoop() {
  if(!pubSubClient.connected()) {
    long now = millis();

    if(now - lastPubSubConnectionAttempt > 5000) {
      lastPubSubConnectionAttempt = now;
      if(PubSubConnect()) {
        lastPubSubConnectionAttempt = 0;
      }
    }
  } else {
    pubSubClient.loop();
  }
}

void PubSubCallback(char* topic, byte* payload, unsigned int length) {
  char *p = (char *)malloc((length + 1) * sizeof(char *));
  strncpy(p, (char *)payload, length);
  p[length] = '&#92;&#48;';

  Serial.print("Message received: ");
  Serial.print(topic);
  Serial.print(" - ");
  Serial.println(p);

  free(p);
}

void connectWifi(const char* ssid, const char* password) {
  int WiFiCounter = 0;
  // We start by connecting to a WiFi network
  Serial.print("Connecting to ");
  Serial.println(ssid);

  WiFi.disconnect();
  WiFi.mode(WIFI_STA);
  WiFi.begin(ssid, password);
  while (WiFi.status() != WL_CONNECTED &amp;&amp; WiFiCounter &amp;amp;lt; 30) {
    delay(1000);
    WiFiCounter++;
    Serial.print(".");
  }

  Serial.println("");
  Serial.println("WiFi connected");
  Serial.print("IP address: ");
  Serial.println(WiFi.localIP());
}

void setup() {
  Serial.begin(115200);
  connectWifi(SSID, PASSKEY);
  PubSubSetup();
}

void loop() {
  PubSubLoop();
}

To run this, first fire up our MQTT server using docker-compose up, next load up the above code on the ESP8266, replacing the constants at the top of the file with the relevant settings.

If you are running Docker on Linux, or using Docker for Mac; or Docker for Windows the IP address of the server will be the same as the IP address of your computer.

If you are running docker-machine, you will need to run docker-machine ip to find out the local IP address.

Open up the serial monitor and you should see something like this:

Connecting to [what ever your ssid is].
WiFi connected
IP address: [some IP address]
Connecting to MQTT server... Connected.

Now, if we publish a message on to the queue

docker-compose run mosquitto-publisher -t "test" -m "Hello Arduino!"

We should see the Arduino consuming the message:

Message received: test - Hello Arduino!

If you don’t see the message, there should be hints in the serial monitor about what went wrong.

Things to look out for:

  • If you can’t connect to the WiFI, check your SSID and passkey
  • If you can’t connect to the MQTT server, check your IP address. Also, check the docker output – you should see a message when the Arduino connects.

Garage Door Opener – How can I make this garage door opener secure?

One of the design goals for this project was a secure system – this device can open my garage, and I don’t really want just any person to be able to do that!

Disclaimer: I’m not a security expert! If you find holes in my logic, please let me know!

The most obvious way to interface with the controller was to setup some sort of server that a controller (eg an iPhone app) talks to. The problem with this is that an open network port is an attack vector – if a good guy can connect to a network port, so can a bad guy. While I could set up a username or password, having a port open potentially means buffer overflows, and since I’m not really a C/C++ guy this a big problem for me – I mean a lot of really smart people avoid writing servers in C…

After some research, I found this paper (PDF) talking about the use of the publish/subscriber pattern (AKA pub/sub), where a device connects to as server and subscribes to event notifications. This means there is no port open on the device, so even if an attacker found it’s IP address, there is no way for them to connect to it. It seems MQTT is the IOT pub/sub system of choice (it drives a lot of public IOT platforms).

This of course is not without other issues (not exhaustive – please suggest more if you can think of others):

  1. Problem: If an attacker got on the network, they could just connect to the MQTT server and send a “open” command. Solution: Access control lists (ACL): Only allow certain MQTT clients send certain commands. We would need some way for the server to verify who the client is…
  2. Problem: What if an attacker managed to spoof the IP or MAC address (perhaps through ARP poisoning) they could become a legitimate MQTT server, allowing them to send an open command. Solution: Verify the identity of the server. TLS certificates can help with that. Using a certificate signed by a custom Certificate Authority (CA) means we can guarantee the server is who it says it is. This also fixes the client verification problem from point 1.

After a quick search, I found the mosquitto project – an open source MQTT server which looked pretty easy to setup, supports ACLs and TLS.

Docker all the things

I decided to set it up a test environment using docker, as it makes dependency management much easier, and also makes the setup scriptable, so when it comes time to deploy to “production” I know exactly what I need to do.

You can clone my git repository to get started (I’ve tagged each of the steps so you can play at home – we’ll start with mqtt-1):

git clone https://github.com/madpilot/home-automation
cd home-automation
git checkout -b mqtt-1 mqtt-1
docker-compose build
docker-compose up

Congratulations! You now have a working MQTT server running on port 1883. Because it hasn’t configured it yet, the server has no authentication or authorisation – that’s fine for the moment – let’s get the baseline working, then we can add the security layers later.The easiest way to test the server is to use the mosquitto command line client. I’ve included these as part of the docker-compose cluster – in fact, when you ran docker-compose, a subscriber was automatically created (subscribed to the “test” channel) and publisher publishes the first message.

Look through the output on the screen. If you see:

mosquitto-subscriber_1  | Hello World

Everything has worked!You can try it out yourself – run the following command:

docker-compose run mosquitto-publisher -t "test" -m "Hello again"

And you should see

mosquitto-subscriber_1  | Hello again

I’ve been a bit tricky by using a docker entry point to hide away the full command to make sending messages much easier. The full command that gets called is

mosquitto_pub -h mosquitto -t test -m "Hello again"

Which tells mosquittopub to connect to the server with a host name of _mosquitto (Which is set by docker), publish to the “test” channel, and send the message “Hello again”.Now that we have a working MQTT server and a way of testing things, we can start looking at the Arduino side of things.

Garage Door Opener – Setting up the Arduino IDE for the ESP8266

Thankfully, setting up the Arduino IDE to program the ESP8266 this bit was way easier than I thought – the team behind the Arduino library have done a pretty awesome job. I’m not going to duplicate the steps here – the Github page does a great job of explaining it.

Now you should be able to pick the “Generic ESP8266 Module” from the board list. I had to make a guess at the settings, as I had no idea what type I had – the defaults were fine in my case.

Don’t forget to select the right port after you have plugged in the FTDI cable (Tools > Port) – on my Ubuntu machine it switches between /dev/ttyUSB0 and /dev/ttyUSB1 every time I plugged it in, so if you can’t upload code – check that the port hasn’t changed.

Using openssl to encrypt development scripts that have secrets

I like having scripts that can pull production data down to development – the best kind of fake data is real data. Usually that involves taking a database dump and downloading any uploaded files. Unfortunately, that also means remembering long command line arguments, and dealing with credentials for both the database and the file server.

Up until now, I’ve kept a secure notepad of command line arguments with secrets in my password manager, but that doesn’t really scale if you want to be able to supply different arguments in different contexts (The number of times I’ve forgotten to change an argument…) – what I really wanted was a script that I could call that abstracted the nasty command line call with long arguments to a slightly less nasty command line call with shorter arguments. Ideally it could also be stored in source control so other could use it.

The app I’m currently working on has a little helper bash script that does common tasks, like bringing up docker, running bundler – things that cost me valuable keypresses – and I really wanted to add a sync from production script. And this is how I did it.

The bash script (let’s call it /bin/lazy.sh) is just a stupid set of functions and case statements:

command = $1

function run {
  local command = $1
  shift

  case $command in
    backend)
      docker-compose run backend $@
    ;;
    frontend)
      docker-compose run frontend $@
    ;;
}

case $command in
  run)
    run $@
  ;;
esac

This allows me to build up a nice little DSL of helper commands, meaning I don’t have to type so much.

$ lazy.sh run backend

Now, the fancy bit. Create another script, called lazy.secret (not stored in source control)

command = $1

function sync {
  local command = $1
  shift

  case $command in
    database)
      PGPASSWORD=supersecretpassword pgdump -h -h database-server.aaaaaa.ap-southeast-2.rds.amazonaws.com -d database_name -U username
    ;;
    uploads)
      AWS_ACCESS_KEY_ID=amazonaccesskey AWS_SECRET_ACCESS_KEY=longstringofrandomcharacters s3_get bucket
    ;;
}

case $command in
  sync)
    sync $@
  ;;
esac

And then encrypt it:

openssl enc -aes-256-cbc -salt -in lazy.secret -out /bin/lazy.encrypted

When this happens, openssl will ask you to provide a passcode to decrypt the file. The encrypted file that has the secrets can by stored in source control (it’s not readable without the passkey), and the passcode can be stored in your password manager.

If you want to be slightly more paranoid, delete lazy.secret – you can decrypt the file if you need to modify it.

openssl enc -aes-256-cbc -d -in $dir/lazy.encrypted -out lazy.secret

Of course, remembering the command line argument to decrypt the file is way too hard, so let’s get the original /bin/lazy.sh script do that for us (it will ask you for the passkey first):

command = $1

function sync {
  # This tells bash to look for the file in the same directory as the source script, not the current working dir
  dir="$( cd "$( dirname "${BASH_SOURCE[0]}" )" && pwd )"
  # Decrypt the file, and pipe it into bash. We need to supply /dev/stdin so the command line arguments passthrough.
  openssl enc -aes-256-cbc -d -in $dir/lazy.encrypted | /bin/bash /dev/stdin $@
}

function run {
  local command = $1
  shift

  case $command in
    backend)
      docker-compose run backend $@
    ;;
    frontend)
      docker-compose run frontend $@
    ;;
}

case $command in
  run)
    run $@
  ;;
  sync)
    sync $@
  ;;
esac

Kablamo!

$ /bin/lazy.sh sync database
enter aes-256-cbc decryption password:

Limitations

It’s not perfect, but it’s a nice simple way to share complicated scripts that require credentials with your team. Things to consider:

  1. Running ps while the script is running will expose all the secrets. But this also a problem when running the scripts by hand
  2. Everyone needs to know the passkey – Perhaps openssl has a way of having different keys unlock the same script? Let me know in comments
  3. If the key becomes exposed, your source control has a history that allows an attacker to decrypt and get the secrets at that point in time – in this case, just rotate all the credentials in the script, change the passkey and push. You should be doing this each time a team member arrives or leaves anyway.

Garage Door Opener – Programming the ESP8266

I has an ESP8266-01 kicking around my workshop just waiting for a project, so the garage door opener was a perfect choice – it only needed one output, and two inputs.

The first problem I had though, was I needed to program it. I read that you can use a 3.3V FTDI cable, which I already had – sort of. It’s will interface at 3.3V, but the VCC is 5V.

My first attempt was just using a simple resistor divider, which didn’t work – I’m guessing the load caused to much of a voltage drop.

So I grabbed a LM317T, a couple of switches, and some resistors to build a small interface board. This is based on a number of different circuits I found searching the internet.

ESP8266 Programmer scematic

It’s super simple. I feed in 5V to VCC, and the LM317T outputs 3.3V. The resistors values were calculated using the look up table here.

The two 3k3 resistors ensure that GPIO0 and RST (Reset) pins are held HIGH during boot up (which is required for normal operation).

To program the device, (and you’ll quickly get used to this little dance) you push the RESET, then the PROGRAM button, then release the RESET button first, followed by the PROGRAM button. This ensures that the GPIO0 pin is held LOW during the device boot sequence, putting us in programmer mode!

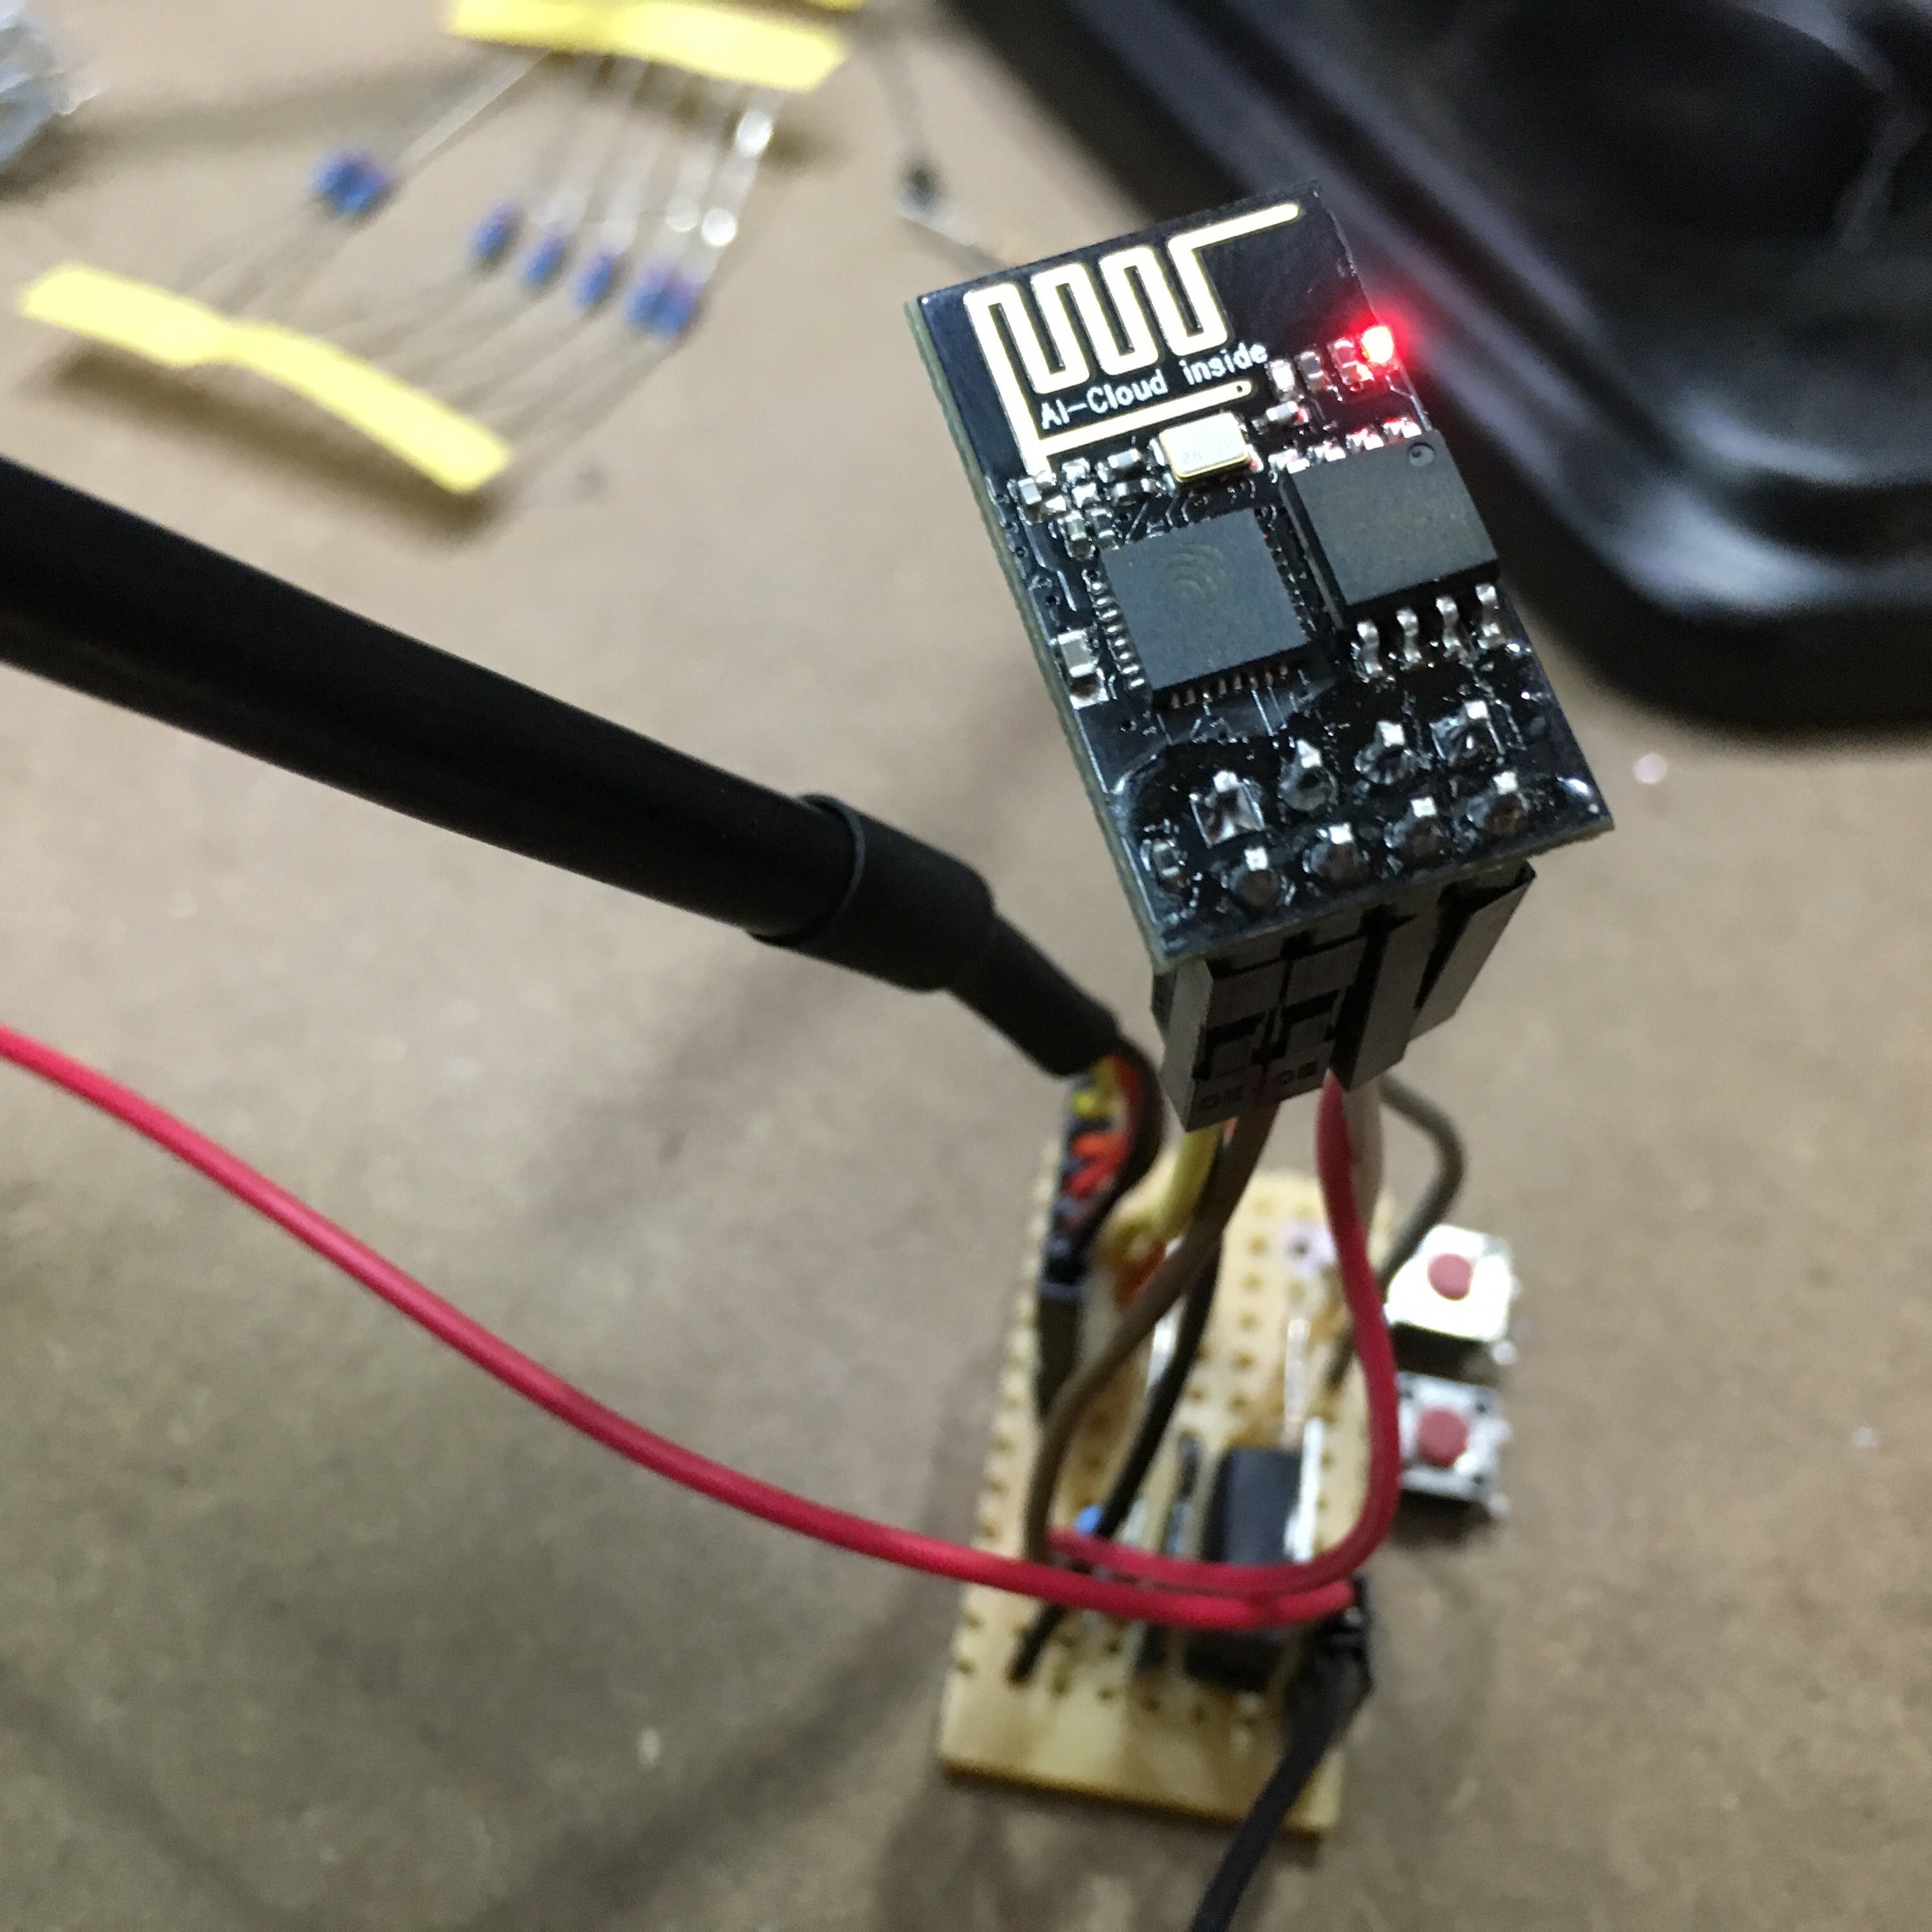
If all goes well you should see a constant red LED, and a flickering blue LED when you are talking to the device over FTDI.

Here is an artistic picture of my cobbled-together breadboard (it’s the blurry bit down the bottom):

My Ghetto ESP8266 programmer

Setting up Buildbox when you run your own Git server

I’ve been trying to get a CI server for 88 Miles sorted out for ages. I tried to cobble something together before, but lost interest trying to keep track of previous builds and Ruby environments and other stuff. Me being me, I run my own Git server, so many of the existing CI servers out there won’t work for me (They assume GitHub), and I don’t really feel comfortable sending out source on a private project to a third party server. I also have a VM in my office that runs various dev machines, so I have the hardware to do it. Well, it turns out that a buddy of mine has been building a CI server that is a perfect fit for my purposes! It’s called Buildbox, and it comprises of an agent that you run on your hardware that manages builds for you. This is roughly what I did to get it running.

The Build Server

I setup a VM running Gentoo, with 1Gb of RAM and two virtual CPUs. It is as close to my prod environment as I can get it, running RVM – this is important, as there is a bit of a trick to this. I also set up a specific user (called build), that will do the work. I initiate the Buildbox daemon using monit, so if it ever dies, it should get restarted automatically.

Note: I’ve omitted the Buildbox setup instructions – The website does a better job than I could.

The wrapper script

Because I’m running RVM, and because monit is fairly dumb in setting up bash environments, I wrote a small wrapper script that will start and stop the Buildbox executable:

#!/bin/bash
case $1 in
        start)
                if [[ -s "$HOME/.rvm/scripts/rvm" ]]; then
                        source "$HOME/.rvm/scripts/rvm"
                elif [[ -s "/usr/local/rvm/scripts/rvm" ]]; then
                        source "/usr/local/rvm/scripts/rvm"
                else
                        printf "ERROR: An RVM installation was not found.\n"
                        exit -1
                fi

                rvm use ruby-2.0.0-p247
                buildbox agent:start &
                echo $! &gt; /var/run/buildbox/buildbox.pid
                ;;
        stop)
                kill `cat /var/run/buildbox/buildbox.pid`
                rm /var/run/buildbox/buildbox.pid
                ;;
        *)
                echo "Usage: buildbox-wrapper {start|stop}";;
esac
exit 0

If you call buildbox-wrapper start it sets up a RVM environment, then runs the buildbox agent and then saves the PID to /var/run/buildbox/buildbox.pid (Make sure the /var/run/buildbox directory is writable by the build user). Calling buildbox-wrapper stop reads the pid file and kills the agent.

The monit config

Add the following to your monitrc:

check process buildbox with pidfile /var/run/buildbox/buildbox.pid
        start program = "/bin/su - build /bin/bash --login -c '/home/build/scripts/buildbox-wrapper start'"
        stop program = "/bin/su - build /bin/bash --login -c '/home/build/scripts/buildbox-wrapper stop'"

This will change to the build user, then run the wrapper script.

My build script

You enter this into the code section of the web UI (I was a little confused by this – I didn’t realise it was editable!)

#!/bin/bash
set -e
set -x

if [ ! -d ".git" ]; then
  git clone "$BUILDBOX_REPO" . -q
fi

git clean -fd
git fetch -q
git checkout -qf "$BUILDBOX_COMMIT"

bundle install
bundle exec rake db:schema:load
bundle exec rake minitest:all

This is pretty much a cut and paste from the Buildbox website, except I run Minitest. I also tmp/screenshots/*/* and coverage/*/* to the artifacts section. Artifacts are get uploaded after a build is complete. I use them to upload my screenshots from all of my integration tests, as well as my coverage reports.

Git post-receive

This script belongs on your Git server in the hooks directory. Name is post-receive

#!/bin/bash

while read oldrev newrev ref
do
  branch=`echo $ref | cut -d/ -f3`
  author=`git log -1 HEAD --format="format:%an"`
  email=`git log -1 HEAD --format="format:%ae"`
  message=`git log -1 HEAD --format="format:%B"`

  echo "Pushing to Buildbox..."

  curl "https://api.buildbox.io/v1/projects/[username]/[projectname]/builds?api_key=[apikey]" \
          -s \
          -X POST \
          -F "commit=${newrev}" \
          -F "branch=${branch}" \
          -F "author[name]=${author}" \
          -F "author[email]=${email}" \
          -F "message=${message}"
  echo ""
done

Replace username, projectname and apikey with your own details. Make the file executable, and then push a change, and a build should start!

I, for one, welcome our new screencasting overloads

Or, how I used robots to make my screencasts.

I don’t like screencasts. I don’t like watching them, and I hate making them.

However, I know a lot of people do like watching them, especially people that are trying evaluate software. It had been pointed out to me that there was no way to see the internals of 88 Miles without signing up (Personally, I would suggest signing up, but whatever). So I thought I’d investigate a way to make a screencast without wanting to stab myself in the face.

So why do I hate making them?

  1. If you change any part of the UI, you have to go through and re-record the whole thing. This becomes tedious. That said, having an out of date screencast is probably worse than having no screencast.
  2. Making typos during the recording looks unprofessional, so either you need to be perfect (not going to happen) or you need to spend ages editing out the typos (I’ve got better things to do).
  3. Not only do you have to write content, you have to record voice over audio and video. They are a lot of work.

I’ve spent a lot of time on the look and feel of 88 Miles, and I wasn’t going to produce a crappy screencast – it had to look professional. So I needed a way to automate as much of this as I could, so that I replicate the video easily.

After putting out a call to twitter, Max pointed me at a ruby gem called Castanaut that basically wraps AppleScript allowing the automation of both the screencasting software (in my case: iShowU) and Safari. Success! Sort of. There was a little bit of work to get it all working.

The first thing to do is install the gem:

gem install castanaut

I started out using the screenplay from Castanaut site, but had to make some changes to get it working. First of all, I don’t have Mousepos installed, so I removed that plugin.

Next, Castanaut seemed to miss clicks randomly, which was a pain. After a bit of digging it looks like it was the way that it was calling AppleScript. Rather than debugging that, I just installed cliclick which is a commandline app that control the mouse without AppleScript. I had to write a small plugin to override the move and click functions. (Save this to plugin/cliclick.rb)

module Castanaut
  module Plugin
    module Cliclick
      def click(btn = "left")
        `cliclick c:+0,+0`
      end

      def doubleclick(btn = "left")
        `cliclick dc:+0,+0`
      end

      def cursor(*options)
        options = combine_options(*options)
        apply_offset(options)
        @cursor_loc ||= {}
        @cursor_loc[:x] = options[:to][:left]
        @cursor_loc[:y] = options[:to][:top]

        `cliclick m:#{@cursor_loc[:x]},#{@cursor_loc[:y]}`
      end
    end
  end
end

Castanaut will use say (the built in speech synthesis software on a Mac) for timing voiceovers. You really don’t want to be using that in your final screencast, unless you are actually Stephen Hawking. To solve this problem, I wrote another plugin that automatically generates a subtitle file that, when run under VLC will display the text, allowing me to read along with the video

module Castanaut
  module Plugin
    module Subtitle
      def start_subtitles(filename)
        @filename = filename
        @start = Time.now
        @sequence = 1
        @srt = ''
        @webvtt = "WEBVTT\n\n"
      end

      def stop_subtitles
        @start = nil
        @sequence = 0
        File.write "#{@filename}.srt", @srt
        File.write "#{@filename}.vtt", @webvtt
        @srt = ''
        @webvtt = ''
      end

      def subtitle(narrative, &blk)
        start = Time.now - @start
        yield
        stop = Time.now - @start

        @srt += "#{@sequence}\n"
        @srt += "#{time_diff(start)} --> #{time_diff(stop)}\n"
        @srt += "#{narrative.scan(/\S.{0,40}\S(?=\s|$)|\S+/).join("\n")}\n"
        @srt += "\n"

        @webvtt += "#{time_diff(start).gsub(',', '.')} --> #{time_diff(stop).gsub(',', '.')}\n"
        @webvtt += "#{narrative.scan(/\S.{0,40}\S(?=\s|$)|\S+/).join("\n")}\n"
        @webvtt += "\n"

        @sequence += 1
      end

      def say_with_subtitles(narrative)
        subtitle narrative do
          say(narrative)
        end
      end

      def while_saying_with_subtitles(narrative, &blk)
        subtitle narrative do
          while_saying narrative, &blk
        end
      end

      protected
      def time_diff(time)
        micro = ((time.to_f - time.to_i) * 1000).floor
        seconds = (time.abs % 60).floor
        minute = (time.abs / 60 % 60).floor
        hour = (time.abs / 3600).floor
        (time != 0 && (time / time.abs) == -1 ? "-" : "") + hour.to_s.rjust(2, '0') + ":" + minute.to_s.rjust(2, '0') + ":" + seconds.to_s.rjust(2, '0') + ',' + micro.to_s
      end
    end
  end
end

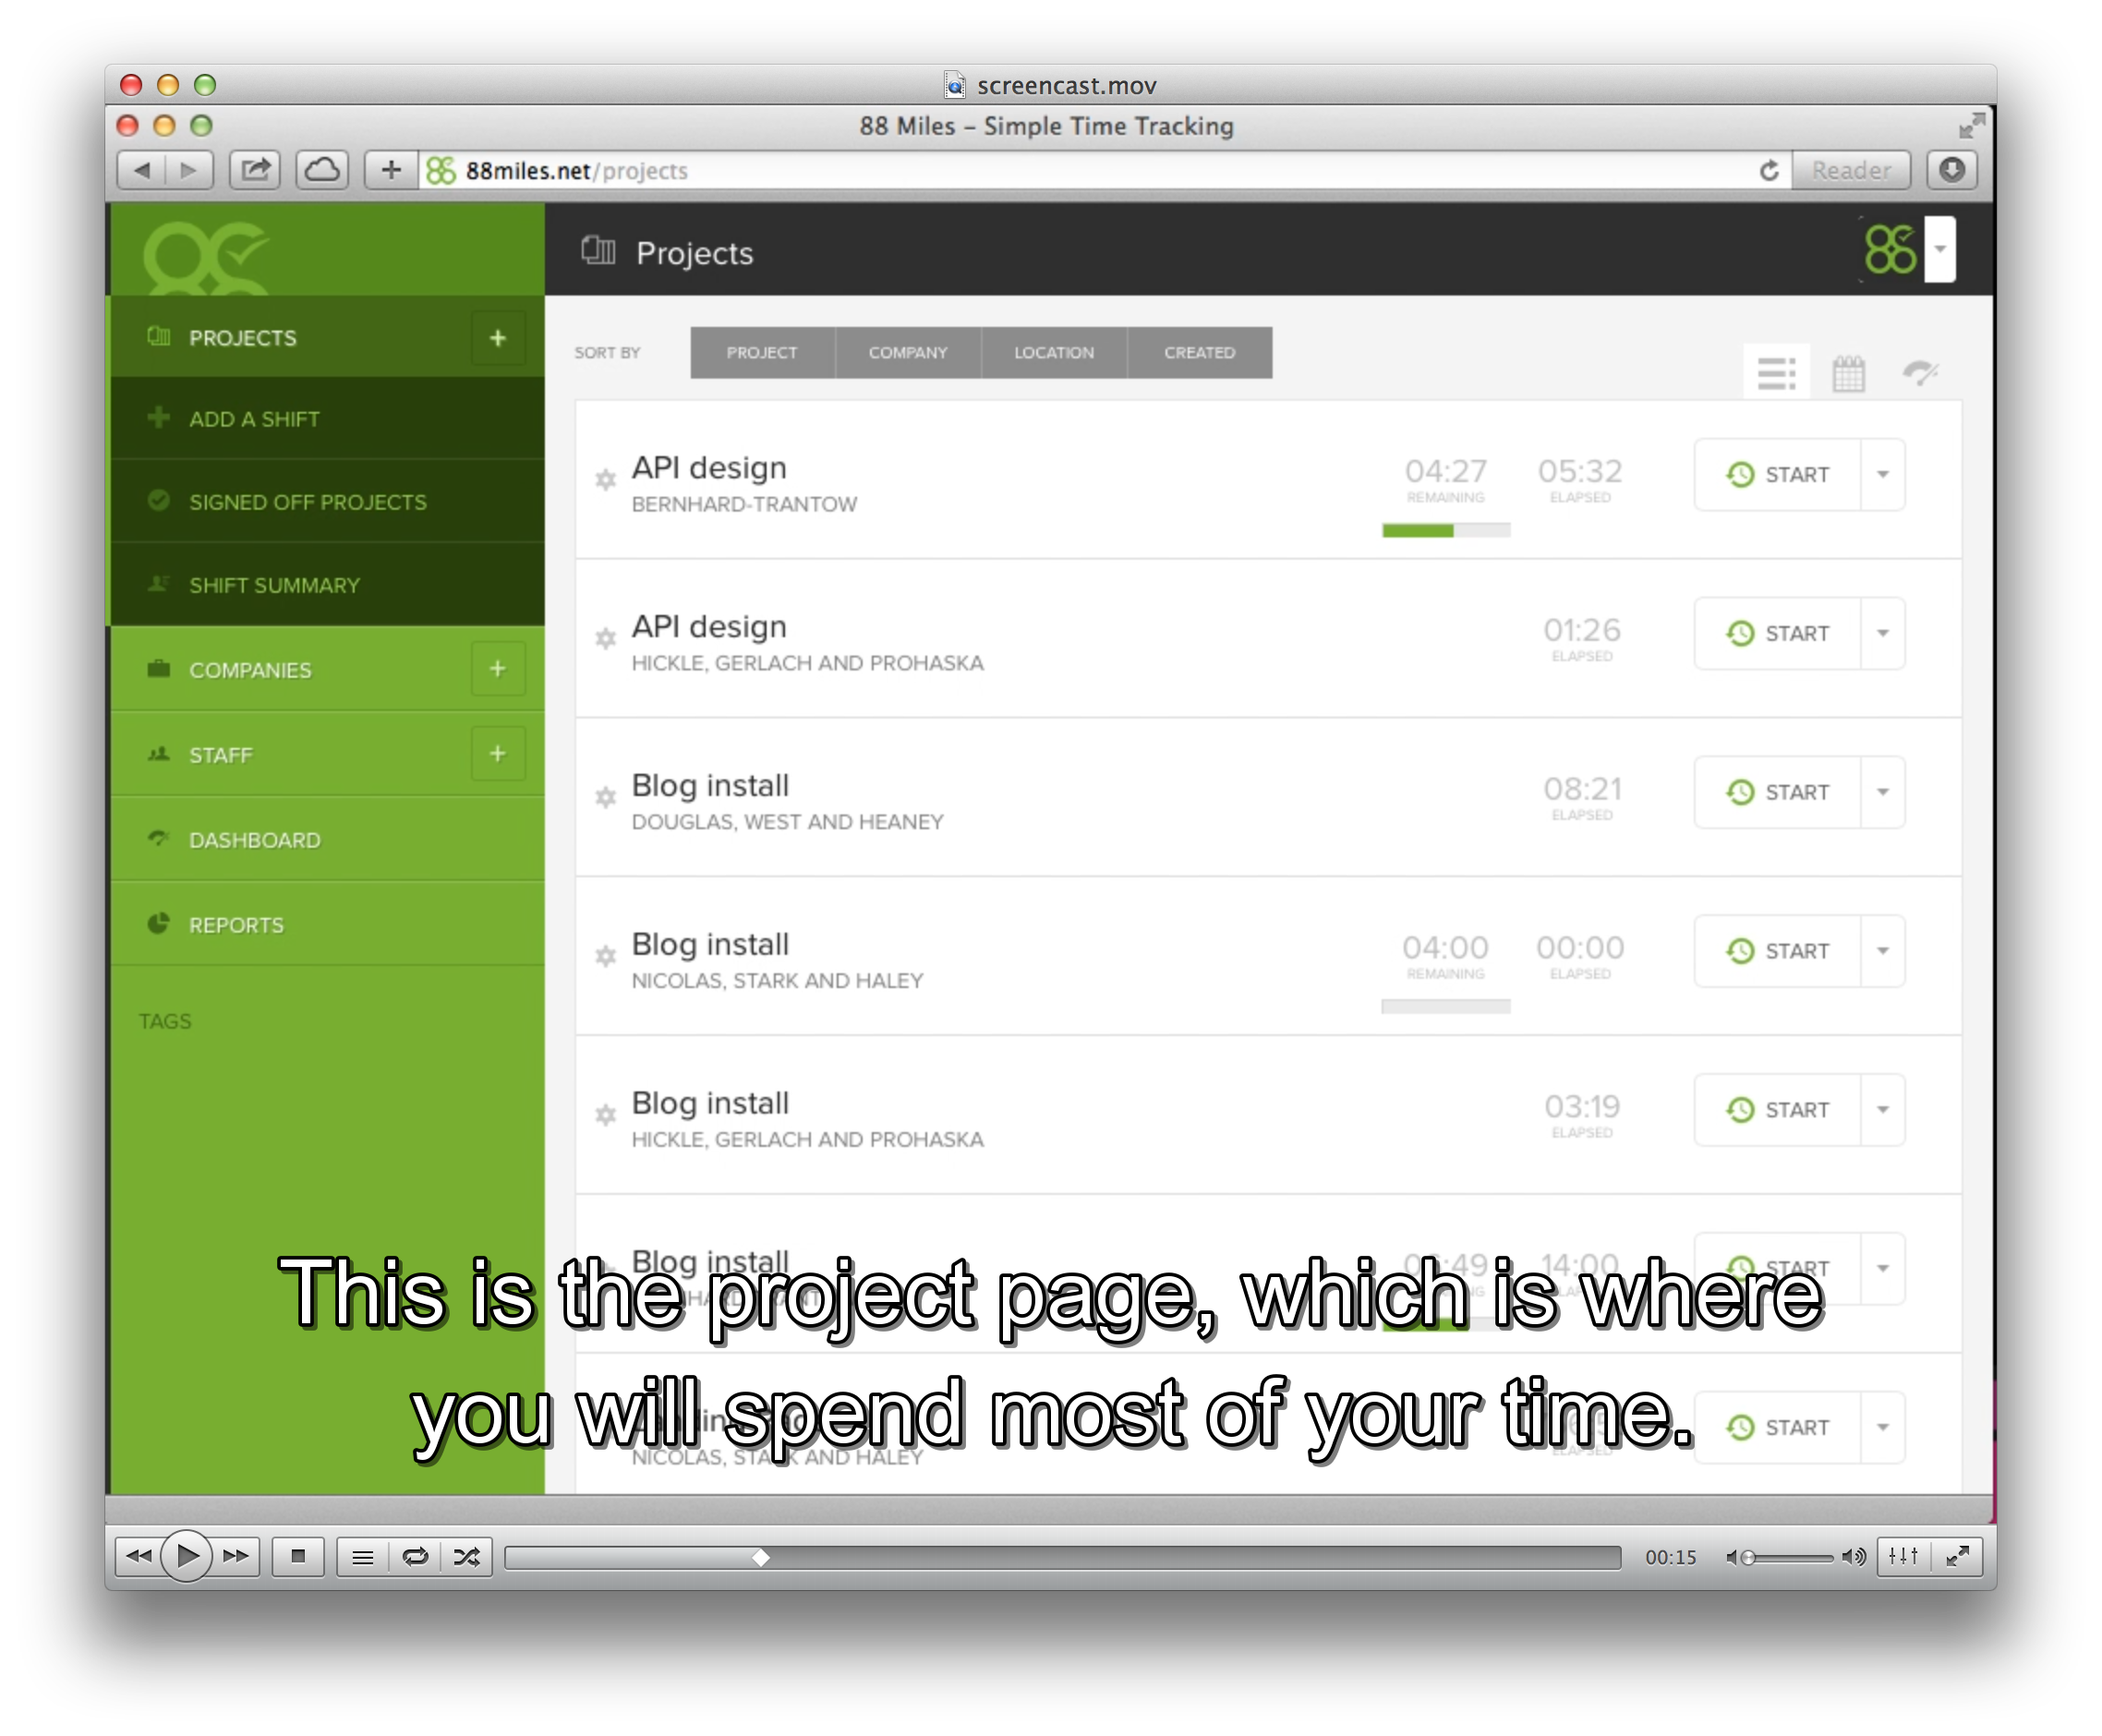
This will create both a SRT and VTT (Web subtitle) file. Here is a screen shot of the subtitle overlayed on to the video:

Showing the subtitles overlayed in VLC

Here is an excerpt from my screenplay file:

#!/usr/bin/env castanaut
plugin "safari"
plugin "keystack"
plugin "cliclick"
plugin "subtitle"
plugin "ishowu"
plugin "sayfast"

launch "Safari", at(120, 120, 1024, 768)
url "http://88miles.net/projects"
pause 5

ishowu_start_recording
start_subtitles "/Users/myles/Movies/iShowU/tour"
pause 1
say_with_subtitles "Hi, my name is Myles Eftos, and I'm the creator of Eighty Eight Miles"
say_with_subtitles "a time tracking application for designers, developers and copywriters."
say_with_subtitles "This short video will show you how Eighty Eight Miles tracks your time"

Oh, one last thing – I found the synthesised voice was too slow, so I made another plugin that speeds up the voice (saved in plugins/sayfast.rb):

module Castanaut
  module Plugin
    module Sayfast
      def say(narrative)
        run(%Q`say -r 240 "#{escape_dq(narrative)}"`)  unless ENV['SHHH']
      end
    end
  end
end

I recorded the voice over using Audacity. I wasn’t too fussed about an exact sync, so I just hit record on Audacity, and play in VLC. If you are worried about sync, just make a noise into the microphone when hit click (tapping the mic will do it), and you can use that as a sync mark.

Protip: Don’t use the built in microphone on your laptop, unless you are going for the “I’m recording this in a toilet” aesthetic. Ideally, you’d have a decent studio mic with a pop filter (I have a Samson C01U), but you know what? A gaming headset mic will still be orders of magnitude better than your laptop microphone.

Now, you should have a MP4 and WAV file (one for video, one for audio) than need to get mashed together. I use Adobe Premier Pro for this, but iMovie works great too. You will need to remove the existing audio track from the video file as it will have the robot voice on it, replacing it with your voice over track.

Finally, I topped-and-tailed the video with some titles for that last bit of fancy.

After exporting the final render, I used FFMPEG to encode the file into a final MP4 and WEBM file so I could drop them into a video tag. To install ffmpeg:

brew install ffmpeg --with-libvpx --with-libvorbis --with-fdk-aacc

Then run the following commands

ffmpeg -i [input file] -crf 10 -b:v 1M -c:a libfaac screencast.mp4
ffmpeg -i [input file] -c:v libvpx -crf 10 -b:v 1M -c:a libvorbis screencast.webm

You can upload those files somewhere, then reference them in like so:

<video autoplay class="tour" controls height="768" preload="auto" width="1024">
  <source src="/videos/screencast.mp4" type="video/mp4"></source>
  <source src="/videos/screencast.webm" type="video/webm"></source>
  <track default kind="captions" label="English" src="/videos/screencast.vtt" srclang="en"></track>
</video>

Want to see the output? Here is the final render embedded on the internets.

Tell your non-tech friends and family: Don’t use LinkedIn Intro

If you have friends or family that are using LinkedIn (And there are a lot of them – I’ve got family members that don’t use Facebook, that do have LinkedIn accounts), please take the time to inform them about the importance of password security.

Knowing that many of their users aren’t particularly technical, they have added a number of dubious (I’d say dangerous) techniques to bolster users connections (and by effect their userbase). Of these techniques, there are two which ask users to enter their email username and password so they can access the user’s email inbox directly. This is a bad idea. Please send this post (or wholesale copy it and email it to them – I’m putting this post under Creative Commons, so copy away) to your less technical friends and family, and offer to help them fix up the mess if they have already given up their username and password.

Giving third party applications like LinkedIn your password is a bad idea.

Dear friends and family,

When you signed up for LinkedIn, they may have asked you for your email login and password, allowing them to search your contacts to create connections. By giving LinkedIn your email login and password, you have given them complete access to your email. This means they can read ALL of your email, and theoretically send email on your behalf.

You might have seen a screen like the one below:

Screen Shot 2013-10-24 at 10.55.47 AM

This is one of the services you should avoid. Even though it says that they don’t store the password, or send email on your behalf, you shouldn’t trust external services with your login and password. Ever.

LinkedIn has also announced LinkedIn Intro. This service DOES store your username and password – and it has to it in such a way that it can easily be read. This service PRETENDS to be your email server, so your email program downloads your mail from LinkedIn rather than your real server. It does this by PRETENDING to be you and logging in to your email server, downloads and changes your email to display their header. This is why they will need your username and password.

So, if you get an invite to use LinkedIn Intro, please ignore it.

What can you do if you have already signed up for these services? The easiest thing to do is to changer your email password. If you don’t know how to do it, get in contact with a trusted friend or family member that can help you out.

Please remember: Anyone that has your email username and password, can read and send email on your behalf, so don’t give it to anyone that asks for it.

What if we treated marketing like we did code?

As someone that started writing code at a young age I, like many others, have learnt my trade via books and google searches and long hours in front of a keyboard. As the Internet engulfed our lives, solutions to problems and access to really smart people has become just one stack overflow or Github repo away. The software world really is one of knowledge sharing. It’s pretty ace.

I’ve been doing a lot of research in to marketing and sales lately for my startup, and I’ve found that the same really can’t be said for the marketing world. While there seems to be a lot of information out there, when you dig a little deeper it seems to be a rehash of a couple of ideas, a lot of link-bait lists and offers to increase my conversions by up to 250%! If I sign up to a newsletter and pay $35 a month and follow 12-simple steps that point me at a $3000 seminar.

It’s got me wondering though – would it be possible to treat marketing the same way that we treat code?

If you think about it, there are a lot of similarities between writing code, and running a marketing campaign:

  1. It’s a creative exercise. As I keep telling non-programmers, it’s not paint-by-numbers. Sure, libraries can help solve problems, but more often than not you have to engineer your own solution, or modify something else to get it working right. From what I’ve seen, marketing is the same. There is some starting points, but you need to work out what will work in a certain situation and adapt.
  2. Regardless of how well you plan, you’ll get thrown a curve-ball that means you’ll have to re-think your strategy
  3. It’s testable. Not in a unit test sense, but in a benchmark sort of way. You can do something measure it and wok out what works best in a given situation. Big-O notation for marketing, anyone? Bueller?
  4. There is a lot of self-proclaimed experts – the difference here is the output of coders can be read and assessed by anyone. Marketeers just say they are experts.

Of course, they aren’t exactly the same either:

  1. Lot’s of people make software for fun. Just look at the number of open source repos on Github. I don’t know of people that do marketing just for fun – they might find it fun, but at the end of the day, they are doing it to make money.
  2. There isn’t much actual sharing. People don’t like giving away real numbers, because they are doing this to make money and that’s a trade secret or something. It’s the equivalent of closed source software, I guess – not that there is anything wrong with it, but if it’s all closed up, it makes getting to the knowledge harder.

The question that I’ve been asking myself, is could be open source some of this stuff? Can we write up some marketing experiments and techniques, with actual results and share them for others to take inspiration off?

What is we wrote that our marketing experiments up and posted it to Github, so others could fork, implement, and improve? A library of marketing libraries for want of a better term?

Is it possible to modularise and share marketing ideas while cutting through the usual online-marketing expert bullshit? Can marketing be something that we play with for no better reason than to learn something or does it have to always just be about making a buck? What, in my n00bness have I missed, that makes this ultimately a stupid idea? Or is this actually something that could happen?

Lots of questions, not too many answers. Leave a comment, or let’s discuss it on twitter.

Ensuring background AJAX requests have completed when leaving a page

To make things feel quicker on 88 Miles, I update the UI straight after an interaction (like punching in or out), even though in reality the AJAX request is still sitting there waiting for confirmation from the server. Generally, the AJAX request will complete correctly (and if it doesn’t a message gets popped up and the UI is restored to a pre-action state), however there is a chance that the user will close their browser or navigate away before everything completes, which may result in a project staying punched in which is less than ideal.

This little snippet of JS will allow you to check for pending AJAX requests, and throw up a warning dialog is a request is still pending.

jQuery example:

var ajaxInProgress = false;
function ajaxStart() {
  ajaxInProgress = true;
}
function ajaxStop() {
  ajaxInProgress = false;
}
$(window).bind('beforeunload', function(e) {
  if(ajaxInProgress) {
    return "There is a background process that hasn't completed yet. Reloading might result in data loss.";
  }
});

Pure XHR example:

var requests = [];
var xhr = new XMLHttpRequest();
xhr.onreadystatechange = function() {
  if(this.readyState == 1) {
    requests.push(this);
  }
  if(this.readyState == 4) {
    var index = requests.indexOf(this);
    // Remove the completed request from the request list - handles out of order responses
    if(index != -1) {
      requests.splice(index, 1);
    }
  }
}
window.onbeforeunload = function() {
  if(requests.length != 0) {
    return "There is a background process that hasn't completed yet. Reloading might result in data loss.";
  }
}

Caveats

Tested on latest Chrome, Firefox, Safari and IE 9+.

It doesn’t work on the iPhone. Which is shit, because phones are the ones that need this the most. It works fine on Android and Windows Phone though.

Previous Next