@madpilot makes

A quick and dirty way to ensure your cron tasks only run on one AWS server

88 Miles has a cron job that runs every hour that does a number of things, one of which is billing. I currently run two servers (Yay failover!), which makes ensuring the cron job only runs once problematic. The obvious solution is to only run cron on one server, but this is also problematic, as there is no guarantee that the server running cron hasn’t died and another spun up in it’s place. The proper sysops solution is to run heartbeat or some other high-availability software to monitor cron – if the currently running server dies, the secondary will take over.

While that is the correct solution that I may implement later, it’s also a pain to setup, and I needed something quick that I could implement now. So came up with a this lo-fi solution.

Each AWS instance has a instance_id with is unique (it’s a string that looks something like this: i-235d734c). By fetching all of the instance_ids of all the productions servers in my cluster, and then sorting them alphabetically, I’ll pick the first one, and run the cron job on that. This setup uses the AWS ruby library, and assumes that your cron job fires off a rake task, which is where this code lives.

So step one is go get the ip address of instance that the job is running on.

uri = URI.parse('http://169.254.169.254/latest/meta-data/local-ipv4')
ip_address = Net::HTTP.get_response(uri).body

That URL is some magic URL that when called from any AWS instance will return metadata about the server – in this case the local ip address (also unique).

Next, pull out all of the servers in the cluster.

servers = []
ec2 = AWS::EC2.new :access_key_id => '[YOUR ACCESS KEY]', :secret_access_key => '[YOUR SECRET KEY]'
ec2.instances.each do |instance|
    servers << instance if instance.tags['environment'] == 'production'
end
servers.compact!

I tag my servers by environment, so I want to filter them based on that tag. You might decided to tag them differently, or just assume all of your server can run cron jobs – that bit is left as an exercise for the reader. Replace [YOUR ACCESS KEY] and [YOUR SECRET KEY] with your access key and your secret key.

Now, sort the servers by instance id

servers.sort{ |x, y| x.instance_id <=> y.instance_id }

Finally, check to see if the first server’s local ip address matches the ip address of the server we are currently running on

if servers.first.private_ip_address == ip_address
    # Success! We are the first server - run that billing code!
end

See? Quick and dirty. There are a few things to keep in mind…

  • If a server with a lower instance_id gets booted just as the cron jobs are due to run, you might get a race condition. You would have to be pretty unlucky, but it’s a possibility.
  • There is no testing to see if the nominated server can actually perform the job – not a big deal for me, as the user will just get billed the next day. But you can probably work around this via business logic if it is critical for your system – crons fail, so you need a way to recover anyway…

As I said – quick and dirty, but effective!

Delivering fonts from Cloudfront to Firefox

I use both non-standard and custom icon fonts on 88 Miles, which need to be delivered to the browser in some way. Since all of the other assets are delivered via Amazon’s Content Delivery Network (CDN) Cloudfront, it would make sense to do the same for the fonts.

Except that didn’t work for Firefox and some version of Internet Explorer. Turns out they both consider fonts as an attack vector, and will refuse to consume them if they are being delivered via another domain (commonly know as a cross domain policy). On a regular server, this is quite easy to fix: You just set the:

Access-Control-Allow-Origin: *

HTTP header. The problem is, S3 doesn’t seem to support it (It supposedly supports CORS, but I couldn’t get it working properly). It turns out though, that you can selectively point Cloudfront at any server, so the simplest solution is to tell it to pull the fonts from a server I control that can supply the Access-Control-Allow-Origin header.

First, set up your server to supply the correct header. On Apache, it might look something like this (My fonts are in the /assets folder):

<Location /assets>
  Header set Access-Control-Allow-Origin "*"
</Location>

If you don’t use Apache, google it. Restart your server.

Next, log in to the AWS console and click on Cloudfront, and then click on the i icon next to the distribution that is serving up your assets.

Amazon Cloudfront settings

Next, click on Origins, and then Create Origin button.

In the Origin Domain Name field enter the base URL of your server. In the Origin ID field, enter a name that you’ll be able to recognise – you’ll need that for the next step.

Hit Create, and you should see the new origin.

New origin added

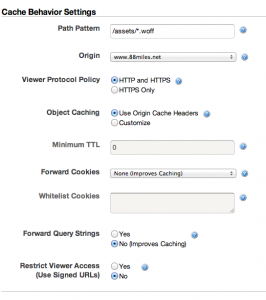
Now, click on the Behaviours tab, and click Create Behavior. (You’ll need to do this once for each font type that you have)

Enter the path to you fonts in Path pattern. You can use wildcards for the filename. So for woff files it might look something like:

Setting up the cache

Select the origin from the origin drop down. Hit Create and you are done!

To test it out, use curl:

> curl -I http://yourcloudfrontid.cloudfront.new/assets/fonts.woff

HTTP/1.1 200 OK
Content-Type: application/vnd.ms-fontobject
Content-Length: 10228
Connection: keep-alive
Accept-Ranges: bytes
Access-Control-Allow-Origin: *
Date: Mon, 16 Sep 2013 06:05:35 GMT
ETag: "30fb1-27f4-4e66f39d4165f"
Last-Modified: Sun, 15 Sep 2013 17:14:52 GMT
Server: Apache
Vary: Accept-Encoding
Via: 1.0 ed617e3cc5a406d1ebbf983d8433c4f6.cloudfront.net (CloudFront)
X-Cache: Miss from cloudfront
X-Amz-Cf-Id: ZFTMU-m781XXQ2uOw_9ukQGbBXuGKbjlVsilwW44IS2MvHbeBsLnXw==

The header is there. Success! Now, pop open your site in Firefox, and you should see all of your fonts being served up correctly.

An open letter to the Liberal member for Perth: Darryl Moore.

Hi Darryl,

As a Liberal voter, today’s announcement regarding the cut to ICT spending and the implementation of a mandatory internet filter; as well as the clearly flawed coalition broadband strategy, you have forced me to swing my vote. I write you this email so you can be aware of the issues for at least one of your constituents.

It disappoints me that your party has a lack of understanding of technology and the role that it plays in the future of this country. As an IT professional, who runs my own business as well as an internet startup that exports services to the world, the short-sightedness of your strategy is concerning. We are looking backwards to support unsustainable industries like the car industry, while ignoring an industry that Australian can become a world-class player.

We should be encouraging spending in an industry that has the potential to increase exports to the world, not decreasing them.

We should also be encouraging smart people in this country to stay here, rather than forcing them to leave our country to seek opportunities – and better yet, our country should be a destination for other smart people. We should be boosting our knowledge economy, not restricting it.

I’m happy to hear you reasoning behind these decisions.

Thank you for your time.

Ref:

http://www.zdnet.com/au/australian-opposition-vows-to-implement-internet-filter-by-default-7000020270/
http://www.zdnet.com/au/coalition-to-cut-it-research-centre-nictas-funding-7000020267/

Using Selenium to generate screenshots for support documents

I’ve just been working on some support documentation for 88 Miles, and I wanted to include some screenshots. Since I’m lazy, and hate having to repeat tasks, I decided to use Selenium and Capybara to generate all the screenshots for me. Using robots means I can re-generate all my screenshots quickly, so I’m more likely to do it if I change the UI. I covered using PhantomJS for generating screenshots before, but I’m using Selenium for this to make sure a real browser is used, just in case there are any rendering differences (which there usually is).

Again, this guide is for OSX. I’m also using Chrome, rather than the default Firefox as the webdriver.

First, install the selenium server

brew install selenium-server-standalone

and start the server up

java -jar /usr/local/opt/selenium-server-standalone/selenium-server-standalone-2.35.0.jar -p 4444

Next, download the chrome webdriver from google code, unzip it and copy the chromedriver executable to /usr/local/bin

Add the selenium-webdriver gem to your Gemfile in the test section

group :test do
    gem "selenium-webdriver"
end

Edit your test/test_helper.rb and create a new driver for chrome (put this after you require capybara)

require 'capybara/rails'

Capybara.register_driver :chrome do |app|
  Capybara::Selenium::Driver.new(app, :browser =&gt; :chrome)
end

Finally, create a new test that will generate the screenshots. I created a directory for the tests, and a directory for the screen shots to be saved to

mkdir test/support
mkdir app/assets/images/support

Now you can create a integration test file, and watch as a browser opens an starts replaying all the actions!

require File.expand_path(File.join(File.dirname(__FILE__), '..', 'test_helper'))

module Support
  class ReportsControllertest &lt; ActionDispatch::IntegrationTest
    self.use_transactional_fixtures = false

    setup do
      Capybara.default_driver = :chrome
      Capybara.javascript_driver = :chrome
    end

    teardown do
      Capybara.use_default_driver
    end

    test 'generate screenshots' do
      visit '/login'
      save_screenshot(Rails.root.join('app', 'assets', 'images', 'support', 'login.png'))
    end
  end
end

To run just this test (it’s slow, so you probably don’t want to automatically run it using guard):

bundle exec ruby -I"lib:test" test/support/reports_controller_test.rb

You can see (a beta) example on the 88 Miles beta website.

Track email opens using a pixel tracker from Rails

If you are sending out emails to you customers from your web app, it pretty handy to know if they are opening them. If you have ever sent out an email newsletter from a service like Campaign Monitor, you would have seen email open graphs. Of course, tracking this stuff is super important for a newsletter campaign, but it would also be interesting to see if users are opening, for example, welcome emails or onboarding emails.

The simplest way to do this is via a tracking pixel – a small, invisible image that is loaded off your server every time the email is opened (See caveat below). This is fairly simple to achieve using Rails by building a simple Rack application.

Caveat

This only works for HTML emails (unless you can work out how to embed an image in a plain text email), and relies on the user having “Load images” turned on. Clearly, this isn’t super accurate, but it should give you a decent estimate.

The Setup

We’ll add two models: One to tracking sending email, and one to track opening of email:

rails generate model sent_email
rails generate model sent_email_open

The schema for these are fairly simple: Save a name to identify the email, the email address it was sent to, an ip address and when the email was sent and opened.

class CreateSentEmails < ActiveRecord::Migration
  def change
    create_table :sent_emails do |t|
      t.string :name
      t.string :email
      t.datetime :sent
      t.timestamps
    end
  end
end
class CreateSentEmailOpens < ActiveRecord::Migration
  def change
    create_table :sent_email_opens do |t|
      t.string :name
      t.string :email
      t.string :ip_address
      t.string :opened
      t.timestamps
    end
  end
end
class SentEmail < ActiveRecord::Base
  attr_accessible :name, :email, :sent
end
class SentEmailOpen < ActiveRecord::Base
  attr_accessible :name, :email, :ip_address, :opened
end

With the models setup, let’s add a mail helper that will generate the image pixel – create this is /app/helpers/mailer_helper.rb

module MailerHelper
  def track(name, email)
    SentEmail.create!(:name =d> name, :email =d> email, :sent =d> DateTime.now)
    url = "#{root_path(:only_path =d> false)}email/track/#{Base64.encode64("name=#{name}&email=#{email}")}.png"
    raw("<img src=\"#{url}\" alt="" width=\"1\" height=\"1\"d>")
  end
end

What this does is give our mailers a method called track that takes a name for the email and the email address of the person we are sending it to. To enable it, call the helper method in the mailers you want to track:

class UserMailer < ActionMailer::Base
  helper :mailer
end

Now we can add the tracker to our html emails. Say we have a registration email that goes out, and there is a user variable, with an email attribute:

<!-- Snip --d>
<%= track('register', @user.email) %d>
<!-- Snip --d>

Right, now the magic bit:

Create a directory called /lib/email_tracker and create a new file called rack.rb

module EmailTracker
  class Rack
    def initialize(app)
      @app = app
    end

    def call(env)
      req = ::Rack::Request.new(env)

      if req.path_info =~ /^\/email\/track\/(.+).png/
        details = Base64.decode64(Regexp.last_match[1])
        name = nil
        email = nil

        details.split('&').each do |kv|
          (key, value) = kv.split('=')
          case(key)
          when('name')
            name = value
          when('email')
            email = value
          end
        end

        if name && email
          SentEmailOpen.create!({
            :name =d> name,
            :email =d> email,
            :ip_address =d> req.ip,
            :opened =d> DateTime.now
          })
        end

        [ 200, { 'Content-Type' =d> 'image/png' }, [ File.read(File.join(File.dirname(__FILE__), 'track.png')) ] ]
      else
        @app.call(env)
      end
    end
  end
end

Create a 1×1 pixel transparent PNG and save it as track.png and place it in the same directory. Next, include it in your config/application.rb

module App
    class Application < Rails::Application
        require Rails.root.join('lib', 'email_tracker', 'rack')
        # Some other stuff
        config.middleware.use EmailTracker::Rack
    end
end

And that’s it! Now, every time the email gets sent out, it will create a record in the send_emails table, and if it is opened (and images are turned on) it will create a record in send_email_opens. Doing up a status board is left up as an exercise to the user, but you can check you percentage open rate by doing something like:

(SentEmailOpen.where(:name =d> 'register').count.to_f / SentEmail.where(:name =d> 'register').to_f) * 100

How it works

It’s super simple. The track method generates a Base64 encoded string that stores the name of the email and the email address it is being sent to. It them returns an image URL that can be embedded in the email. The Rack app looks for a URL that looks like /track/email/[encodedstring].png and if it matches records the hit. It then returns a transparent PNG to keep the email client happy.

I might get around to turning this into a gem if there is enough interest.

Freelancer mentoring

I’ve been a freelancer for 85% of my work career. I’ve traversed the giddy-heights and the earth-shaking lows of working for myself for a long time, and I think it’s time to give back. One thing that I have noticed during those 11 years is that it is all to easy to live in your little bubble and not talk to anyone other than clients for weeks on end. So, I’m going to start running freelancer mentoring.

I want to pull together a small group of freelancers, and then have a meet-up (probably 4-5 people to start with) on a Friday morning at my office or the coffee shop next door, and basically just chat about how things are going, give some advice, but generally act as a sounding board. Kind of like a water cooler for people that don’t own a water cooler (do people still own water coolers?). Having a small group means you can form a support group for each other too; as well as perhaps team up on bigger jobs.

Oh, and this isn’t just for web people – the basic tenants of freelancing is the same regardless of industry, and you’ll be amazed how helpful talking shop to freelancers from other industries can be.

To start with we’ll probably meet once a month.

Anyway, if you are a freelancer in Perth, Western Australia and are craving some human interaction, either hit me up in the comments, via twitter or email me directly.

Testing UI with Integration tests in Rails with phantomjs

Computers aren’t very good at testing visual changes on websites. Sure you can test the differences between two images, but image changes are really brittle. However, humans are pretty good at it. As a result, the common way to test visuals it to actually click through stuff on a browser. This doesn’t scale. For one, if your UI changes based on different initial states, it can take ages to set this stuff up.

Thankfully there is a fairly simple solution.

Rails integration tests can control with a number of browsers using Capybara and a automation system like Selenium or PhantomJS. If you haven’t heard of these, Selenium automates real browsers, and PhantomJS is a headless webkit browser. Both support modern CSS and JavaScript, so it’s like having a 1000 monkeys on a 1000 UNIX terminals. It just so happens that both also support taking screenshots, which we can use as a poor-man’s Mechanical Turk.

Aside: There is another solution: Using something like BrowserStack, although because it works remotely, it might make setting up the testing environment between tests difficult. I’ll look at this later in another blog post once I get a chance to play with it.

There are pros and cons to both systems:

Selenium

Pro: Can control basically any browser that it has a driver for – including Android and iPhones.
Con: It requires Java and a computer with all of those browsers and emulators installed. It’s also the slower of the two.

PhantomJS

Pro: Is headless, so doesn’t require X windows, or any other window manager.
Con: It’s WebKit only.

I’ll go through setting up PhantomJS on OSX, because that’s what I’ve set up so far; I’ll leave setting up Selenium as an exercise for the reader – the theory should be the same.

First, you need to install PhantomJS. On OSX, it’s just a matter of using homebrew

brew install phantomjs

Next, add the poltergeist gem (which is an interface to PhantomJS. It will also install Capybara)

group :test do
    gem "poltergeist", "~&gt; 1.3.0"
end

Add the following to your test/test_helper.js

require 'capybara/rails'
require 'capybara/poltergeist'

Capybara.default_driver = :poltergeist
Capybara.javascript_driver = :poltergeist

class ActionDispatch::IntegrationTest
  include Capybara::DSL

  setup do
    Capybara.reset!
  end

  teardown do
    Capybara.reset!
  end
end

Finally, generate a integration test

rails generate integration_test name_of_the_test

Open up the Integration test and create a test

require 'test_helper'

class NameOfTheTestIntegrationTest &lt; ActionDispatch::IntegrationTest
    # Don't forget this line - Database transactions don't work well with Capybara
    self.use_transactional_fixtures = false

    test 'some test name' do
      visit '/'
      # This is the important line. This is what saves the screenshot
      save_screenshot(Rails.root.join('tmp', 'screenshots', 'name_of_the_integration', 'some-test-name.png'))
    end
end

Run the integration test, and you will find a nice 1024×768 PNG screen shot in the tmp/screenshots/name_of_the_integration/some-test-name.png directory.

So, after your tests run, you can scan through the screen shots and see if anything looks weird. Win!

For a more in-depth instructions for running tests in Capybara, checkout their GitHub page.

So… It’s been a while.

Yeah, so I’ve decided to start blogging again.

While twitter is good for short bursts of vitriol, I’m missing the longer form of the game, and I think it is time to get back to it.

So what have I been up to for the past year-and-a-half? Besides my consulting and freelancing work, Adrianne and I started (and have almost wrapped up) Horse & Cart; Me and some other guys built a landing page for a product over a weekend (and got a shit-ton of sign ups); I started working on 88 Miles again, with the intention of doing 2 hours a day on it, which I was doing really well until I bought and subsequently had to move into a house. That stuff is a serious time sink. Who knew. (It’s ok, though – I’m back on 88 Miles again. New version due on 15 September!)

Any way, I managed to find a couple of hours to throw some paint around here, upgrade WordPress (which I’m glad to see still looks like it was coded by moneys throwing faeces at a keyboard – I don’t know why I do this to myself) and get this site uploaded to a new server. Oh – don’t bother reporting problems with this site on IE < 9 – I don’t care.

My intention is to continue blogging about tech, code and business stuff, just like before. And of course, you can still find my pithy rants on my twitter account.

Speak soon,

Myles.

Simulating the iOS “slider” checkbox, using just CSS

… well, some CSS and one image.

I’ve been really interested in emulating the iOS UI in HTML, CSS and JS. Not for any useful reason, more out of morbid curiosity. It could come in handy for home screen web applications, but for standard webapps, I’m beginning to think the uncanny valley plays too big a role to give good results. Regardless, it’s something I’m still playing with.

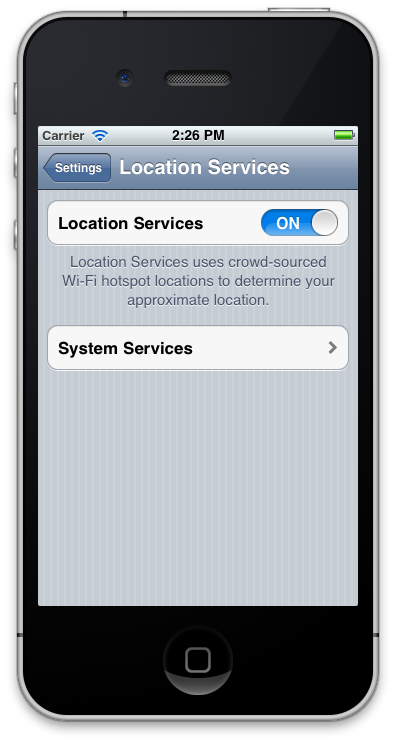
One of the elements that is quite different between Mobile Safari and native iOS applications is the rendering of checkboxes. Mobile Safari renders them in a similar way to desktop Safari – as a traditional checkbox, but native iOS application render a slider:

Example of the slider in iOS

There have been a number of techniques to simulate this in the browser: the most popular is to replace the checkbox with a couple of spans. The problem with this technique is that, unless you code them in via JavaScript, you lose all of the default events that occur, and even if you do, you are bound to forget one.

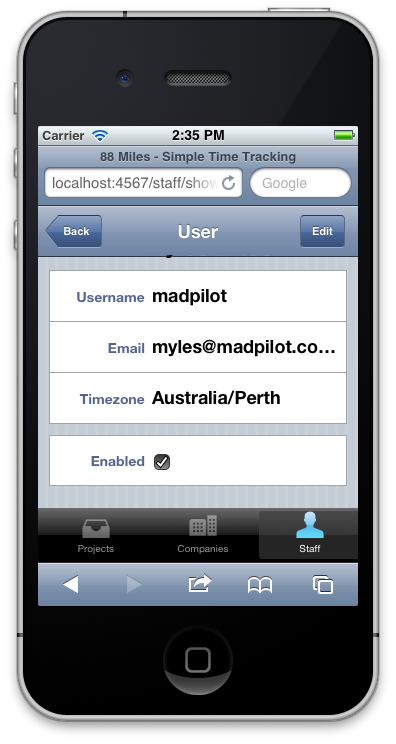
By accident, I found that you can clear the default styling of a checkbox using the -webkit-appearance: none CSS rule. Which gives us a completely blank state to work with. So let’s start with what the checkbox looks like without any styling:

The default style for checkboxes in iOS

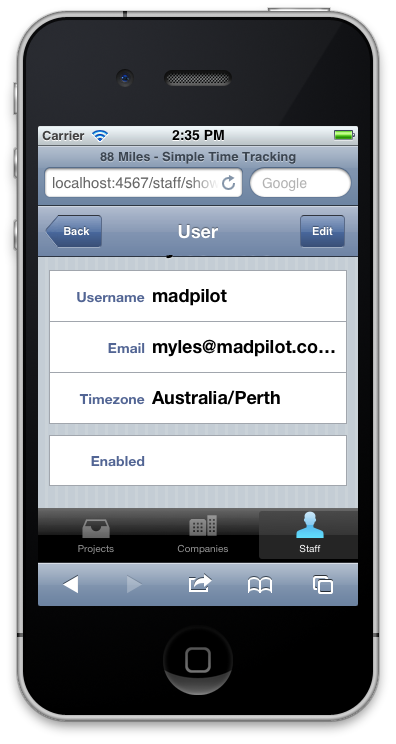
Next, let’s add  -webkit-appearance: none – you’ll notice the checkbox disappears

iOS checkbox with -webkit-appearance: nonw

Next, we’ll add a background graphic that looks like the slider. This is the one I did. It is terrible, but it’ll do for this example. You’ll notice that it has both the “On” and “Off” sides in one graphic. More on that in a second.

Checkbox sprite

So now we can drop in the CSS to style it:

input[type=checkbox] {
  border: 1px solid #686868;
  height: 27px;
  width: 79px;
  -webkit-appearance: none;
  -webkit-border-radius: 13px;
  background-image: url(/blog/wp-content/uploads/2011/12/checkbox-background.png);
  background-position: -52px 0;
  background-repeat: no-repeat;
  -webkit-animation-timing-function: ease-in-out;
  -webkit-animation-duration: 400ms;
  -webkit-animation-name: checkbox-switch-off;
}

input:checked[type=checkbox] {
  background-position: 0 0;
  -webkit-animation-name: checkbox-switch-on;
}

@-webkit-keyframes checkbox-switch-on {
  from {
    background-position: -52px 0;
  }
  to {
    background-position: 0 0;
  }
}

@-webkit-keyframes checkbox-switch-off {
  from {
    background-position: 0 0;
  }
  to {
    background-position: -52px 0;
  }
}

So what is happening here? It’s pretty straight forward actually. We put a border, and set the height and width appropriately, then set a border radius (we are simulating iOS 5 here, so they are rounded). Next we add our background images, and set the background position so that the “Off” state is showing, using regular old CSS spriting.

Next, we target the checked state, using the :checked pseudo class. This will move the background image to the “On” state when it is checked.

Finally, we add some a slide animation. We create a webkit animation that tweens the background image from one position to the other. Simple really!

Demo

The final style

Problems

  1. It’s  webkit only at the moment. If you can zero out checkbox styling on Firefox or Opera, it wouldn’t be difficult to implement for them too (Just change the vendor specific CSS and animations). It might also work in IE 10?
  2. The animation will always go from On to Off on page load, because the CSS animation will run. You could easily fix this with a line of JavaScript, but if anyone else can suggest a way to do it purely in CSS, I’d be all ears.

How to re-play an AJAX request in jQuery after an authentication error

I’m building a mobile web app that is basically one HTML file + backbone.js + other JavaScript magic. The app is authenticated, so the user needs to be able to login. Thankfully the server returns a 403 if a request is not authorised to access the requested endpoint. Ideally, if that happened, a login form would pop up, the user would enter their details, and the system would continue on it’s merry way.

With jQuery, this is surprisingly easy.

You can setup global settings using the jQuery.ajaxSetup method. These settings get injected into every AJAX request you make via the jQuery API. The attribute we are interested in setting is the statusCode attribute: in particular the 403 function.

jQuery.ajaxSetup(
  statusCode: {
    403: function() {
      // This calls a backbone view that renders a login window, then
      // calls the success function one the user has been authenticated
      // The call back simply re-runs $.ajax using the current context object,
      // which conveniently is a hash of the original AJAX request params.

      var sessionLogin = new SessionsLoginView();
      var context = this;
      sessionLogin.render({
        success: function() {
          $.ajax(context);
        }
      });
    }
  }
});

What happens is a 403 response code gets captured, we save the current AJAX object into the context variable, we then call the login form, which gets the user to authenticate and then calls the success function. It just so happens that the context variable stores a hash of the original AJAX request settings, which we pass directly into $.ajax. This in effect replays the query, now with the new authentication token!

The beauty of this (besides the fact that it’s hands off, and nicely abstracted) is that it will handle changing passwords on the server gracefully (it’ll just pop up the login form again), as well as handle incorrect usernames or passwords.

Previous Next