@madpilot makes

Simulating the iOS “slider” checkbox, using just CSS

… well, some CSS and one image.

I’ve been really interested in emulating the iOS UI in HTML, CSS and JS. Not for any useful reason, more out of morbid curiosity. It could come in handy for home screen web applications, but for standard webapps, I’m beginning to think the uncanny valley plays too big a role to give good results. Regardless, it’s something I’m still playing with.

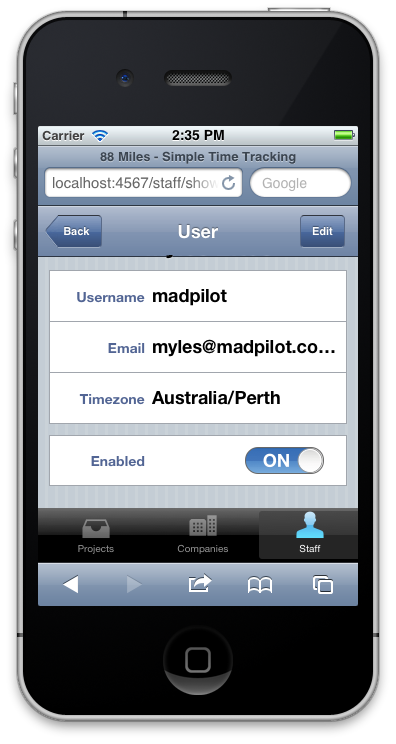
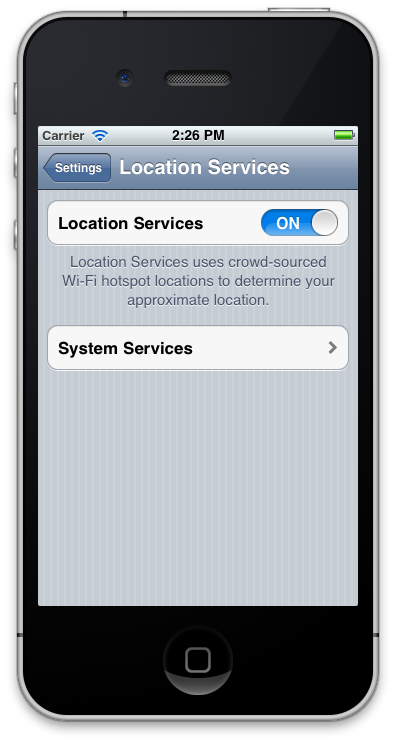
One of the elements that is quite different between Mobile Safari and native iOS applications is the rendering of checkboxes. Mobile Safari renders them in a similar way to desktop Safari – as a traditional checkbox, but native iOS application render a slider:

Example of the slider in iOS

There have been a number of techniques to simulate this in the browser: the most popular is to replace the checkbox with a couple of spans. The problem with this technique is that, unless you code them in via JavaScript, you lose all of the default events that occur, and even if you do, you are bound to forget one.

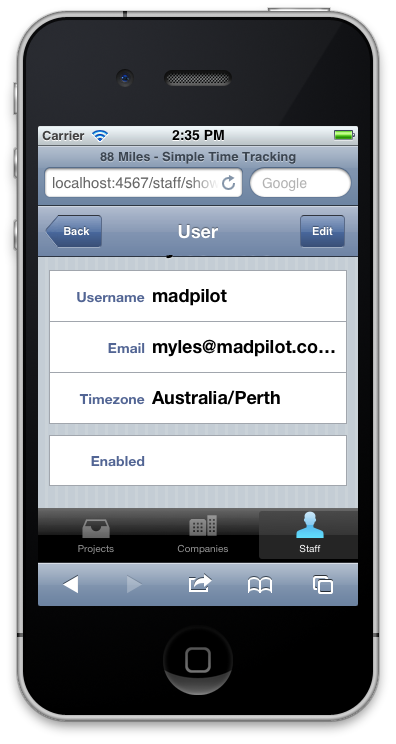
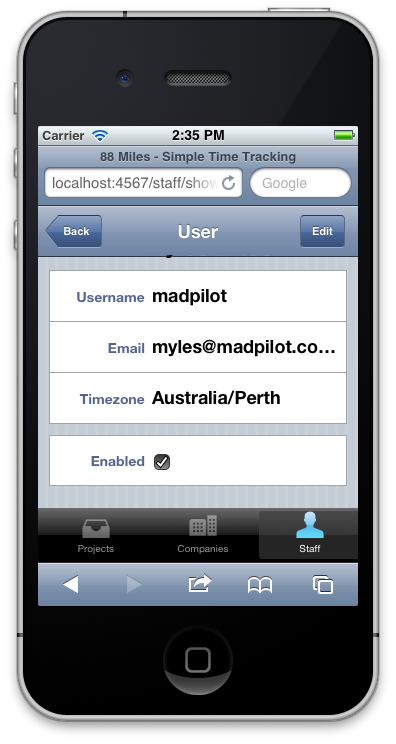
By accident, I found that you can clear the default styling of a checkbox using the -webkit-appearance: none CSS rule. Which gives us a completely blank state to work with. So let’s start with what the checkbox looks like without any styling:

The default style for checkboxes in iOS

Next, let’s add  -webkit-appearance: none – you’ll notice the checkbox disappears

iOS checkbox with -webkit-appearance: nonw

Next, we’ll add a background graphic that looks like the slider. This is the one I did. It is terrible, but it’ll do for this example. You’ll notice that it has both the “On” and “Off” sides in one graphic. More on that in a second.

Checkbox sprite

So now we can drop in the CSS to style it:

input[type=checkbox] {
  border: 1px solid #686868;
  height: 27px;
  width: 79px;
  -webkit-appearance: none;
  -webkit-border-radius: 13px;
  background-image: url(/blog/wp-content/uploads/2011/12/checkbox-background.png);
  background-position: -52px 0;
  background-repeat: no-repeat;
  -webkit-animation-timing-function: ease-in-out;
  -webkit-animation-duration: 400ms;
  -webkit-animation-name: checkbox-switch-off;
}

input:checked[type=checkbox] {
  background-position: 0 0;
  -webkit-animation-name: checkbox-switch-on;
}

@-webkit-keyframes checkbox-switch-on {
  from {
    background-position: -52px 0;
  }
  to {
    background-position: 0 0;
  }
}

@-webkit-keyframes checkbox-switch-off {
  from {
    background-position: 0 0;
  }
  to {
    background-position: -52px 0;
  }
}

So what is happening here? It’s pretty straight forward actually. We put a border, and set the height and width appropriately, then set a border radius (we are simulating iOS 5 here, so they are rounded). Next we add our background images, and set the background position so that the “Off” state is showing, using regular old CSS spriting.

Next, we target the checked state, using the :checked pseudo class. This will move the background image to the “On” state when it is checked.

Finally, we add some a slide animation. We create a webkit animation that tweens the background image from one position to the other. Simple really!

Demo

The final style

Problems

  1. It’s  webkit only at the moment. If you can zero out checkbox styling on Firefox or Opera, it wouldn’t be difficult to implement for them too (Just change the vendor specific CSS and animations). It might also work in IE 10?
  2. The animation will always go from On to Off on page load, because the CSS animation will run. You could easily fix this with a line of JavaScript, but if anyone else can suggest a way to do it purely in CSS, I’d be all ears.
How to re-play an AJAX request in jQuery after an authentication error

I’m building a mobile web app that is basically one HTML file + backbone.js + other JavaScript magic. The app is authenticated, so the user needs to be able to login. Thankfully the server returns a 403 if a request is not authorised to access the requested endpoint. Ideally, if that happened, a login form would pop up, the user would enter their details, and the system would continue on it’s merry way.

With jQuery, this is surprisingly easy.

You can setup global settings using the jQuery.ajaxSetup method. These settings get injected into every AJAX request you make via the jQuery API. The attribute we are interested in setting is the statusCode attribute: in particular the 403 function.

jQuery.ajaxSetup(
  statusCode: {
    403: function() {
      // This calls a backbone view that renders a login window, then
      // calls the success function one the user has been authenticated
      // The call back simply re-runs $.ajax using the current context object,
      // which conveniently is a hash of the original AJAX request params.

      var sessionLogin = new SessionsLoginView();
      var context = this;
      sessionLogin.render({
        success: function() {
          $.ajax(context);
        }
      });
    }
  }
});

What happens is a 403 response code gets captured, we save the current AJAX object into the context variable, we then call the login form, which gets the user to authenticate and then calls the success function. It just so happens that the context variable stores a hash of the original AJAX request settings, which we pass directly into $.ajax. This in effect replays the query, now with the new authentication token!

The beauty of this (besides the fact that it’s hands off, and nicely abstracted) is that it will handle changing passwords on the server gracefully (it’ll just pop up the login form again), as well as handle incorrect usernames or passwords.

Time to learn Ruby on Rails!

I like Rails. A lot. And you should too – it makes build web stuff fun, and faster. It’s poetry when compared to PHP. Not to mention there is some smart nerds doing work on it, and it has one of the most vibrant and passionate communities around. Unfortunately, the learning curve can be significant, especially if you are learning Ruby at the same time. Me to the rescue!

The guys behind Sitepoint have just launched a new site: Learnable, which is an online training centre, where people not only go to learn stuff, but they can teach stuff too! They ask me to create a Ruby on Rails 3 course for their launch, and it just went live today!

The course is 12 lessons, and covers enough stuff to build a real app – a code snippet library (A bit like pastie or github gists). I’ll be maning the course forums and answering any questions you have, and will appear online via video link up for some live Q&A sessions in the next couple of weeks.

If you are still using PHP, or have been meaning to learn Rails for a while, then go and sign up – it’s only $19.95 (Bargin!).

The only real pre-requisite is a basic grasp of programming – if you understand if statements, for loops and variables, you should be fine. Serious. Go now. It’s awesome. But don’t just believe me, listen to this talking headshot video of me:

https://learnable.com/courses/learning-rails-3-212

Need a frontend coder?

While I work on some personal summer projects, I’m looking at getting some front end contract work – you know HTML/CSS/JS sort of stuff.If you know anyone looking to turn pictures into websites, get them in contact with me.Hourly rate negotiable depending on contract length.

Making the OSX Terminal.app work properly

I just acquired a 13″ MacBook so I can build some me iPhone and iPad apps, and the allure of Unix on the desktop is a nice added benefit, however it is apparent that the default terminal emulator is kind of balls out of the box. I spend A LOT of time in a terminal, with VIM being my IDE is choice. What many people might not know is that modern terminal emulators support mouse gestures, as does vim (:set mouse=a).

I use this. All the time.Vim 7 supports files tabs, which allows you to open multiple files at once (command :tabe ). Vim being vim, you can navigate your tabs using key sequences (Next Tab :tabn Previous Tab :tabp Move to tab :tabm et al.), but clicking stuff with your mouse is easier.The scroll wheel is also quite useful, which vim also supports.Finally, click and dragging over text in vim with a mouse enters Visual mode, which allows you to yank and delete blocks of text, also quite handy.The problem is, Terminal.app doesn’t support mouse stuff… Out of the box any way.

Step 1: Download and install SIMBL

Step 2: Download and install MouseTerm

Step 3: Restart Terminal.app

Right, so that is sorted, next up: OSX’s stupid keybindings. Ok, I guess it makes sense for the home key to go to the very beginning of the document and end to do the opposite, but really the Windows way of home and end placing the cursor to the beginning and end of the line is more practical. Also, PgUp and PgDn don’t work. So, open Terminal.app then select Preferences from the Terminal menu. Click the Keyboard tab, and paste the following strings into the areas next to the Keys:

home: 33[H
end: 33[F
pgup: 33[5~
pgdn:  33[6~

FINALLY, these binding don’t place nice with vim, so open up .vimrc and enter the following:

set mouse=a
map ^[[F $
imap ^[[F ^O$
map ^[[H g0
imap ^[[H ^Og0

Creating a bootable USB stick to install VMware ESXi

I had to install VMware ESXi on a machine that didn’t have a CDROM or DVD player. For extra difficulty, I also didn’t have a Linux box with a USB drive handy – but after a bit of hair pulling, I managed to create a bootable USB stick image in Linux (In my case Gentoo). Hat tip to http://communities.vmware.com/thread/75792

  1. Create a fake filesystem. I created a 1Gb, but 512Mb should be enough
dd if=/dev/zero of=/mnt/vmware.img bs=1024 count=1048576
  1. Associate it with a loopback device
losetup /dev/loop0 vmware.img
  1. Create a FAT filesystem on the image
mkfs.vfat /dev/loop0
  1. Mount the VMware CD ISO to a temporary directory
mkdir -p /mnt/vmware
mkdir -p /mnt/vmware-usb
mount -t iso9660 -o loop /path/to/vmware.iso /mnt/vmware
mount -t vfat -o loop /mnt/vmware.img /mnt/vmware-usb
  1. Copy the contents across
cp -r /mnt/vmware/* /mnt/vmware-usb
  1. Delete the isolinux.bin and rename isolinux.cfg file on the USB flash disk to syslinux.cfg in /mnt/vmware-usb
  2. Add usb to the end of the append line in syslinux.cfg
  3. Run syslinux to write a bootloader
syslinux -s /dev/loop0
  1. Unmount everything
cd /mnt
unmount /mnt/vmware
unmount /mnt/vmware-usb
losetup -d /dev/loop0

vmware.img should now be a bootable USB image. You will need to write it to your USB stick now. In linux you can use dd (assuming your USB stick is at sdb):

dd if=/mnt/vmware.img of=/dev/sdb

In windows, use Image Writer for Windows.Or, an easier solution might be to buy a DVD Drive :)

220s: A marketing odyssey

For those of you that have been keeping abreast of the goings on of my work life will know that I helped start up a cooperative workspace in Leederville just over a year ago. The idea behind cooperative spaces is pretty simple: You get a bunch of freelancers together to share rent, ADSL and other running costs, which can be prohibitive if you are on your own. A lovely side-effect of throwing a bunch of like-minded people into a couple of rooms together is that you can share work, talk about problems you might have and avoid that oh-so-familiar cabin-fever that is common to people that work from home on their own for long periods of time.

When twotwenty started, we had dreams of doing big jobs together and sharing work, and generally acting like a company – except with the personality of freelancing. While there has been some sharing, lots of talking and there hasn’t really been a single cohesive push marketing or branding wise. So over the past few weeks we have been busy planning, writing, designing, photographing and coding up some marketing material to see if it is possible to do cooperative marketing. At this stage we are focusing on the local Leederville area (of course, we are more than happy to talk to people in other areas), so we came up with the “your local web guys” campaign, starting with the launch of our shiny new website: http://www.twotwenty.com.au. Designed by Pascal, the brief was to present something targeted to the local Leederville area, that spoke about the individuals at twotwenty. We wanted to be approachable and personal, hence the sometimes risky headshots. The only way we had even a chance of pulling them off was with professional photography (Seriously kids, don’t try them at home).

So, if you are in Leederville, drop in and say hi, and we can go for coffee. Oh, and you can follow us on twitter.

Rails Training is starting a week later

Due to a scheduling clash with us and the State government (There was a public holiday we forgot about), the start of Rails Training 1 has been pushed back a week. It now starts on Monday 8th and Thursday 11th respectively.

There are still spots left! Go and register. I’ll wait.

Soooo… Which one is better? Online or offline marketing?

Both Alex and I are web nerds. Throw us a technical problem and will be champing at the bit to solve it. This, like many other coders who start their own business, is what we spend all day doing. Unfortunately for us, being totally awesome at what we do is only a small part of running a successful business. Alex’s business, Brown Beagle Software has just taken on it’s first employee, and I’m ready to start selling the living daylights out of my CMS so we need to move beyond adhoc, word-of-mouth “marketing” and get a bit more serious. Of course, neither of us know a great deal about that…

Alex and I are both residents of the collaborative work space twotwenty and over coffee we were discussing some joint marketing stuff that would help the whole group get some work, and the topic of mail drops and social networking came up — and we noticed a pattern: I was speaking in terms of offline networking, whilst Alex kept going back to

online networking. Being the contrary type that I am, I laid down the challenge: We should see which type of sales and marketing works best: offline or online!

Rules

The rules of our little game are pretty simple:

  1. Alex can use any marketing method he chooses, but it must occur _online._This would include Twitter, Facebook, Google Adwords, SEO. He can’t count leads from people that originated in real life.

    • Myles can’t use the inter-tron with his quest: He can only use traditional channels, such as face-to-face, networking meetups, traditional media and offline advertising
    • A lead is counted as a genuine enquiry for work. For the sake of this experiment, we can sell any of our services, but we need to be able to do the work. A completion is counted when a job is accepted.
    • Once a prospect has been engaged, communication can continue into the other medium (e.g. Myles can use email, Alex can use a phone).
    • Myles and Alex can spend up to $250 each on their campaigns.
    • Both need to track how much time they have spent on marketing.
    • At the end of the month, whoever has the best ratio of leads vs. time spent marketing will be deemed the twotwenty marketeer of the month™, and will gain kudos until the end of time (or until April).
Head over to <http://www.offlinevsonline.com> to watch the craziness unfurl.

Learn Ruby on Rails

Alex Pooley (from Brown Beagle Software, and fellow 220er and Rails guy) are running some Ruby on Rails training sessions in March.

It will be an intensive primer designed to get web developers who work in PHP, or .Net up-to-speed in Rails in about four classes. We will cover Ruby, Rails and unit testing as well as deployment.

The classes cost $220, with one stream running on Monday 1st-22nd March 2010 and the other Thursday 4th-25th March 2010. So if you have been meaning to look at Rails, but haven’t had the time, then this could be perfect for you!

Head over to  http://railstraining.in and sign up!

Previous Next